Vuforia SDK overview
Vuforia is a cross-platform Augmented Reality (AR) and Mixed Reality (MR) application development platform, with robust tracking and performance on a variety of hardware (including mobile devices and mixed reality Head Mounted Displays (HMD) such as the Microsoft HoloLens). Unity’s integration of Vuforia allows you to create vision apps and games for Android and iOS using a drag-and-drop authoring workflow. A Vuforia AR+VR samples package is available on the Unity Asset Store, with several useful examples demonstrating the most important features of the platform.
Vuforia supports many third-party devices (such as AR/MR glasses), and VR devices with back-facing cameras (such as the Gear VR). See the Vuforia page on Devices for a full list of supported devices. See the Vuforia API reference for more information about classes, properties and functions used in the SDK.
You can use any device with a camera to test AR/MR games and applications built in Unity with Vuforia.
Important concepts
Before learning more about Vuforia and its supported features, you need to understand a number of important concepts. Among these concepts are forms of tracking and marker types commonly used in Vuforia applications.
Marker-based tracking
In AR or MR, markers are images or objects registered with the application which act as information triggers in your application. When your device’s camera recognizes these markers in the real world (while running an AR or MR application), this triggers the display of virtual content over the world position of the marker in the camera view. Marker-based tracking can use a variety of different marker types, including QR codes, physical reflective markers, Image Targets and 2D tags. The simplest and most common type of marker in game applications is an Image Target.
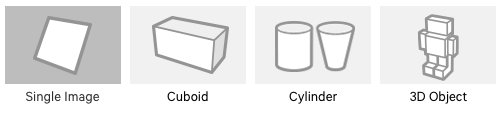
Image Targets
Image Targets are a specific type of marker used in Marker-based tracking. They are images you manually register with the application, and act as triggers that display virtual content. For Image Targets, use images containing distinct shapes with complex outlines. This makes it easier for image recognition and tracking algorithms to recognize them.
Markerless tracking
Applications using Markerless tracking are more commonly location-based or position-based Augmented or Mixed Reality. This form of tracking relies on technologies such as GPS, accelerometer, gyroscope and more complex image processing algorithms, to place virtual objects or information in the environment. The VR hardware and software then treats these objects as if they are anchored or connected to specific real-world locations or objects.
Hardware and software requirements
This section provides an overview of both hardware and software requirements for using the Vuforia SDK with Unity.
The table below lists the supported mobile device operating system (OS) versions required for running applications created with the Vuforia SDK. The table also includes supported OS and Unity versions for developing applications with Vuforia.
Mobile devices
| Device OS | Development OS | Unity Version | |||
|---|---|---|---|---|---|
| Android (1) | 4.1.x+ | Windows (2) | 7+ | Windows (2) | 2017.2+ |
| iOS (2) | 9+ | OS X | 10.11+ | OS X | 2017.2+ |
| Windows (2) | 10 UWP |
- 32-bit only
- 32 & 64-bit
Optical see-through digital eyewear
The Vuforia SDK supports a range of optical see-through digital eyewear devices. The table below lists supported devices, along with their required operating system (OS) versions. The table also includes supported OS and Unity versions for developing applications with Vuforia for these devices.
| Device | Device OS | Development OS | Unity Version | ||||
|---|---|---|---|---|---|---|---|
| HoloLens | Current version | Android (1)(2) | 4.0.3+ | Windows (3) | 7+ | Windows (3) | 2017.2+ |
| ODG | R7+ | Windows (1) | 10 UWP | OS X | 10.11+ | OS X | 2017.2 |
| Epson | BT–200 |
- 32-bit only
- 4.0.3 Native only support for Epson BT–200
- 32 & 64-bit
Vuforia tools
Some Vuforia tools are only supported on specific hardware. The table below lists these tools, along with their supported devices and required OS versions.
| App | Devices | OS Version |
|---|---|---|
| Calibration Assistant | Moverio BT–200 ODG R–7 |
Android 4.0.3+ |
| Object Scanner | Samsung Galaxy S8+ Samsung Galaxy S8 Samsung Galaxy S7 Samsung Galaxy S6 |
Latest supported OS on the device |
For more detailed information on these tools see the Vuforia Calibration Assistant and Object Scanner pages in the Vuforia developer library.
Virtual Reality SDK integration support
Below is a list of VR SDKs fully integrated into the Unity Editor, along with the release version of the Editor where they were first integrated.
| VR SDK | Versions |
|---|---|
| Google VR SDK | Unity 2017.2 |
| Cardboard Android SDK | Unity 2017.2 |
| Windows Mixed Reality (HoloLens only) | Unity 2017.2 |
Graphics API support
The table below lists all the Graphics APIs supported by Vuforia when developing applications on supported operating systems.
| Android | iOS | Windows |
|---|---|---|
| OpenGL ES 2.0 OpenGL ES 3.x |
OpenGL ES 2.0 OpenGL ES 3.x Metal (iOS 8+) |
DirectX 11 on Windows 10 |
For more information on using Vuforia with digital eyewear (such as the ODG R7+ and Epson BT–200), see Vuforia documentation on Vuforia for digital eyewear
For more information on using Vuforia with HoloLens, see Vuforia documentation on working with the Hololens sample in Unity
For more information on using Vuforia with the Google VR SDK, see Vuforia documentation on Developing for Google Cardboard
Quick start guide
This section provides instructions on setting up a Unity project with Vuforia as well as creating your first Vuforia application with Unity. Use this tutorial as a starting point for the development of your AR or MR application.
Project setup
Setting up your project to develop Vuforia AR or MR mobile applications is very similar to the set-up process for building with Unity for a mobile platform. The Unity Installer includes the Vuforia SDK. Follow the instructions for downloading and installing Unity on the InstallingUnity manual page. Vuforia provides a selection of Prefabs designed to be dropped into a Scene to provide feature functionality to your application. These are all available from inside the Unity Editor.
You should adhere to the same performance considerations as required for developing regular mobile games. For information on optimising for mobile devices, see Unity documentation on mobile optimisation.
To get Vuforia set up with Unity:
- Install the latest version of Unity, and in the Unity component selection section of the installer, select Vuforia Augmented Reality Support, along with either the iOS Build Support or Android Build Support packages.

Note: Most AR and MR applications target mobile devices, so the focus of this guide is development for Android and iOS. See guides for enabling build support for Android and iOS devices in the Getting Started documentation for Android and iOS.
Create a Vuforia developer account from the Vuforia registration page. This account gives you access to the tools you need to make AR and MR applications with Vuforia in Unity.
If you have not already created a Unity ID, then do so from the Unity registration page. You need a Unity ID to download any packages from the Unity Asset Store.
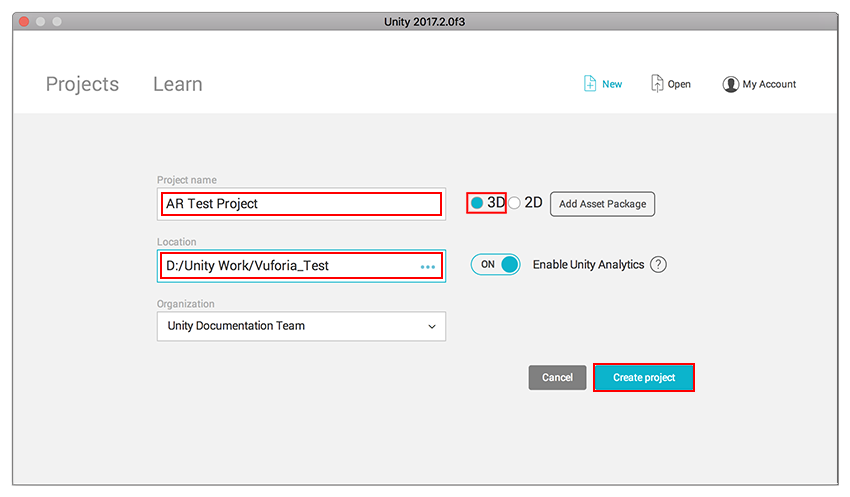
Open Unity and create a new 3D Project (make sure the 3D option is selected next to the Add Asset Package button). Name your Project, then click the Create project button.
Tip: Download the Vuforia AR+VR Sample package from the Unity Asset Store. This package provides useful example Scenes demonstrating important features. You will not need this for following this guide, but it is useful to have for further learning later.
Activating Vuforia in Unity
To activate Vuforia in your Unity project, access the Player Settings from Edit > Project Settings > Player and select the tab for the mobile device you are building to. Under XR Settings, tick the Vuforia Augmented Reality Support checkbox.

Your Scene now contains two GameObjects: a main Camera, and a directional light. You need to add a new AR Camera to the Scene in order to enable AR functionality, and you need to delete the current Main Camera GameObject from the Scene.
To delete the Camera GameObject, select it in the Hierarchy window and press the delete key on your keyboard, or right click it and select Delete.
Adding a Vuforia AR Camera and other GameObjects
To add an AR Camera to your scene, go to GameObject > Vuforia > AR Camera.
If this is the first Vuforia GameObject added to your Scene then Unity also prompts to import your Vuforia Assets. Select Import, and Unity imports all necessary Vuforia files into your project.
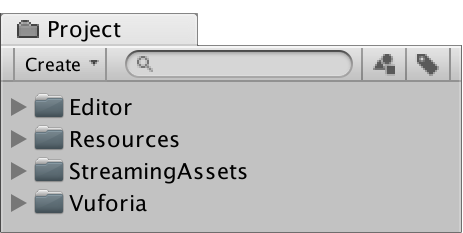
The Project window displays 4 new folders, one of which is called Vuforia. The code and Assets in this folder provide the main AR and MR functionality. The other folders provide sample Scenes, resources, tools, and plugins so that you can develop AR and MR applications for a variety of devices.
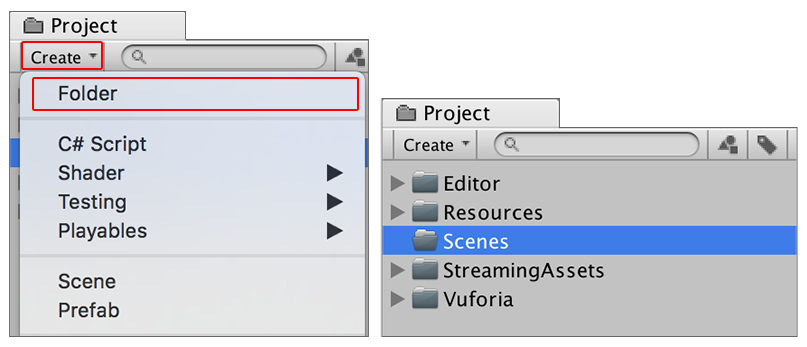
Create a new folder in your project. To do this, navigate to the Project window, click the Create button, and select Folder. Name this new folder Scenes and save a new Scene inside this folder.
This process also adds a new ARCamera GameObject in your Scene hierarchy.
Creating a Vuforia license key
The last step in the setup process is to create a license key from the License Manager section of the Vuforia Developer Portal. You need to enter this into Unity’s Vuforia configuration settings in order to build and test your application with Unity.
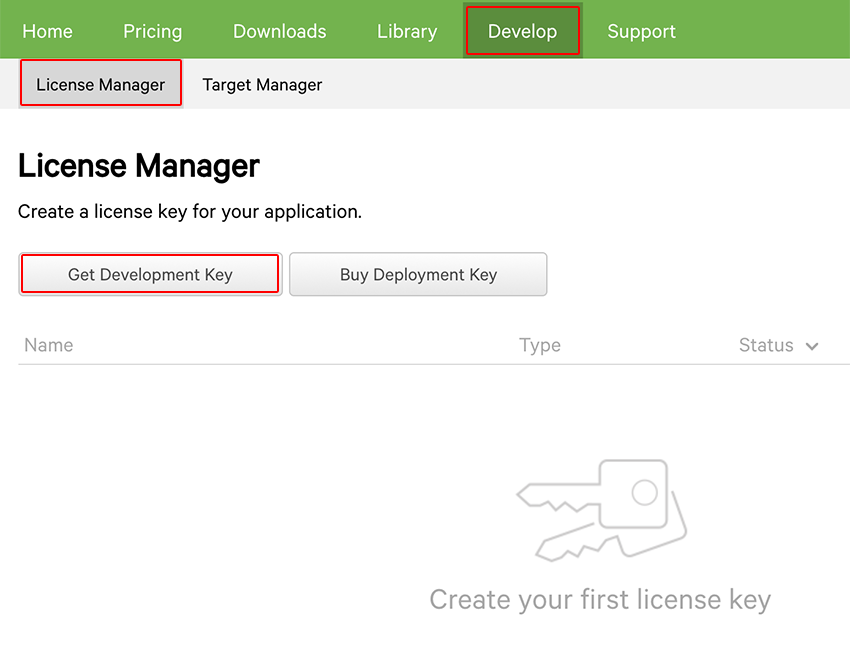
Visit the Vuforia Developer Portal and log in (or create a new account). Navigate to the License Manager in the Develop section and click the Get Development Key button to open the Add License Key page.
On the Add License Key page, enter a name for your app. Accept the terms and conditions, then click the Confirm button to generate a new license key.
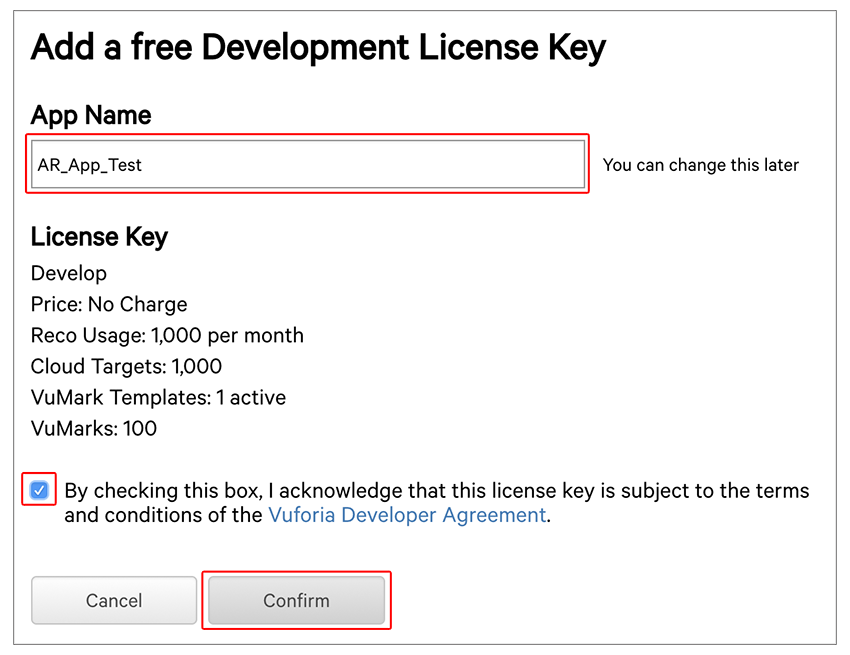
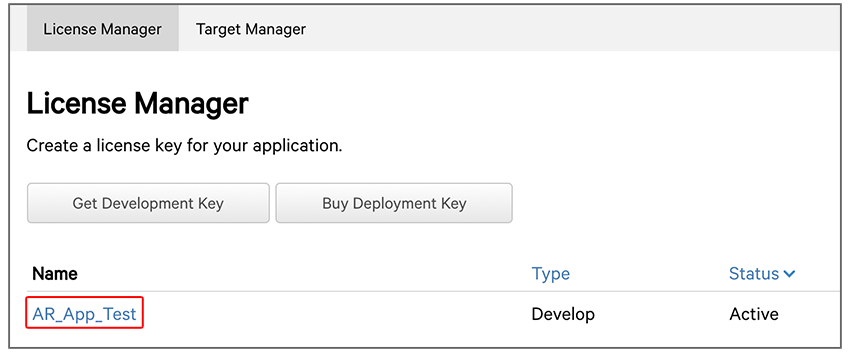
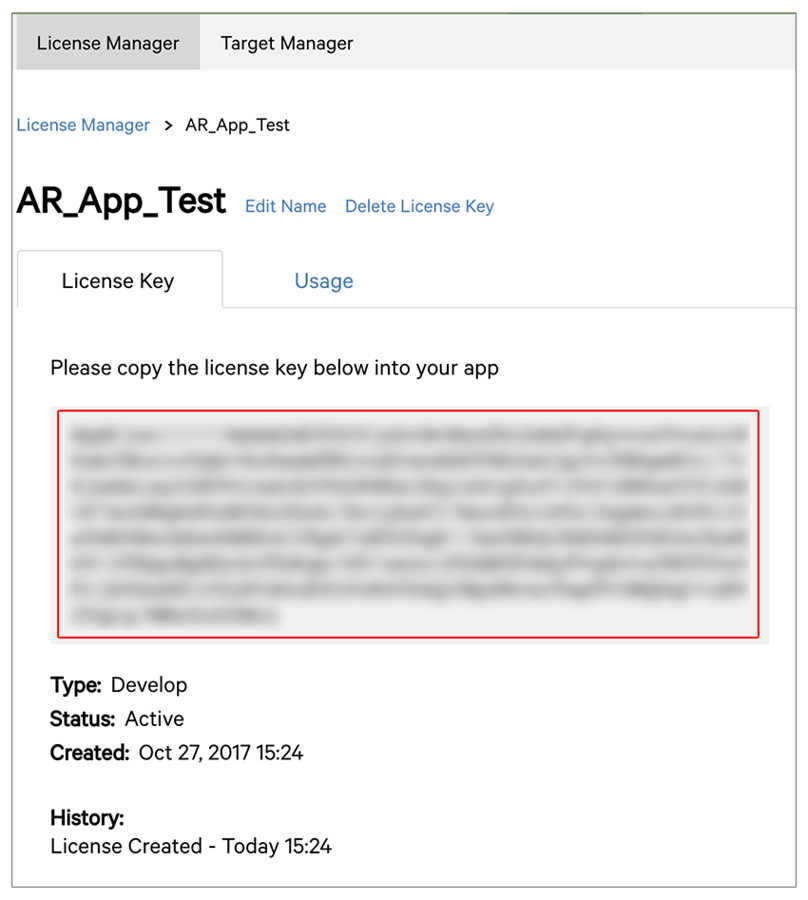
On the next page, agree to the Vuforia Developer conditions (tick the box) and then click the Confirm button. This brings you back to the Licence Manager page where you can see your newly created license in a list where its status is Active. Click on the name of your App to view the license details. This allows you to retrieve your development license key.
Copy the license key to the clipboard and navigate back to your Unity Project.
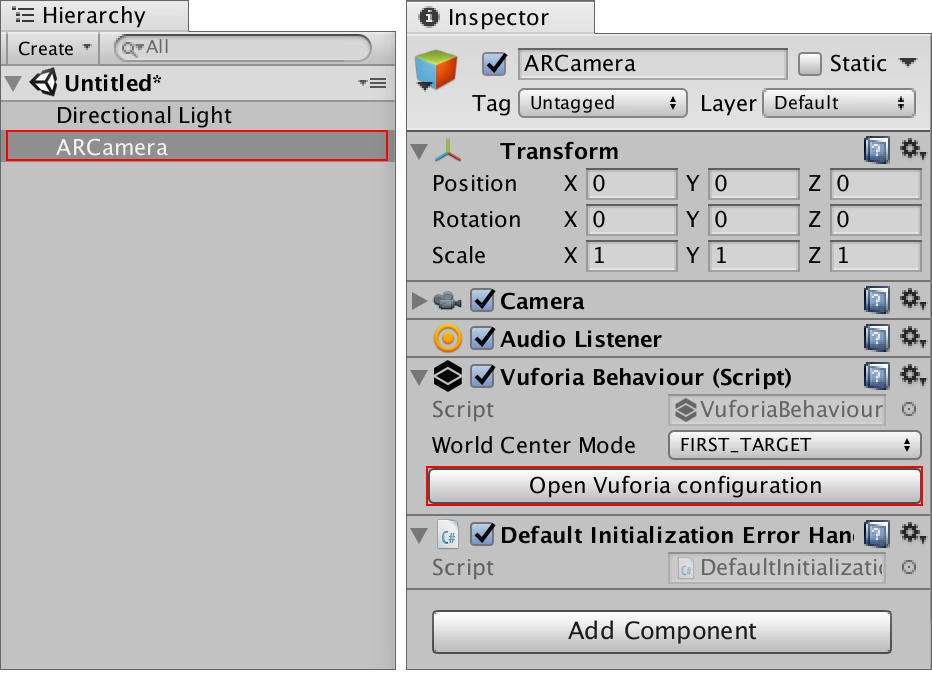
Select the ARCamera GameObject from the Hierarchy window and, in the Inspector window, navigate to the the Vuforia Behaviour(Script) component and click the Open Vuforia configuration button.
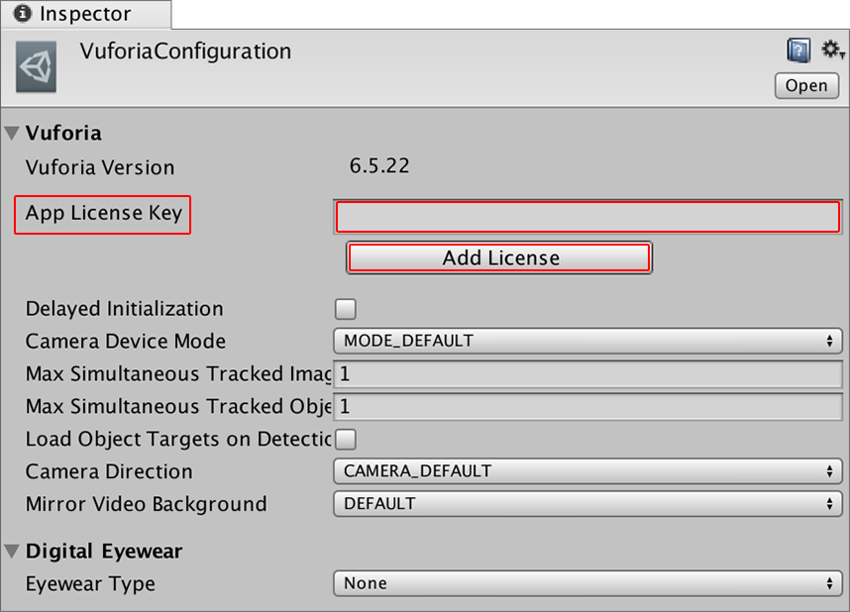
The Inspector window displays a list of Vuforia Configuration options. Paste your Vuforia Development key into the App License Key text box under the Vuforia section and then click the Add License button.
Testing your set-up
To test Vuforia apps in the Unity Editor, you need to have a webcam connected to your PC or laptop. As a final step to make sure Vuforia is now installed properly in your Unity Project, press the Play button to test your Scene. If Vuforia is set up correctly, a video feed from your webcam appears in the Editor Game View.
Now you are ready to set up Image Targets and add AR functionality to your Project.
Setting up Image Targets
This section shows you how to set up a simple Image Target and get it responding to basic tracking events.
To allow your application to recognize images and use them as Targets to trigger gameplay, display graphics or information, you need to create a Target database. You can create Target databases directly from the Vuforia Developer Portal Target Manager page, as the steps in this section describe.
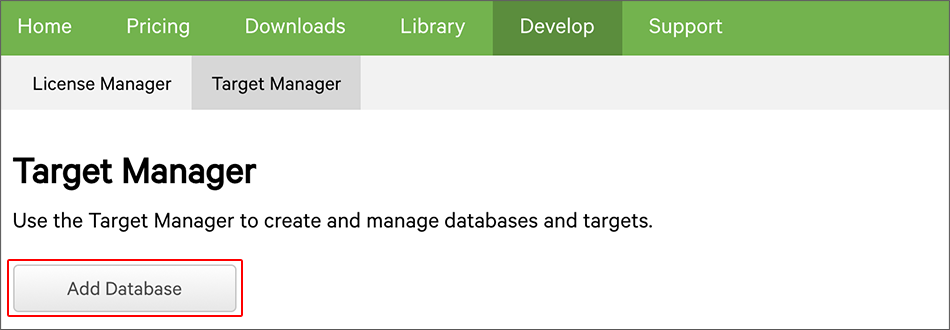
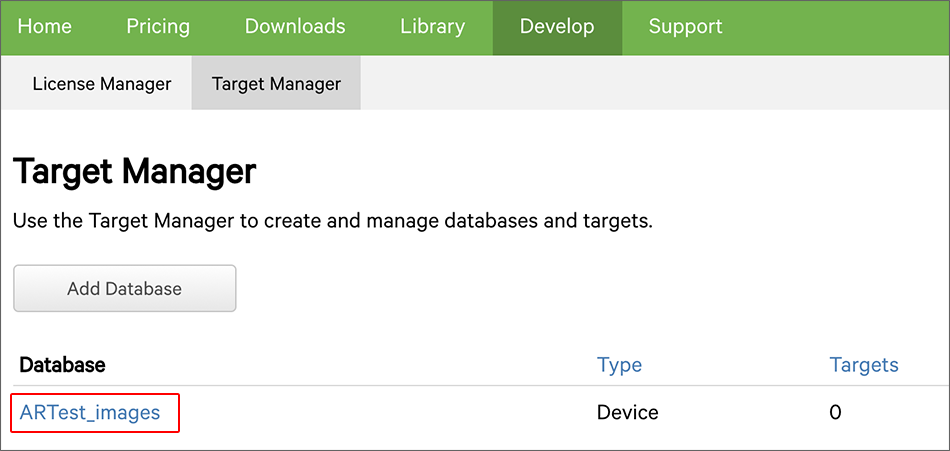
Log into your Vuforia Developer account. Then navigate to the Target Manager page and click on the Add Database button.
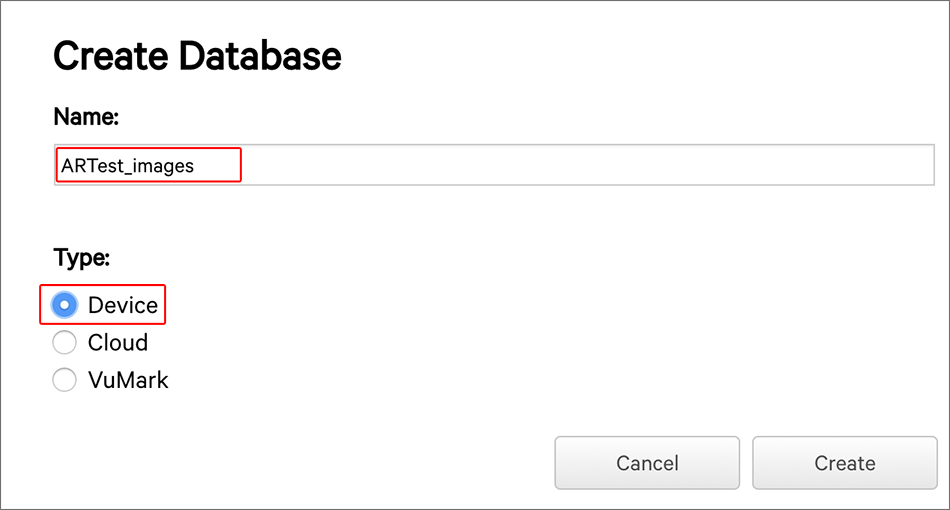
On the Create Database page, type a name for your database, select Device from the Type options, then click the Create button.
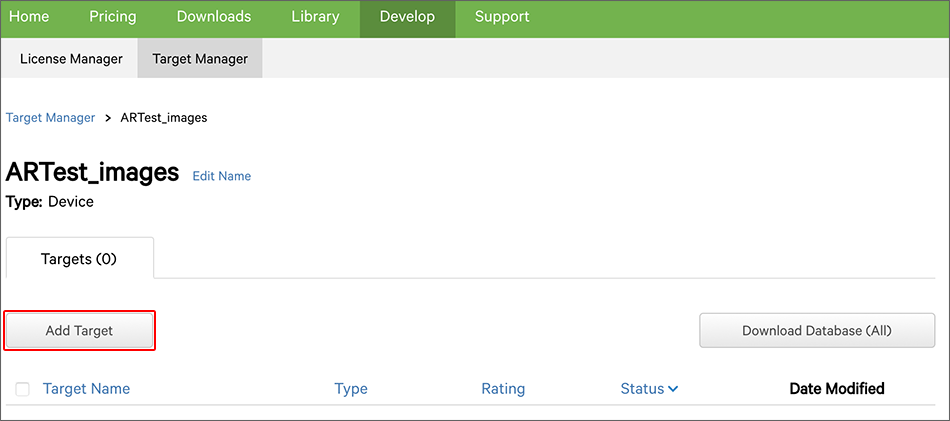
This adds the new Target database to the Target Manager list. Now click on the Database name in the list to open the Device Database list.
This brings you to the Target list page for the database, where you can add new Targets and download the database in specific formats for use with several platforms. Click the Add Target button to open the Add Target popup window.
The Add Target window presents you with options to specify details about the Target you want to add. There are four different types of Targets you can add: Single Image, Cuboid/Box, Cylinder and 3D Object. Under Type, Select Single Image and browse your hard drive to locate the image you want to use as an Image Target.

This example uses a playing card to demonstrate the Image Target recognition capabilities in Unity.

Use any image, but make sure that the image has enough detail to be rated as a 5-star Target so that the camera can easily track it.

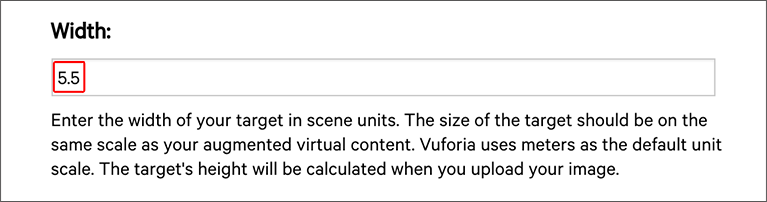
The Width value is a scale value that you need to set to the size you want the image to appear in your Unity Scene (in real-world units). Unity measures everything in your Scene in relation to the size of your Target image. For this example, the width of the playing card is 5.5cm, so you would use 5.5cm as the Width value. If you need a larger size Target, then increase this Width.
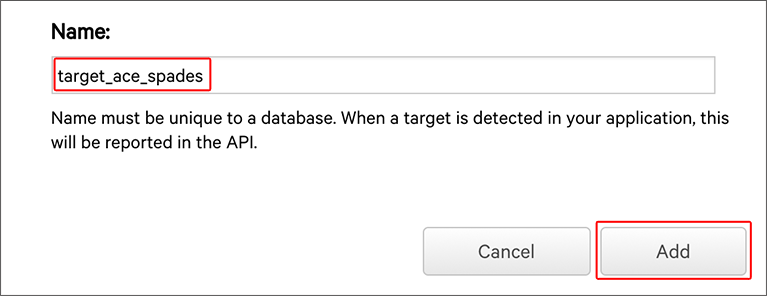
Enter a name for the Target image, and click the Add button to upload the Image Target to the database.
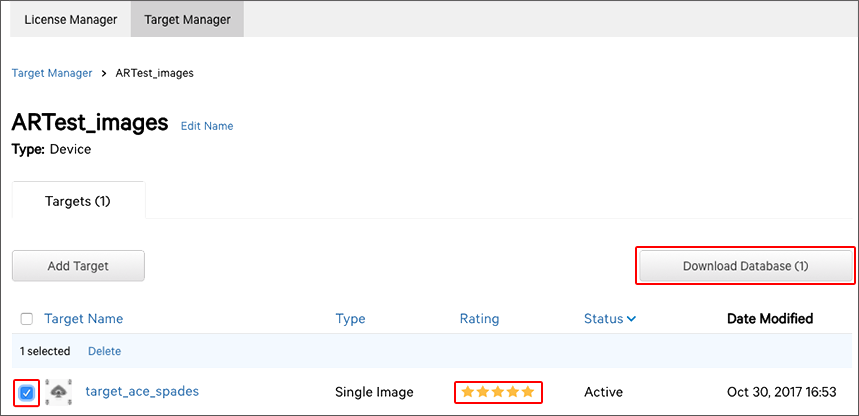
The image appears in the list of Targets with a Rating value represented by stars. If your Rating is less than 5 stars, it may be harder for the camera to track it. To learn more about what affects Image Target ratings, see Vuforia documentation on Optimizing target detection and tracking stability.
Once you are satisfied with your image’s Rating, select the checkbox to the left of the Image Target name and click the Download Database button.
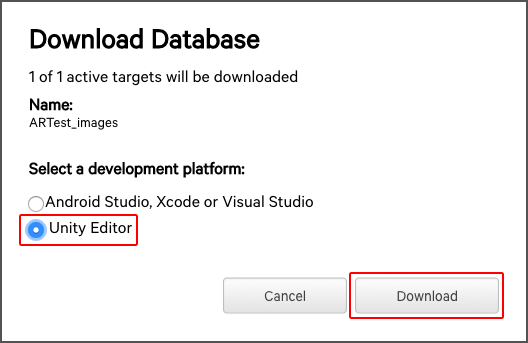
On the Download Database window, under Select a development platform, select Unity Editor, then click the Download button. This downloads a Unity package of the Target database that you can save on your hard drive.
Switch back to your Unity project to import the Unity package for use in your application.
Importing and activating the Target Database in Unity
In the Unity Editor, navigate to Asset > Import Package > Custom Package and find the package on your hard drive. In the Import Unity Package window, click the Import button.
Select the ARCamera from the Hierarchy window and, in the Inspector window, navigate to the Vuforia Behaviour (Script) component and click on the Open Vuforia configuration button.

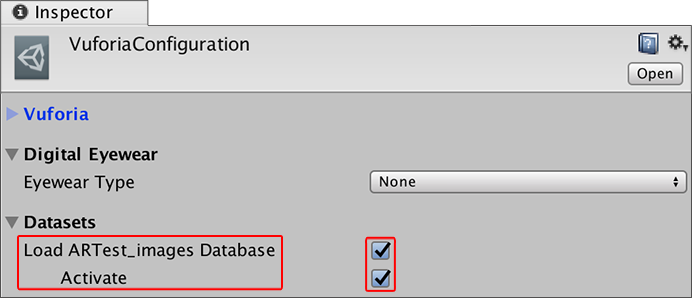
In the Vuforia Configuration window, under Datasets, select and check both the Load [DatabaseName] Database and Activate checkboxes. This activates your Image Target database for use with Unity.
Adding Image Targets to your Scene
To add an Image Target to the Scene, go to GameObject > Vuforia > Image.

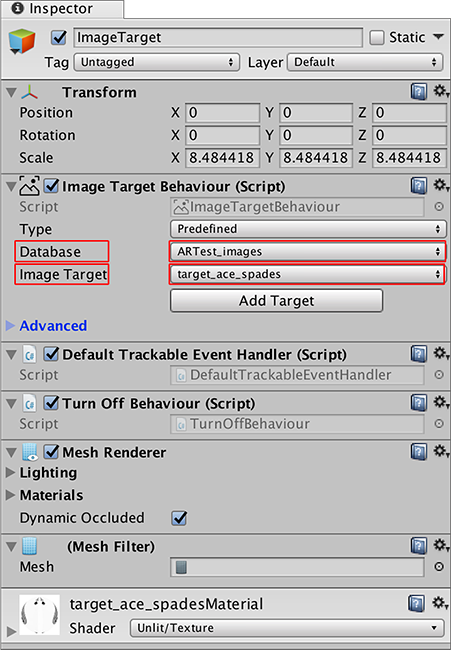
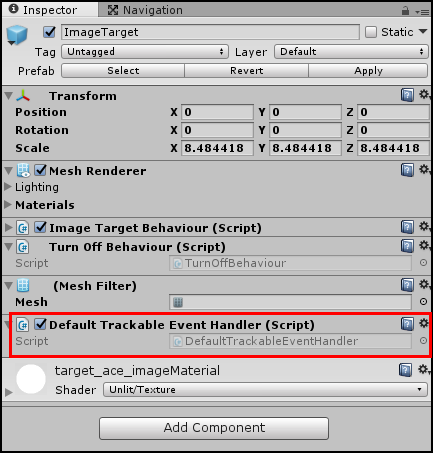
With the Image Target GameObject in your Scene, select it and look at the Inspector window to view its components.
In the Image Target Behaviour component, click on the Database drop-down list and select your Target database. In the Image Target drop-down list, select the name of your Image Target from the database.
Note: There is no need to click the Add Target button, as this brings you to the Vuforia website to give you information about adding Targets to your app.
The last step is to make a 3D GameObject appear when Vuforia recognizes the Image Target.
Displaying 3D Models on top of tracked images
This section describes how to display a GameObject when the camera recognizes and tracks an on-screen Image Target.
Make the GameObject a child of the Image Target GameObject. This child GameObject must contain both a MeshRenderer and MeshFilter component.
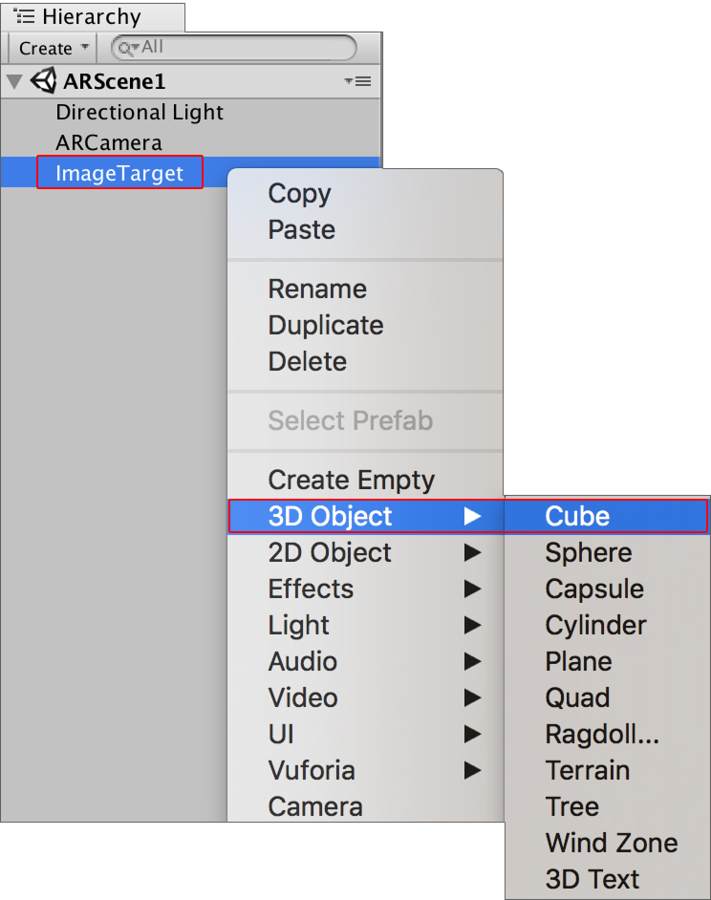
Add a Cube Primitive as a child to your Image Target GameObject. To do this, right-click it and select 3D Object > Cube from the pop-up menu.
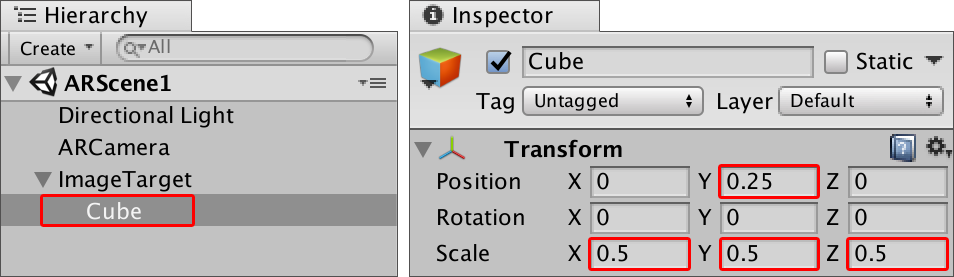
Now scale the Cube GameObject, and move it closer to your Image Target GameObject to make it look like it is sitting on the Target image. Use the Scene view to judge the position of the GameObject. If you used the same Width as the playing card in this guide, then change the X, Y and Z Scales of the GameObject’s Transform component to 0.5 and change the Transform Position Y value to 0.25 to make it sit well on the Image Target GameObject.
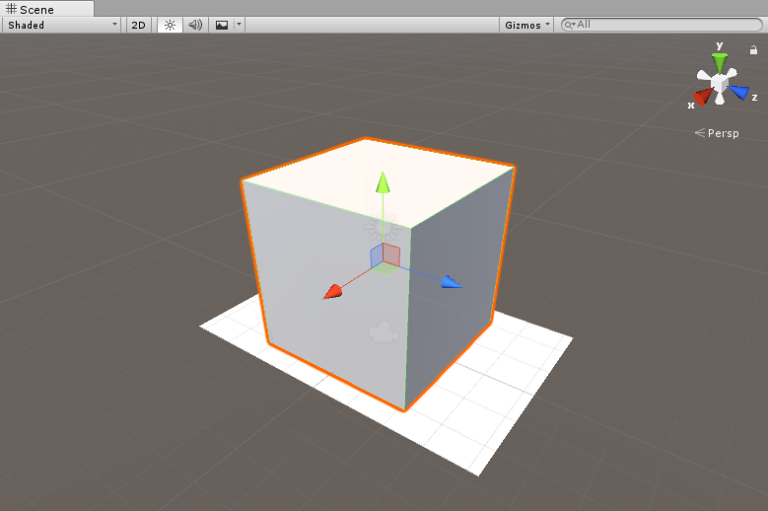
Your Scene should look something like this:
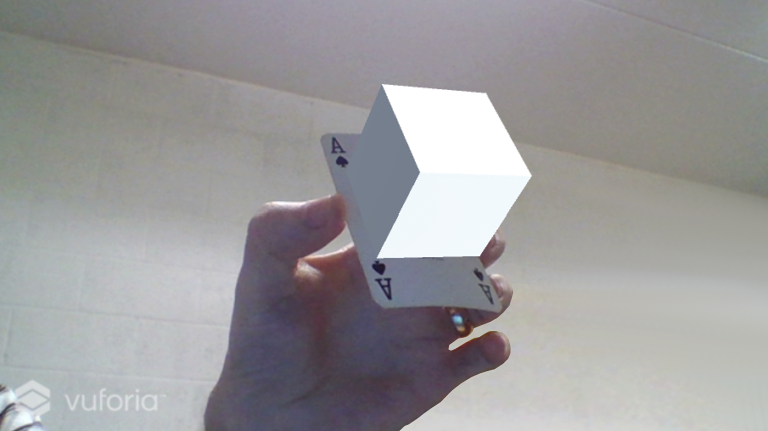
Click the Unity Editor Play button to test the AR functionality. When you place the image in front of the webcam, the Cube appears on top of the image in the Game view.
The Camera component on the ARCamera has its default Far Clipping Planes set to 2000. For games or applications which require image tracking at larger distances (such as those requiring AR or MR glasses), you need to adjust the Far Clipping Planes for the Camera component in Unity, and increase the size of the Targets to ensure the device camera can easily track them.
You have now successfully made a simple app that uses an Image Target, and displays a basic 3D shape in its place once the camera can track it.
Platform configuration settings
This section provides a step-by-step guide for configuring your Unity Project to build Vuforia Augmented/Mixed Reality applications.
Here is a list of important XR settings used in Vuforia Unity integration. To access these, open the Player Settings (Edit > Project Settings > Player, then select the tab for the device you are building to):
Vuforia Augmented Reality support: Enables Vuforia Augmented Reality support in your application
Virtual Reality SDKs: Allows Vuforia features to be integrated into VR applications. This menu is displayed when you select the Virtual Reality Supported checkbox.
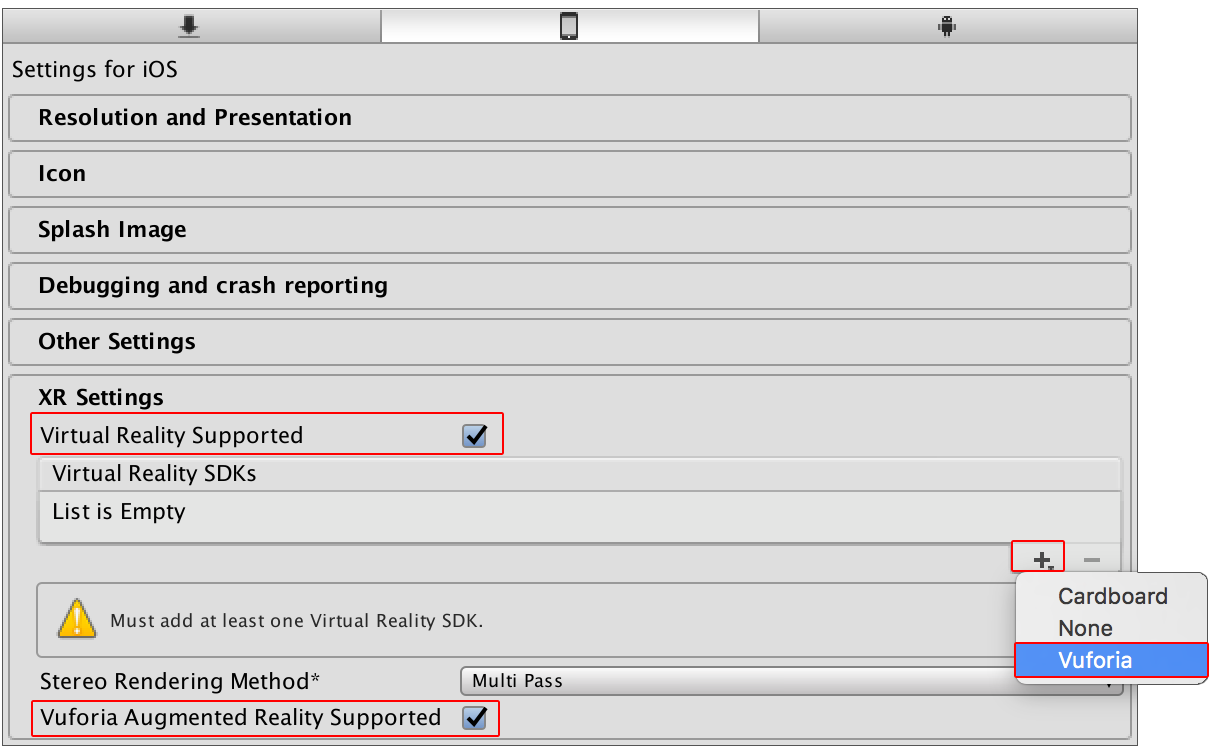
Vuforia supports the following XR SDKs:
The Vuforia VR SDK (in the Virtual Reality SDKs list) is a stand-alone VR configuration with no external dependencies. It provides stereo rendering and distortion correction, along with head and hand tracking (with positional tracking available for Tango), and viewer profile support to define parameters of various VR headwear.
Stereo rendering method
The stereo rendering method is only relevant when using the Vuforia Virtual Reality SDK. Android, iOS, and Windows Mixed Reality devices support Multi-Pass instancing, Single-Pass Instancing and non-instancing.
When using Vuforia Augmented Reality with another Virtual Reality SDK, stereo rendering support is determined by the Virtual Reality SDK being used.
Supported graphics APIs
Recommendation: In Unity’s Player Settings (Edit > Project Settings > Player, then select the tab for the device you are building to), open Other Settings and enable Use Auto Graphics API.
| Android | iOS | Windows |
|---|---|---|
| OpenGL ES 2.0 OpenGL ES 3.x |
OpenGL ES 2.0 OpenGL ES 3.x Metal (iOS 8+) |
DirectX 11 on Windows 10 |
Supported features
Vuforia provides a number of features to allow development of AR/MR applications.
The table below lists these features along with the OS and device types supporting them.
| Feature | Description | OS | Handhelds | Eyewear |
|---|---|---|---|---|
| Image Targets | Tracks planar images | Android, iOS, UPW | Да | Да |
| Multi Targets | Tracks geometric arrangements of images | Android, iOS, UPW | Да | Да |
| Cylinder Targets | Tracks images wrapped on cylinders and cones | Android, iOS, UPW | Да | Да |
| User Defined Targets | Tracks images captured by users at runtime | Android, iOS, UPW | Да | Not recommended |
| Cloud Recognition | Cloud-based Image Targets | Android, iOS, UPW | Да | Да |
| Device Tracking | 3 DoF & 6 DoF positional tracking* | Android, iOS, UPW | Yes ( Limited to 6 DoF ) | Yes ( Limited to 6 DoF ) |
| VuMark | Customizable encodable AR markers | Android, iOS, UPW | Да | Да |
| Object Reco | Tracks 3D objects from scans | Android, iOS, UPW | Да | Да |
| Model Targets** | Track 3D objects from 3D models | Android, iOS, UPW | Да | Да |
| Smart Terrain | Track surfaces and geometry in the user’s environment | Android, iOS, UPW | Да | Ограниченно |
| AR + VR | AR feature support for VR apps | Android, iOS, UPW | Да | Да |
* 6 degrees of freedom tracking is available for Tango and HoloLens devices
** Model Targets are available through the Vuforia Early Access Program and public in Unity 2017.3
Helpful tips
Here are a few useful tips that will reduce your learning curve when working with Vuforia in Unity.
Image Target tracking
When a camera is tracking an Image Target in the in-Editor Play mode, Unity disables all components belonging to the Image Target GameObject’s child GameObjects. This does not include any Script components attached to the child GameObjects of the Image Target GameObject. Any Scripts continue to run even when the Image Target is not in view. This might require you to do conditional checks to prevent any code in the Script’s Update() method constantly running if you don’t need it. Alternatively, you can disable the Script component in code, and re-enable it whenever it is needed again.
Running code during Image Target state change events
A useful script for running code during specific Image Target tracking event states (such as whether the target is visible or not) is the Default Trackable Event Handler (Script) component attached to each Image Target GameObject.
Here are two of the most useful methods:
private void OnTrackingFound()
Unity calls this method from the Default Trackable Event Handler (Script) component of the specific instance of an Image Target GameObject when Vuforia finds it in the Camera view. This method is very useful for running specific code at the very beginning of tracking an object (such as adding the GameObject to a list of active GameObjects).
private void OnTrackingLost()
Unity calls this method from the Default Trackable Event Handler (Script) component of the specific instance of an Image Target GameObject when Vuforia loses track of an Image Target from the Camera view. This method is very useful for running specific code as soon as an Image Target disappears from view (such as removing the GameObject from a list in your GameManager keeping track of all GameObjects active in your application).
Extended Tracking
For Image Targets that only require an initial setup and registration, and do not require images to be constantly tracked, navigate to the Target’s Image Target Behaviour (Script) component and enable the Enable Extended Tracking option.
Enable Extended Tracking allows positions and orientations of Image Targets to persist even when not in view of the Camera (after the camera has recognized them at least once) and uses features of the environment to improve tracking performance. More detailed information on Extended Tracking with Vuforia is available in the Vuforia documentation on extended tracking.
Publishing your AR/MR application
To export your Vuforia AR or MR application from Unity to mobile platforms, use the same steps as when normally publishing to Android or iOS devices. See documentation on publishing for these platforms:
No special settings are required.
Useful links
Here are some useful resources and tutorials to help you learn more about the many features available with Vuforia.
Vuforia documentation: Vuforia Developer Library
Vuforia documentation: Best practices for mixed reality AR/VR experiences
Troubleshooting guides
This section provides links to useful troubleshooting information for the most common problems you may encounter when developing with the Vuforia SDK.
- [Vuforia Developer Portal: FAQ](https://developer.vuforia.com/forum/faq/faq
Copyright © 2023 Unity Technologies
优美缔软件(上海)有限公司 版权所有
"Unity"、Unity 徽标及其他 Unity 商标是 Unity Technologies 或其附属机构在美国及其他地区的商标或注册商标。其他名称或品牌是其各自所有者的商标。
公安部备案号:
31010902002961