Preparing render settings in Unity
The following advice helps you understand how to use Unity’s rendering features to realistically mimic the real world, and quickly achieve your project’s believable visual goal. This covers:
- Linear rendering mode
- Rendering mode
- Enabling post-processing
- High Dynamic Range (HDR) Camera
- HDR Light map encoding (optional)
- Enabling Image Effects for viewport
For more in-depth information, see Unity’s lighting and rendering tutorial.
Linear rendering mode
In simple terms, the linear rendering mode prepares Unity to do lighting and shading calculations using physically accurate mathematics before transforming the final output into the format that works best for monitors.
To specify a gamma or linear workflow:
In Unity, select Edit > Project Settings > Player and open Player Settings.
Go to Other Settings > Rendering and change the Color Space to Linear.
Defining your color space should be one of the earliest decisions in your project because of the drastic impact on the final shading and lighting results. For more advice on each workflow, see Linear or gamma workflow.
Rendering mode
The Spotlight Tunnel Sample Scene uses the deferred shading rendering path. This allows you to:
Work with multiple dynamic lights efficiently
Combine multiple reflection cubemaps
Use the existing Screen Space Reflection features in Unity 2017+
To set the rendering path in the Editor, select Edit > Project Settings > Graphics or select the Main Camera in your Scene, and then set the Rendering Path in the Inspector window.
For more information on the rendering mode, see Rendering Pipeline Details.
Enabling post-processing
To display HDR lighting properly, install the Unity post-processing stack V1 in your project, and follow these steps to set it up and enable tonemapping:
-
Create a Post-Processing Profile Asset in your project and configure it:
- Enable Color Grading > Tonemapper > Filmic (ACES) (Academy Color Encoding Standards). For advice on using ACES tonemapping to handle high intensity color values, such as colored light or fire, see High intensity color.
- Enable Dithering. Dithering allows the Scene to alleviate banding artifacts introduced by 8 Bit/channel output from an HDR Scene. Modern engines use this technique to circumvent the limitation of 16M color output.
- Leave the rest of the Tonemapper settings with their default values.
Select the Main Camera in your Scene, click Add Component in the Inspector window, and choose Post-Processing Behaviour.
In the Profile field, enter the post-processing profile you created.
The Spotlight Tunnel sample scene uses the post-processing stack V1. For advice on using post-processing stack V2, refer to the package readme.
High Dynamic Range (HDR) Camera
When rendering believable lighting, you’re dealing with lighting values and emissive surfaces that have a brightness higher than 1 (high dynamic range), much like real life. You then need to remap these values to the proper screen range (see tonemapping). The high dynamic range setting is crucial because it allows the Unity camera to process high values, rather than clip them. To enable HDR, select the Main Camera in your Scene and ensure that Allow HDR is checked in the Inspector window.
HDR Lightmap encoding (optional)
The Spotlight Tunnel Sample Scene doesn’t use baked lighting. However, if you’re planning to use HDR baked lighting, set the light map encoding to HDR light map for consistent results.
To set lightmap encoding in Unity, go to Edit > Project > Player > Other Settingspost > Lightmap Encoding. For more information, see Lightmaps: Technical information.
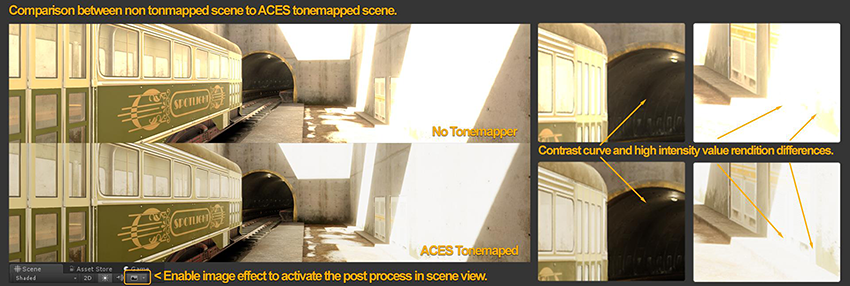
Enabling image effects in the viewport
To see the tonemapper while working with the Scene, enable Image Effects in the drop-down toolbar menu at the top of the Scene view. In the following image, notice the highlight rendition and the dark tunnel value separation improvements in the tonemapped Scene. If you look at the non-tonemapped Scene, you can see how the highlights didn’t converge to a unified color (the yellowish burning sun in this case).
This setup essentially tries to replicate how a digital camera captures a Scene with a fixed exposure (without exposure adaptation/eye adaptation features enabled).
At this point, you have a proper foundational Scene rendering setup that should give believable results with a wide range of content:

- 2018–03–23 Page published with limited editorial review
- Making believable visuals Best Practice Guide added in Unity 2017.3
Copyright © 2023 Unity Technologies
优美缔软件(上海)有限公司 版权所有
"Unity"、Unity 徽标及其他 Unity 商标是 Unity Technologies 或其附属机构在美国及其他地区的商标或注册商标。其他名称或品牌是其各自所有者的商标。
公安部备案号:
31010902002961