Importing non-humanoid animations
A Humanoid model is a very specific structure, containing at least 15 bones organized in a way that loosely conforms to an actual human skeleton. Everything else that uses the Unity Animation System falls under the non-Humanoid, or Generic category. This means that a Generic Model might be anything from a teakettle to a dragon, so non-Humanoid skeletons could have a huge range of possible bone structures.
The solution to dealing with this complexity is that Unity only needs to know which bone is the Root node. In terms of the Generic character, this is the best approximation to the Humanoid character’s center of mass. It helps Unity determine how to render animation in the most faithful way possible. Since there is only one bone to map, Generic setups do not use the Humanoid Avatar window. As a result, preparing to import your non-Humanoid Model file into Unity requires fewer steps than for Humanoid models.
- Set up your Rig as Generic.
- You can optionally limit the animation that gets imported on certain bones by defining an Avatar Mask.
- From the Animation tab, enable the Import Animation option and then set the other Asset-specific properties, .
- If the file consists of multiple animations or actions, you can define specific frame ranges as Animation Clips.
- For each Animation Clip defined in the file, you can:
- Set the pose and root transform
- Optimize looping
- Add curves to the clip in order to animate the timings of other items
- Add events to the clip in order to trigger certain actions in time with the animation
- Discard part of the animation similar to using a runtime Avatar Mask but applied at import time
- Select a different Root Motion Node to drive the action from
- Read any messages from Unity about importing the clip
- Watch a preview of the animation clip
- To save your changes, click the Apply button at the bottom of the Import Settings window or Revert to discard your changes.
Setting up the Rig
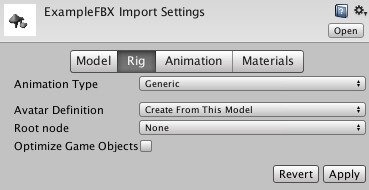
From the Rig tab of the Inspector window, set the Avatar (animation) type to Generic. By default, the Avatar Definition property is set to Create From This Model and the Root node option is set to None.
In some cases, you can change the Avatar Definition option to Copy From Other Avatar to use an Avatar you already defined for another Model file. For example, if you create a Mesh (skin) in your 3D modeling application with several distinct animations, you can export the Mesh to one FBX file, and each animation to its own FBX file. When you import these files into Unity, you only need to create a single Avatar for the first file you import (usually the Mesh). As long as all the files use the same bone structure, you can re-use that Avatar for the rest of the files (for example, all the animations).
If you keep the Create From This Model option, you must then choose a bone from the Root node property.
If you decide to change the Avatar Definition option to Copy From Other Avatar, you need to specify which Avatar you want to use by setting the Source property.
Click the Apply button. Unity creates a Generic Avatar and adds an an Avatar sub-asset under the Model Asset, which you can find in the Project view.
Note: The Generic Avatar is not the same thing as the Humanoid Avatar, but it does appear in the Project view, and it does hold the Root node mapping. However, if you click on the Avatar icon in the Project view to display its properties in the Inspector, only its name appears and there is no Configure Avatar button.
Creating an Avatar Mask
You can apply masking to animation clips either during import time, or at runtime. Masking during import time is preferable, because it allows the discarded animation data to be omitted from your build, making the files smaller and therefore using less memory. It also makes for faster processing because there is less animation data to be blended at runtime. In some cases, import masking may not be suitable for your purposes. In that case, you can apply a mask at runtime by creating an Avatar Mask Asset, and using it in the layer settings of your Animator Controller.
To create an empty Avatar Mask Asset, you can either:
- Choose Create > Avatar Mask from the Assets menu.
- Click the Model object you want to define the mask on in the Project view, and then right-click and choose Create > Avatar Mask.
The new Asset appears in the Project view:
You can now choose which bones to include or exclude from a Transform hierarchy and then add the mask to either an Animation Layer or add a reference to it under the Mask section of the Animation tab.
- 2018–04–25 Page amended with limited editorial review
Copyright © 2023 Unity Technologies
优美缔软件(上海)有限公司 版权所有
"Unity"、Unity 徽标及其他 Unity 商标是 Unity Technologies 或其附属机构在美国及其他地区的商标或注册商标。其他名称或品牌是其各自所有者的商标。
公安部备案号:
31010902002961