Blending clips
Blend two clips on the same track to create a smooth transition between two Animation clips, two Audio clips, or two Playable clips. To blend two clips, position or trim one clip until it overlaps the other clip.
In a blend, the first clip is referred to as the out-going clip and the second clip is referred to as the incoming clip. The area where the out-going clip transitions to the incoming clip is referred to as the blend area. The blend area sets the duration of the transition.
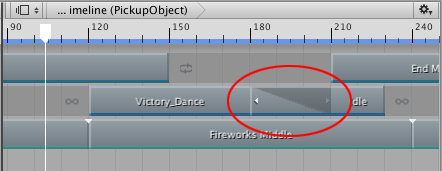
Although the Clips view represents a blend area as a single linear curve, the transition between clips is actually comprised of two blend curves. The blend curve for the out-going clip is referred to as the Blend Out curve. The blend curve for the incoming clip is referred to as the Blend In curve. By default, each blend curve is automatically set to an ease-in and ease-out curve.
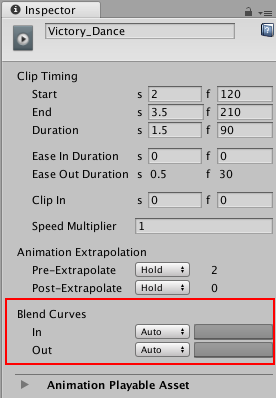
Use the Blend Curves in the Inspector window to change the shape for either the Blend In or Blend Out curve of the selected clip. However, the Inspector window only allows for editing the properties of one clip at a time. It is not possible to simultaneously customize both blend curves from the same blend area.
To customize the Blend Curves for the transition between two clips, do the following:
Select the out-going clip to customize its Blend Out curve (labelled Out).
Select the in-coming clip to customize its Blend In curve (labelled In).
To customize either the Blend Out curve or Blend In curve, use the drop-down menu to switch from Auto to Manual. With Manual selected, the Inspector window shows a preview of the blend curve. Click the preview to open the Curve Editor below the Inspector window.
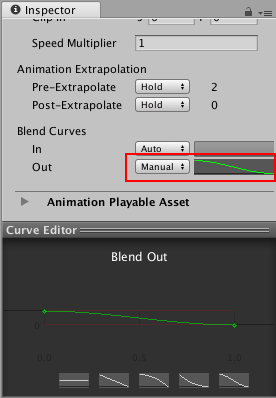
Use the Curve Editor to customize the shape of the blend curve. By default, the blend curve includes a key at the beginning of the curve and a key at the end of the curve. The Curve Editor provides the following different methods of modifying the blend curve:
Select the key at the start of the blend curve and use the tangent handles to adjust the interpolation between keys.
Select the key at the end of the blend curve and use the tangent handles to adjust the interpolation between keys.
Add additional keys to change the shape of the blend curve by adding more interpolation points. Adding keys in the Curve Editor is the same as adding keys in the Curves view.
Right-click a key to delete or edit the key. Editing keys in the Curve Editor is the same as editing keys in the Curves view. Note that the first and last keys cannot be deleted.
Select a shape template from the bottom of the Curve Editor.
The Curve Editor also includes shape templates based on whether you are modifying the Blend In curve or the Blend Out curve. Select a shape template to change the blend curve to the selected shape template.
- 2017–08–10 Page published with limited editorial review
Copyright © 2023 Unity Technologies
优美缔软件(上海)有限公司 版权所有
"Unity"、Unity 徽标及其他 Unity 商标是 Unity Technologies 或其附属机构在美国及其他地区的商标或注册商标。其他名称或品牌是其各自所有者的商标。
公安部备案号:
31010902002961