Progressive CPU Lightmapper
Progressive Lightmapper is a fast path-tracing-based lightmapper system that provides baked lightmaps and Light Probes with progressive updates in the Editor. It requires non-overlapping UVs with small area and angle errors, and sufficient padding between the charts.
Progressive Lightmapper takes a short preparation step to process geometry and instance updates, and generates the G-buffer and chart masks. It then produces the output immediately and progressively refines it over time for a much-improved interactive lighting workflow. Additionally, baking times are much more predictable because Progressive Lightmapper provides an estimated time while it bakes.
Progressive Lightmapper also bakes global illumination (GI) at the lightmap resolution for each texel individually, without upsampling schemes or relying on any irradiance caches or other global data structures. This makes it robust and allows you to bake selected portions of lightmaps, which makes it faster for you to test and iterate on your Scene.
For an in-depth video showing the interactive workflow, see Unity’s video walkthrough: In Development - Progressive Lightmapper (YouTube).
Settings
To use the Progressive CPU Lightmapper, go to Window > Rendering > Lighting Settings, navigate to Lightmapping Settings, and set Lightmapper to Progressive CPU. See Lightmapping Settings for more information about this window.

| Property: | Function: | |
|---|---|---|
| Prioritize View | Enable this to make the Progressive Lightmapper apply changes to the texels that are currently visible in the Scene View, then apply changes to the out-of-view texels. | |
| Multiple Importance Sampling | Enable this to use multiple importance sampling for sampling the environment. This generally leads to faster convergence when generating lightmaps, but can lead to noisier results in certain low frequency environments. This is disabled by default. | |
| Direct Samples | The number of samples (paths) shot from each texel. This setting controls the number of samples Progressive Lightmapper uses for direct lighting calculations. Increasing this value can improve the quality of lightmaps, but increases the baking time. | |
| Indirect Samples | The number of samples (paths) shot from each texel. This setting controls the number of samples Progressive Lightmapper uses for indirect lighting calculations. For some Scenes, especially outdoor Scenes, 100 samples should be enough. For indoor Scenes with emissive geometry, increase the value until you see the result you want. | |
| Environment Samples | Define the number of samples the lightmapper uses for environment lighting calculations. Higher values can improve the quality of the lightmaps, but increase the time required for baking to complete. This is set to 500 by default. | |
| Bounces | Use this value to specify the number of indirect bounces to do when tracing paths. For most Scenes, two bounces is enough. For some indoor Scenes, more bounces might be necessary. | |
| Filtering | Configure the way the Progressive Lightmapper applies post-processing to lightmaps to limit noise. For lightmap post-processing, the lightmap is split into Direct, Indirect and Ambient Occlusion targets that Unity applies post-processing to individually, before it composites them together into a single lightmap. - Direct: Any light that arrives directly from a Light to a sensor (usually the Camera). - Indirect: Any light that arrives indirectly from a Light to a sensor. This most commonly applies to light that reflects off other GameObjects. - Ambient Occlusion: Any ambient light that the lighting system calculates. See Ambient Occlusion for more information. The Progressive Lightmapper supports the NVIDIA OptiX AI-Accelerated Denoiser, which reduces perceptible noise in the lightmap without causing blurring. It requires an NVIDIA GPU with 4GB+ VRAM and driver version 390+. It is not supported for the NVIDIA Series 20x GPUs (Turing RTX). It is only supported on the Windows platform. |
|
| None | Select this to use no filter or denoising for the lightmap. | |
| Auto | Select this to use a platform-dependent preset for post-processing the lightmap. If your development machine fulfils the requirements to run OptiX (the NVIDIA OptiX AI-Accelerated Denoiser), the Progressive Lightmapper uses the denoiser with a Gaussian filter that has a 1-texel radius for all targets. If your development machine cannot run OptiX, the Progressive Lightmapper uses a Gaussian filter that has a 1-texel radius for Direct, 5-texel radius for Indirect, and 2-texel radius for Ambient Occlusion. |
|
| Advanced | Select Advanced to manually configure options for each type of lightmap target. The targets types are Direct, Indirect and Ambient Occlusion. For more information, see Advanced Filtering settings, below. | |
Advanced Filtering settings
| Setting | Description | |
|---|---|---|
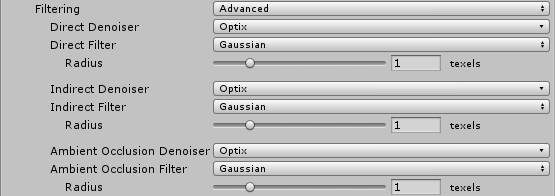
| Advanced | Set Filtering to Advanced to manually configure options for each type of lightmap target. The target types are: - Direct: Any light that arrives directly from a Light to a sensor (usually the Camera). - Indirect: Any light that arrives indirectly from a Light to a sensor. This most commonly applies to light that reflects off other GameObjects. - Ambient Occlusion: Any ambient light that the lighting system calculates. See Ambient Occlusion for more information. |
|
| Denoiser | Select a denoiser to use for the lightmap target: - Optix: If your development machine fulfils the requirements to support the NVIDIA OptiX AI-Accelerated Denoiser, you can select it here. If your system cannot run it, this option is greyed out and set to None by default. - None: Select this to use no denoising for the lightmap target. |
|
| Filter | Select a filter to use for the lightmap target: - Gaussian: Select this to use a Gaussian filter for the lightmap target. The Gaussian filter applies a bilateral Gaussian filter on the lightmap. This blurs the lightmap and reduces the visible noise. - A-Trous: Select this to use an A-Trous filter for the lightmap target. The A-Trous filter minimizes the amount of blur while it removes visible noise in the lightmap. - None: Select this to disable all filtering for the lightmap target. |
|
| Radius | This option is only available when Filter is set to Gaussian. Use the Radius value to set the radius of the Gaussian filter kernel in texels. A higher Radius increases the blur strength and reduces the perceptible noise, but might cause detail to be lost in the lighting. | |
| Sigma | This option is only available when Filter is set to A-Trous. Use the Sigma value to adjust how much to preserve detail or blur the lighting. A higher Sigma increases the blur strength and reduces the perceptible noise, but might cause detail to be lost in the lighting. | |
Advanced Filtering settings
| Setting | Description | |
|---|---|---|
| Advanced | Set Filtering to Advanced to manually configure options for each type of lightmap target. The target types are: - Direct: Any light that arrives directly from a Light to a sensor (usually the Camera). - Indirect: Any light that arrives indirectly from a Light to a sensor. This most commonly applies to light that reflects off other GameObjects. - Ambient Occlusion: Any ambient light that the lighting system calculates. See Ambient Occlusion for more information. |
|
| Denoiser | Select a denoiser to use for the lightmap target: - Optix: If your development machine fulfils the requirements to support the NVIDIA OptiX AI-Accelerated Denoiser, you can select it here. If your system cannot run it, this option is greyed out and set to None by default. - None: Select this to use no denoising for the lightmap target. |
|
| Filter | Select a filter to use for the lightmap target: - Gaussian: Select this to use a Gaussian filter for the lightmap target. The Gaussian filter applies a bilateral Gaussian filter on the lightmap. This blurs the lightmap and reduces the visible noise. - A-Trous: Select this to use an A-Trous filter for the lightmap target. The A-Trous filter minimizes the amount of blur while it removes visible noise in the lightmap. - None: Select this to disable all filtering for the lightmap target. |
|
| Radius | This option is only available when Filter is set to Gaussian. Use the Radius value to set the radius of the Gaussian filter kernel in texels. A higher Radius increases the blur strength and reduces the perceptible noise, but might cause detail to be lost in the lighting. | |
| Sigma | This option is only available when Filter is set to A-Trous. Use the Sigma value to adjust how much to preserve detail or blur the lighting. A higher Sigma increases the blur strength and reduces the perceptible noise, but might cause detail to be lost in the lighting. | |
Statistics

The panel below the Auto Generate and Generate Lighting options shows statistics about the lightmapping, including:
- The number of lightmaps that Unity has created
- Memory Usage: The amount of memory required for the current lightmapping.
- Occupied Texels: The number of texels that are occupied in lightmap UV space.
- Lightmaps in view: The number of lightmaps in the Scene view.
-
Lightmaps not in view: The number of lightmaps that are out of view.
- Converged: All calculations for these lightmaps are complete.
- Not Converged: Baking is still in progress for these lightmaps.
- Bake Performance: The number of rays per second. If this is low (that is, less than 2) you should adjust your settings or your hardware to process more light rays at a time.
In Auto mode, Unity automatically calculates the lightmaps and Light Probes. If you have Auto disabled, you need to press the Build button to start the bake.
During baking
Progressive Lightmapper provides options to monitor and stop the bake while it is in progress, if you need to.
ETA

The progress bar that appears while Unity is baking the lightmap provides an “estimated time of arrival” (displayed as ETA). This is the estimated time in seconds for the current bake to complete. This allows for much more predictable baking times, and allows you to quickly learn how much time baking takes with your current lighting settings.
Force Stop

During manual baking, click Force Stop at any time to halt the baking process. This allows you to stop the process as soon as you see results that look good.
Progressive Lightmapper added in 2018.1 NewIn20181
2018–11–27 Page amended with limited editorial review
Copyright © 2023 Unity Technologies
优美缔软件(上海)有限公司 版权所有
"Unity"、Unity 徽标及其他 Unity 商标是 Unity Technologies 或其附属机构在美国及其他地区的商标或注册商标。其他名称或品牌是其各自所有者的商标。
公安部备案号:
31010902002961