Importing and preparing Sprites
Import the individual tiles or tilesheet images for your Isometric Tilemap into your Unity Project by placing the textures into the Assets folder. Select the imported images to view their Texture Importer settings in the Inspector window.
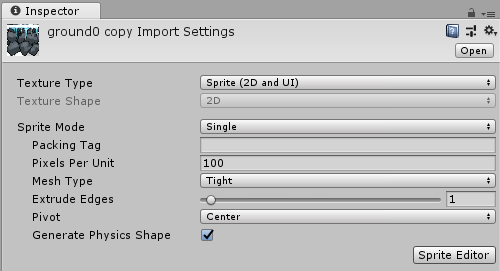
When importing Sprites for use in an Isometric Tilemap, use the following recommended settings. For further information about each setting, refer to the documentation on Texture Type: Sprite (2D and UI).
- Texture Type - Set this to Sprite (2D and UI). Other texture types are not supported for Tilemaps.
- Sprite Mode - Set this to Single if the texture contains only a single Sprite. Set to Multiple if it contains multiple Sprite textures, for example a sprite sheet with multiple Tiles textures.
- Pixels Per Unit (PPU) - This value is the number of pixels that make up one Unity unit for the selected Sprite. This determines the size of the Sprite when it is rendered on the Tilemap. This is also affected by the Cell Size setting of the Grid that contains the Tilemap, which determines how many Unity units make up a single Cell.
In the example below, the imported Sprite is a 256x128 image, and the Isometric Tilemap has a Cell Size of (XYZ: 1, 0.5, 1) Unity units. To make the Sprite fit exactly on a single Cell of the Tilemap, set its PPU value to 256. Its entire width then corresponds to one Unity unit, which is equal to the width (X value: 1) of a single Cell.

If the Sprite is set to a PPU value of 128, then it becomes 2 (256px/128) Unity units in width. This causes the Sprite to visually appear to cover 2 Cells in width when painted on the Tilemap. However, the Tile the Sprite is rendered on remains as a single Cell position.
- Mesh Type - Set to Tight to ensure the Tile Meshes follow the outline of the imported Sprites, and the Tiles are drawn flush together on the Tilemap. Due to the general diamond shape of most Isometric Tiles, setting this to Full Rect may result in drawing of wasted transparent spaces at the corners of an Isometric Tile, and is not recommended.
- Generate Physics Shape - If the Tiles do not need to interact with Physics2D, then clear this option. Leave this option enabled to generate a Physics Shape based on the shape of the Tile Sprite, for use with the Tilemap Collider component. To make the generated Physics Shape match the cell of the Tilemap instead, select the Tile Asset and set its Collider Type property to Grid.
After the Sprites are imported, refine the outlines of the Sprites by opening the Sprite Editor for each of them and editing their outlines. For Sprites in an Isometric Tilemap, you should set the Pivot of the Sprite so that the ‘ground’ is relative to the Sprite.
If the Texture is imported with Sprite Mode set to Multiple and contains multiple Sprites, then edit the outline of each Sprite in the Sprite Editor.
- Isometric Tilemaps added in 2018.3 NewIn20183
Copyright © 2023 Unity Technologies
优美缔软件(上海)有限公司 版权所有
"Unity"、Unity 徽标及其他 Unity 商标是 Unity Technologies 或其附属机构在美国及其他地区的商标或注册商标。其他名称或品牌是其各自所有者的商标。
公安部备案号:
31010902002961