- Unity User Manual (2019.3)
- Legacy Topics
- Legacy Asset Bundles
- Creating Asset Bundles in Unity 4
Creating Asset Bundles in Unity 4
In versions of Unity earlier than Unity 5, assets had to be selected and added to bundles using editor scripts alone. (In Unity 5 we provide tools in the editor to assign assets to specific Bundles). This information is provided for those working on legacy projects in Unity 4, and speaks assuming you are using Unity 4.
To create an Asset Bundle you need to use the BuildPipeline editor class. All scripts using Editor classes must be placed in a folder named Editor, anywhere in the Assets folder. Here is an example of such a script in C#:
// Legacy Unity 4 example. Not for use in Unity 5 & onwards
using UnityEngine;
using UnityEditor;

public class ExportAssetBundles {
    [MenuItem("Assets/Build AssetBundle")]
    static void ExportResource () {
        string path = "Assets/myAssetBundle.unity3d";
        Object[] selection = Selection.GetFiltered(typeof(Object), SelectionMode.DeepAssets);
        BuildPipeline.BuildAssetBundle(Selection.activeObject, selection, path,
                                       BuildAssetBundleOptions.CollectDependencies
                                     | BuildAssetBundleOptions.CompleteAssets);
    }
}
An Editor script does not need to be applied to a GameObject, it is instead used by the Editor. This previous example will create a new item in the “Assets” menu of your editor called “Build AssetBundle”.
Чтобы использовать этот пример:
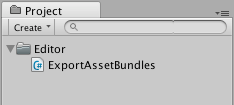
- Создайте C# скрипт с именем ExportAssetBundles.cs, внутри папки Editor, в окне Project View.
- Выберите ассет или ассеты из папки вашего проекта, которые вы хотите поместить в AssetBundle.
- Select Build AssetBundle from the Assets menu. Click “Save” to create the AssetBundle.
- Первая строка функции ExportResource указывает на путь к вашему AssetBundle.
- Следующая строка устанавливает выделение на AssetBundle в окне Project.
The BuildAssetBundle function is the line that creates the AssetBundle and saves it to the specified location. The first parameter specifies the mainAsset, which is a special Asset that can be obtained directly with the mainAsset property when loading Assets from the AssetBundle. It is not mandatory to set a main Asset, if this is not going to be used you can use null for the parameter. The second parameter is the array of objects that will make up the AssetBundle. The third parameter is the location on disk that the AssetBundle will be saved to. The final parameters are the build flags or options used when building AssetBundles. These BuildAssetBundleOptions can be combined using the bitwise OR operator.
Создание AssetBundle’ов должно быть пред-публикационным этапом, происходящим только один раз с помощью одного вызова функции, например, при выборе элемента меню для создания всех AssetBundle’ов. По мере разработки вашего приложения, вам следует написать вспомогательный скрипт, который будет создавать все ваши AssetBundle’ы для целевой платформы по одному щелчку мыши или в режиме командной строки без вмешательства пользователя.
There are three class methods you can use to build AssetBundles:
BuildPipeline.BuildAssetBundle позволяет вам собрать AssetBundle из любого типа ассетов.
BuildPipeline.BuildStreamedSceneAssetBundle используется, когда вы хотите включить в AssetBundle только сцены, которые будут загружены как только данные станут доступны.
BuildPipeline.BuildAssetBundleExplicitAssetNames то же самое, что и BuildPipeline.BuildAssetBundle, но с дополнительным параметром для определения пользовательской строки-идентификатора (имени) для каждого объекта.
Пример того, как можно собрать AssetBundle
Building asset bundles is done through editor scripting. There is basic example of this in the scripting documentation for BuildPipeline.BuildAssetBundle.
В рамках этого самого примера, скопируйте и вставьте скрипт с ссылки выше в новый C# скрипт названный ExportAssetBundles. Этот скрипт должен быть расположен в папке Editor, иначе он не сможет работать внутри Unity редактора.

Теперь, в меню Assets, вы должны будете увидеть две новые опции меню.

- Build AssetBundle From Selection - Track dependencies. Это проведёт сборку текущего объекта в AssetBundle, включая все зависимости этого объекта. Например, если у вас есть префаб, который содержит несколько слоёв иерархии, то тогда все дочерние объекты и компоненты будут рекурсивно добавлены в Asset Bundle.
1.Build AssetBundle From Selection - No dependency tracking. Это ровно противоположный предыдущему метод и он будет включать только единственный ассет, который вы выделили.
For this example, you should create a new prefab. First create a new Cube by going to GameObject > 3D Object > Cube, which will create a new cube in the Hierarchy View. Then drag the Cube from the Hierarchy View into the Project View, which will create a prefab of that object.
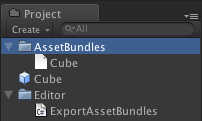
You should then right click the Cube prefab in the project window and select Build AssetBundle From Selection - Track dependencies. At this point you will be presented with a window to save the “bundled” asset. If you created a new folder called “AssetBundles” and saved the cube as Cube.unity3d, your project window will now look something like this.

С этого момента вы можете переместить AssetBundle Cube.unity3d на любой локальный носитель или загрузить на сервер.
Пример того, как изменить свойства ассетов при сборке Asset Bundle
Вы можете использовать AssetDatabase.ImportAsset для вынужденного повторного импорта ассета до вызова BuildPipeline.BuildAssetBundle, и затем использовать AssetPostprocessor.OnPreprocessTexture, чтобы назначит необходимые свойства. Следующий пример покажет вам, как установить разные виды сжатия текстуры при сборке Asset Bundle.
// Legacy Unity 4 example. Not for use in Unity 5 & onwards.
// Builds an asset bundle from the selected objects in the project view,
// and changes the texture format using an AssetPostprocessor.

using UnityEngine;
using UnityEditor;

public class ExportAssetBundles {

    // Store current texture format for the TextureProcessor.
    public static TextureImporterFormat textureFormat;

    [MenuItem("Assets/Build AssetBundle From Selection - PVRTC_RGB2")]
    static void ExportResourceRGB2 () {
        textureFormat = TextureImporterFormat.PVRTC_RGB2;
        ExportResource();
    }

    [MenuItem("Assets/Build AssetBundle From Selection - PVRTC_RGB4")]
    static void ExportResourceRGB4 () {
        textureFormat = TextureImporterFormat.PVRTC_RGB4;
        ExportResource();
    }

    static void ExportResource () {
        // Bring up save panel.
        string path = EditorUtility.SaveFilePanel ("Save Resource", "", "New Resource", "unity3d");

        if (path.Length != 0) {
            // Build the resource file from the active selection.
            Object[] selection = Selection.GetFiltered(typeof(Object), SelectionMode.DeepAssets);

            foreach (object asset in selection) {
                string assetPath = AssetDatabase.GetAssetPath((UnityEngine.Object) asset);
                if (asset is Texture2D) {
                    // Force reimport thru TextureProcessor.
                    AssetDatabase.ImportAsset(assetPath);
                }
            }

            BuildPipeline.BuildAssetBundle(Selection.activeObject,
                                           selection,
                                           path,
                                           BuildAssetBundleOptions.CollectDependencies |
                                           BuildAssetBundleOptions.CompleteAssets);
            Selection.objects = selection;
        }
    }
}
// Legacy Unity 4 example. Not for use in Unity 5 & onwards.
// Changes the texture format when building the Asset Bundle.

using UnityEngine;
using UnityEditor;

public class TextureProcessor : AssetPostprocessor
{
    void OnPreprocessTexture() {
        TextureImporter importer = assetImporter as TextureImporter;
        importer.textureFormat = ExportAssetBundles.textureFormat;
    }
}
Вы также можете проконтролировать процесс импорта ресурса используя AssetDatabase.ImportAssetOptions.
In a test environment, you sometimes need to test a change that requires AssetBundles to be rebuilt. In these cases, it is advisable to use the option BuildAssetBundleOptions.UncompressedAssetBundle when you build the AssetBundles. This makes it faster to build and load the AssetBundles but they will also be bigger and therefore take longer to download.
Сборка AssetBundles в производственной среде
When first using AssetBundles, it may seem enough to manually build them as seen in the previous example. But as a project grows in size and the number of assets increases, doing this process by hand is not efficient. A better approach is to write a function that builds all of the AssetBundles for a project. You can, for example, use a text file that maps Asset files to AssetBundle files.