Getting started with occlusion culling
This page describes how to set up your Scene for occlusion culling, bake your occlusion culling data, and visualize the results.
Setting up your Scene
Before you begin, identify all of the GameObjects in your Scene that you would like to be Static Occluders (GameObjects that do not move, and that block the view of GameObjects that are behind them) and Static Occludees (GameObjects that do not move, and are occluded by Static Occluders). A GameObject can be both a Static Occluder and a Static Occludee.
Good candidates for Static Occluders are medium to large solid GameObjects, such as a wall or a building. To be a Static Occluder, a GameObject must:
- Have a Terrain or Mesh Renderer component
- Be opaque
- Not move at runtime
Note that if you are using LOD groups, Unity uses the base level GameObject (LOD0) of a Static Occluder to determine what it occludes. If the silhouette of a GameObject varies considerably between LOD0 and other LOD levels, it might not be a good candidate for a Static Occluder.
Any GameObject that is likely to be occluded at runtime is a good candidate to be a Static Occludee, including small or transparent GameObjects. To be a Static Occludee, a GameObject must:
- Have any type of Renderer component
- Not move at runtime
When you have identified the GameObjects that you would like to be Static Occluders and Static Occludees, you can set up your Scene.
- Select all of the GameObjects that you would like to be Static Occluders.
- In the Inspector window, open the Static Editor Flags drop-down menu and select Occluder Static.
- Select all of the GameObjects that you would like to be Static Occludees.
- In the Inspector window, open the Static Editor Flags drop-down menu and select Occludee Static.
- Add a Camera to your Scene and select it, or select an existing Camera.
- In the Inspector window, ensure that the Camera’s Occlusion Culling property is enabled.
Baking the data
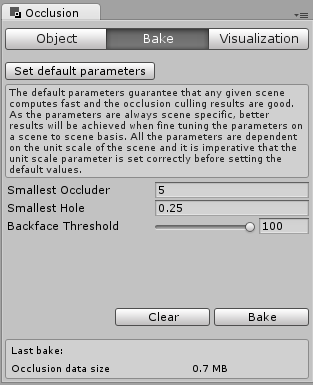
- In the top menu, select Window > Rendering > Occlusion Culling to open the Occlusion Culling window.
- Select the Bake tab.
- In the bottom right hand corner of the Inspector window, press the Bake button. Unity generates the occlusion culling data, saves the data as an asset in your Project, and links the asset with the current Scene(s).
Visualizing the results
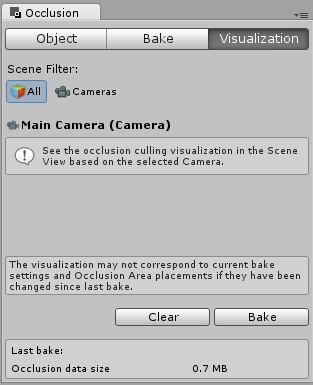
- Ensure that the Occlusion Culling window and the Scene view are both visible. When the Occlusion Culling window is visible, Unity displays occlusion culling data and the Occlusion Culling popup in the Scene view.
- Select a Camera in the Scene.
- Move the Camera around, and observe the Scene view. You should see GameObjects disappear from view when the Camera cannot see them, due to either frustum culling or occlusion culling.
- Use the Occlusion Culling popup in the Scene view to configure the visualization.
- If required, tweak the bake settings in the Bake tab of the Occlusion Culling window, and repeat the baking process.
If you are using the Built-in Render Pipeline, you can use the Overdraw_ Scene View Mode to see the amount of overdraw that is occuring, and the Stats panel in the Game view to see the number of triangles, verts, and batches that Unity is rendering.
Copyright © 2023 Unity Technologies
优美缔软件(上海)有限公司 版权所有
"Unity"、Unity 徽标及其他 Unity 商标是 Unity Technologies 或其附属机构在美国及其他地区的商标或注册商标。其他名称或品牌是其各自所有者的商标。
公安部备案号:
31010902002961