The Occlusion Culling window
Open the Occlusion Culling window by navigating to the top menu and selecting Window > Rendering > Occlusion Culling.
The Occlusion Culling window has 3 tabs: Object, Bake, and Visualization. In addition to this, when both the Occlusion Culling window and the Scene view are visible, the Occlusion Culling popup is visible in the Scene view.
Object tab
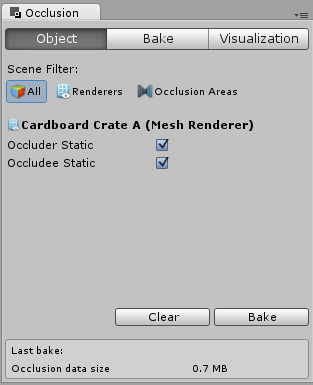
In the Object tab, you can click the All, Renderers, and Occlusion Areas buttons to filter the contents of the Hierarchy window.
When the Renderers filter is active, select a Renderer in the Hierarchy window or Scene view to view and change its occlusion culling settings in the Occlusion Culling window.
When the Occlusion Areas filter is active, you can select an Occlusion Area in the Hierarchy window or Scene view to view and change its Is View Volume setting in the Occlusion Culling window. You can also click Create New Occlusion Area to create a new Occlusion Area in the Scene.
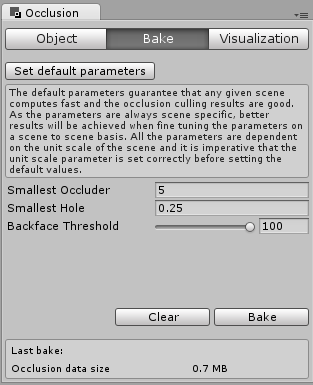
Bake tab
In the Bake tab, you can fine-tune the parameters of the Occlusion Culling bake process. Configure these settings to find a balance between bake times, data size at runtime, and visual results.
The Set Default Parameters button resets the parameters to the default values.
| Setting | Описание |
|---|---|
| Smallest Occluder | The size of the smallest GameObject that can occlude other GameObjects, in metres. In general, for the smallest file size and fastest bake times, you should choose the highest value that gives good results in your Scene. |
| Smallest Hole | The diameter of the smallest gap through which a Camera can see, in metres. In general, for the smallest file size and fastest bake times, you should choose the highest value that gives good results in your Scene. |
| Backface Threshold | If you need to reduce the size of the baked data, Unity can sample the Scene as it bakes, and exclude parts of the Scene where the visible occluder geometry consists of more than a given percentage of backfaces. An area with a high percentage of backfaces is likely to be underneath or inside geometry, and therefore not likely somewhere the Camera is at runtime. The default value of 100 never removes areas from the data. Lower values result in a smaller file size, but can lead to visual artifacts. |
For detailed tips on configuring these values, see the articles linked on the Additional resources page.
At the bottom of the Bake tab are the Bake and Clear buttons. Click the Bake button to bake occlusion culling data. Click the Clear button to remove previously baked data.
Visualization tab
When you select a Camera in the Scene view or Hierarchy window while the Visualization tab is visible, Unity updates the Scene view to show the effects of occlusion culling from the perspective of the selected Camera. You can use the Occlusion Culling popup in the Scene view to configure the visualization.
Occlusion Culling popup in the Scene view
The Occlusion Culling popup has two modes: Edit, and Visualization. You can switch between them using the drop-down menu.
Edit mode
| Setting | Описание |
|---|---|
| View Volumes | When this is enabled, the Scene view contains blue lines that show the cells in the occlusion culling data. The cell size is affected by the Smallest Occluder setting: a lower value results in more, smaller cells, which in turn results in increased precision, and a larger file size. |
Visualize mode
Visualize mode allows you to preview the results of occlusion culling from the perspective of a given Camera. If you have a Camera selected, the preview relates to that Camera. Otherwise, the preview relates to the last Camera that you selected while in Visualize mode.
| Setting | Описание |
|---|---|
| Camera Volumes | When this is enabled, you can see yellow lines that indicate the area of the Scene for which Unity has generated occlusion culling data. This is determined based on Scene geometry, and on any View Volumes that you have defined in your Scene using Occlusion Areas. When the Camera is outside of the yellow lines, Unity does not perform occlusion culling. You can also see grey lines that indicate the cell in the occlusion culling data that the Camera’s current position corresponds to, and the subdivisions within the current cell. The Smallest Hole setting defines the minimum size of the subdivisions within cells: a lower value results in more, smaller subdivisions per cells, which in turn results in increased precision, and a larger file size. |
| Visibility Lines | When this is enabled, you can see green lines that indicate what the currently selected Camera can see. |
| Portals | When this is enabled, you can see lines that represent connections between cells in the occlusion data. The currently visible portals are the ones that the currently selected Camera can see. |
Copyright © 2023 Unity Technologies
优美缔软件(上海)有限公司 版权所有
"Unity"、Unity 徽标及其他 Unity 商标是 Unity Technologies 或其附属机构在美国及其他地区的商标或注册商标。其他名称或品牌是其各自所有者的商标。
公安部备案号:
31010902002961