Update: believable visuals in URP and HDRP
This page contains supplementary information for the Making believable visuals in Unity guide. While the general concepts in that guide still apply, this page contains updated guidance on converting a similar project to the Universal Render Pipeline (URP) and the High Definition Render Pipeline (HDRP), and highlights some key differences between Unity’s render pipelines.
Note that URP and HDRP are in active development, and new features are frequently added. See the latest versions of the URP documentation and the HDRP documentation for further information.
Downloadable example projects
Here are example projects for each render pipeline. You can download these to understand how to create similar visual effects in the different render pipelines, and to explore the different settings:
- Spotlight Tunnel using the Built-In Render Pipeline
- Spotlight Tunnel using URP
- Spotlight Tunnel using HDRP

Converting your project from the Built-in Render Pipeline to URP or HDRP
Before you convert a project from the Built-in Render Pipeline, you should carefully read this page in full.
You should then perform these steps in order:
- Project preparation
- Removing incompatible plug-ins and assets
- Upgrading shaders and materials
- Upgrading post-processing
- Upgrading lighting
1. Project preparation
Make a backup of your existing project before upgrading.
It is risky to upgrade your version of Unity and change your project’s render pipeline at the same time. If you need to do both, upgrade your project to the new version of Unity first, and then switch to a new render pipeline. This allows you to fix any issues with the upgrade and ensure you have the correct package versions.
2. Removing incompatible plug-ins and assets
Plug-ins or Asset Store assets that relate to lit shaders or perform rendering modifications in the Built-in Render Pipeline are not typically compatible with URP or HDRP out of the box, unless noted by the author. Remove any incompatible plug-ins and assets from your Project.
3. Upgrading shaders and materials
Lit shaders
Materials that work with Unity’s Standard Shader (or any shaders that are lit per pixel) do not work in URP or HDRP. They either render as pink, or not render at all.
You must replace these Materials with the equivalent shaders in the render pipeline you are using. The URP replacement for the Standard Shader is UniversalRP/Lit. The HDRP replacement for the Standard Shader is HDRP/Lit.

Alternatively, you can use the Render Pipeline Wizard to perform Material conversion:
- In URP, go to Edit > Render Pipeline > Universal Render Pipeline > Upgrade Project Materials to UniversalRP Materials.
- In HDRP, go to Edit > Render Pipeline > Upgrade Project Materials to High Definition Materials.
Unlit shaders
Some unlit shaders might work in URP or HDRP, but this is not guaranteed and might not be consistent across render pipelines. For example, the Skybox Material is transferable to URP but not HDRP. To ensure forward compatibility, it is best to replace these shaders with their unlit equivalent for your new render pipeline.
Custom shaders
You must recreate custom Surface Shaders and custom lit shaders in Shader Graph for them to work properly in URP or HDRP. For information on Shader Graph, see the Shader Graph documentation.
4. Upgrading post-processing
The Built-in Render Pipeline works with the Post Processing Stack V2 package, and the now-deprecated Post Processing V1 solution. URP and HDRP contain their own integrated post-processing solutions.
To prepare to convert your post-processing solution from Post Processing Stack V1 to URP or HDRP:
- Remove the Post Processing Behaviour component from all Cameras.
To prepare to convert your post-processing solution from Post Processing Stack V2 to URP or HDRP:
- Remove the Post-process Layer component from all Cameras.
- Remove all Post-process Volume components, and delete the Profile Assets from the project.
To begin working with the integrated post-processing solution in URP or HDRP:
- Create a new Global Volume, and assign a new Volume Profile to it.
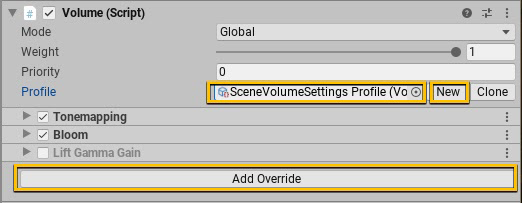
Configure the Volume Profile by adding overrides for the desired post-processing effects.
URP only: Select the Camera your application uses and make sure “Render Post Processing” is enabled. You can enable Anti-Aliasing for the in game camera without adding additional components.

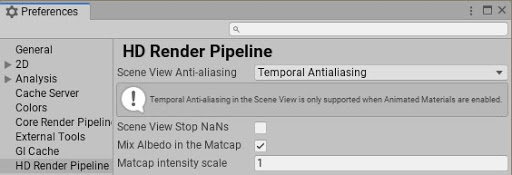
- HDRP only: You can enable different types of Anti-Aliasing in the viewport unrelated to what you use on the game camera.
Post-processing effects
Some post-processing effects are available in HDRP, but not URP. Some are in development while others are not suitable for the particular render pipeline. You should check which post-processing effects are available in the render pipeline that you are using, and determine how to recreate the visual effects in your project.
In Spotlight Tunnel, the most important post-processing effect is the Tonemapper. This effect works the same in URP and HDRP.
Key differences in post-processing between URP and HDRP that affect this update to the Spotlight Tunnel project:
- Bloom works differently in URP and HDRP, and requires different settings. For more information, see the URP documentation and the HDRP documentation.
- The Screen Space Reflections effect is not available in URP.
- Screen Space Ambient Occlusion was not avilable in URP at the time this update was created.
5. Upgrading lighting
Lighting strategy
Support for lighting features varies considerably between render pipelines. For example, the Built-in Render Pipeline supports Realtime Global Illumination, but URP and HDRP do not. The different render pipelines also support different Lighting Modes for Mixed Lights; for example, HDRP does not support Subtractive Lighting Mode, and URP does not support Shadowmask Lighting Mode. For full details of which render pipeline supports which lighting features, see Setting up the lighting pipeline.
Before you convert your project to a different render pipeline, you should choose a lighting strategy that is compatible with your desired render pipeline and works well on your target hardware. The different lighting strategies in the URP and HDRP versions of Spotlight Tunnel demonstrate this.
The URP version of Spotlight Tunnel focuses on runtime performance:

- Baked Global Illumination is enabled, with the CPU Progressive Lightmapper as a backend.
- Most Lights have their Mode set to Baked; a minimal number of Lights have their Mode set to Realtime.
- The Main Directional Light (sun) has its Mode set to Mixed to cast real-time shadows while still producing bounce lighting.
The HDRP version of Spotlight Tunnel focuses on high fidelity rendering:

- Baked Global Illumination is enabled, with the CPU Progressive Lightmapper as a backend.
- Most Lights have their Mode set to Mixed to preserve high quality specular lighting on stationary lights; Lights with their Mode set to Realtime are used wherever they are needed for consistent shadowing.
Note that, depending on your hardware configuration, the GPU Progressive Lightmapper might result in faster lightmap baking than the CPU Progressive Lightmapper.
Light types
In addition to choosing an overall lighting strategy, you should be aware of the differences in Light types between different render pipelines.
Differences between the Built-in Render Pipeline and URP:
- In the Built-in Render Pipeline, the distance fall-off for Spot and Point Lights doesn’t follow any physical laws. In URP, the distance fall-off for Spot and Point Lights follows the inverse square law. Generally speaking, Lights lose more intensity over distance in URP, and you need to amend your Scene’s lighting accordingly.
- To convert the Intensity value of Directional Lights from the Built-in Render Pipeline to URP, use the following formula: URP Directional Light Intensity = (Built-in Renderer Pipeline Directional Light Intensity)^2.2. For example, a value of 7.5 in the Built-in Render Pipeline is equivalent to a value of 84.17 in URP.
Differences between the Built-in Render Pipeline and HDRP:
- HDRP uses a physically based lighting unit and fall-off for all Light types. You must completely recreate your lighting using physically based values.
- HDRP supports additional Light types, such as Spotlight Pyramid/Box, Realtime Tube, and Realtime Rectangular lights. These can help you achieve different realistic effects.

Reflection
Each render pipeline has slight differences in how they handle reflection capturing and reflection blending, and it is likely that you will have to change the position and distribution of the Reflection Probes in your Scene.
For comparison are the reflection systems used in the different versions of Spotlight Tunnel:
- Built-in Render Pipeline: Reflection Probe (Deferred w/blending), ScreenSpace Reflection, Skybox.
- URP: Reflection Probe (Forward), Skybox.
- HDRP: Reflection Probe w/blending. ScreenSpace Reflection, Skybox. In URP:
Converting from the Built-in Render Pipeline’s Deferred reflection to URP requires some manual work, as URP’s Forward Reflection Probe doesn’t blend. Converting from Built-in Render Pipeline’s Deferred reflection to HDRP reflection is straight forward as they both have equivalent blending methods.
Converting your project between URP and HDRP
Conversion from HDRP to URP and vice versa is possible, but it is not automatic and the manual process may be difficult. How difficult the process is mainly depends on how complex your project’s shaders are; if your project mostly uses the render pipeline’s built-in shaders, the process is much easier.
Spotlight Tunnel project was successfully converted from HDRP to URP, with these caveats:
- There is no wizard to assist with Material conversion, but you can select multiple Materials and switch them to the new render pipeline shader. Most of the Materials in Spotlight Tunnel HDRP are HDRP Lit with basic Texture packing, and in most cases they translated to URP Lit without problems. Note that not all texture assignments can transfer directly, because there are many shader features that are different between URP and HDRP; double check each material to make sure texture assignments are properly set.
- Post-processing profiles and settings are different between URP and HDRP. Post-processing effects needed to be manually recreated.
- Some Light types from HDRP are not available in URP.
- The Lighting Unit in URP is different to that in HDRP. Lighting effects needed to be manually recreated.
- The Skybox Material is not compatible between URP and HDRP. We replaced the HDRP Skybox Material with one suitable for URP.
Copyright © 2023 Unity Technologies
优美缔软件(上海)有限公司 版权所有
"Unity"、Unity 徽标及其他 Unity 商标是 Unity Technologies 或其附属机构在美国及其他地区的商标或注册商标。其他名称或品牌是其各自所有者的商标。
公安部备案号:
31010902002961