Using Animation Curves
The Property List
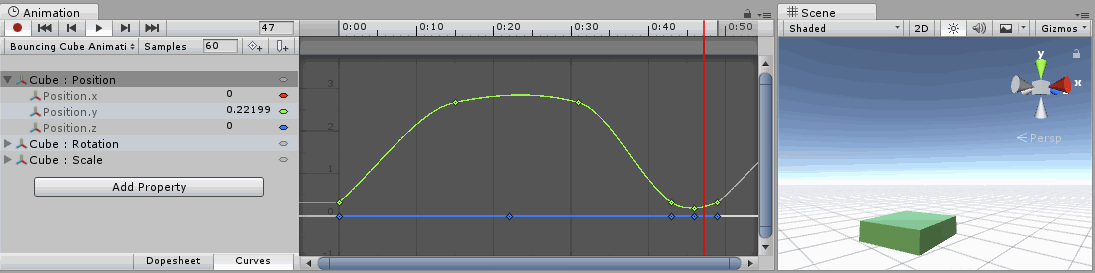
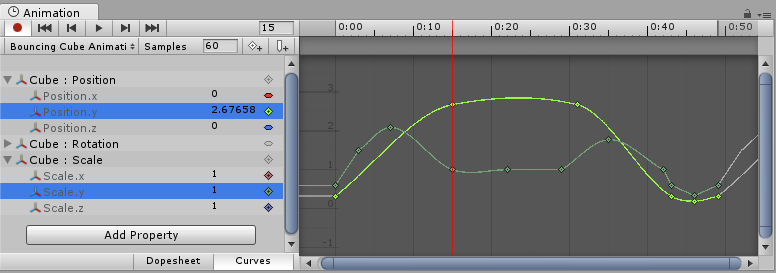
In an Animation Clip, any animatable property can have an Animation Curve, which means that the Animation Clip controls how that property changes over time. In the property list area of the Animation View (on the left), all the currently animated properties are listed. With the Animation View in Dope Sheet mode, the animated values for each property appear only as linear tracks, however in Curves mode you are able to see the the changing values of properties visualised as lines on graph. Whichever mode you use to view, the curves still exist - the Dope Sheet mode just gives you a simplified view of the data showing only when the keyframes occur.
In Curves mode, the Animation Curves have colored curve indicators, each colour representing the values for one of the currently selected properties in the property list. For information on how to add curves to an animation property, see the section on Using the Animation View.
Understanding Curves, Keys and Keyframes
An Animation Curve has multiple keys which are control points that the curve passes through. These are visualized in the Curve Editor as small diamond shapes on the curves. A frame in which one or more of the shown curves have a key is called a keyframe.
If a property has a key in the currently previewed frame, the curve indicator will have a diamond shape, and the property list will also have diamond shapes next to the value.
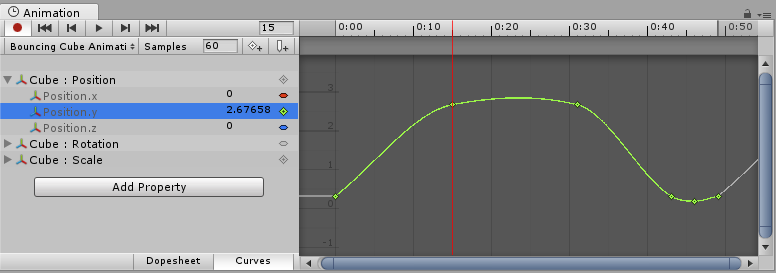
The Curve Editor will only show curves for the properties that are selected. If multiple properties are selected in the property list, the curves will be shown overlaid together.
Adding and Moving Keyframes
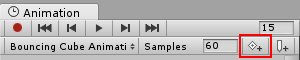
You can add a keyframe at the currently previewed frame by clicking the Keyframe button.
A keyframe can be added at the currently previewed frame by clicking the Keyframe button. This will add a keyframe to all currently selected curves. Alternatively you can add a keyframe to a single curve at any given frame by double-clicking the curve where the new keyframe should be. It is also possible to add a keyframe by right-clicking the Keyframe Line and select Add Keyframe from the context menu. Once placed, keyframes can be dragged around with the mouse. It is also possible to select multiple keyframes to drag at once. Keyframes can be deleted by selecting them and pressing Delete, or by right-clicking on them and selecting Delete Keyframe from the context menu.
Supported Animatable Properties
Окно Animation можно использовать не только для анимирования позиции, вращения и масштаба Game Object’а. Анимировать можно свойства любых компонентов и материалов - даже публичные переменные ваших собственных скриптов. Создание анимаций со сложными визуальными эффектами - всего лишь вопрос добавления анимационных кривых для соответствующих свойств.
Анимационная система поддерживает свойства следующих типов:
- Float
- Color
- Vector2
- Vector3
- Vector4
- Quaternion
- Boolean
Arrays are not supported and neither are structs or objects other than the ones listed above.
For boolean properties, a value of 0 equals False while any other value equals True.
Вот несколько примеров из тех многих вещей, которые могут быть сделаны с помощью окна Animation:
- Анимировать Color и Intensity источника освещения (Light), чтобы заставить его мигать, мерцать или пульсировать.
- Анимировать Pitch и Volume зацикленного источника звука (Audio Source), чтобы произвести звук дующего ветра, работающих двигателей, или текущей воды, при этом не увеличивая размер и количество ассетов.
- Анимировать Texture Offset материала (Material) для симуляции движущихся ремней или дорожек, текущей воды или других специальных эффектов.
- Анимировать состояние Emit и скорости (Velocities) нескольких эллиптических излучателей частиц (Ellipsoid Particle Emitters) для создания захватывающих видов салютов или фонтанов.
- Анимировать переменные в ваших собственных скриптовых компонентах, чтобы со временем изменять разные вещи.
При использовании анимационных кривых (Animation Curves) для контролирования игровой логики, пожалуйста, прочтите о том, каким способом в Unity проигрываются и сэмплируются анимации.
Rotation Interpolation Types
В недрах Unity вращения представлены в виде кватернионов (Quaternions). Кватернионы состоят из значений .x, .y, .z, и .w. В большинстве случаев не стоит трогать эти значения вручную, только если вы не уверены в том, что делаете. Вместо модификации этих значений, вращения обычно меняют с помощью углов Эйлера (Euler Angles), которые имеют значения .x, .y, и .z, представляющие вращения вокруг соответствующих осей.
Интерполяция (interpolation) между двумя вращениями может быть выполнена либо между Quaternion значениями, либо между значениями Euler Angles. Окно Animation позволяет выбрать какую форму интерполяции использовать при анимировании вращений Transform’а. Однако, вращения всегда отображаются в виде Euler Angles значений, независимо от используемой формы интерполяции.
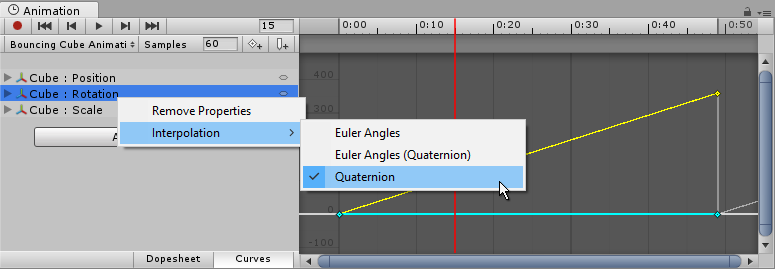
Quaternion интерполяция
Quaternion interpolation always generates smooth changes in rotation along the shortest path between two rotations. This avoids rotation interpolation artifacts such as Gimbal Lock. However, Quaternion interpolation cannot represent rotations larger than 180 degrees, due to its behaviour of always finding the shortest path. (You can picture this by picking two points on the surface of a sphere - the shortest line between them will never be more than half-way around the sphere).
If you use Quaternion interpolation and set the numerical rotation values further than 180 degrees apart, the curve drawn in the animation window will still appear to cover more than a 180 degree range, however the actual rotation of the object will take the shortest path.
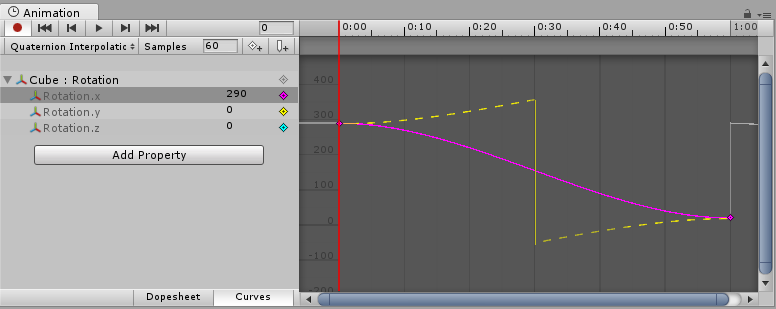
When using Quaternion interpolation for rotation, changing the keys or tangents of either the x, y or z curve may also change the values of the other two curves, since all three curves are created from the internal Quaternion representation. When using Quaternion interpolation, keys are always linked, so that creating a key at a specific time for one of the three curves (x, y or z) will also create a key at that time for the other two curves.
Euler Angles интерполяция
Большинство людей привыкли работать именно с Euler Angles интерполяцией. Euler Angles может представлять произвольно большие вращения и кривые значений .x, .y и .z независимы друг от друга. Euler Angles интерполяция может быть причиной таких артефактов, как шарнирный замок (Gimbal Lock) при вращении вокруг нескольких осей одновременно, но она интуитивна при простых вращениях вокруг одной из осей. Когда используется Euler Angles интерполяция, Unity внутри себя запекает кривые во внутреннее Quaternion представление. Это аналогично тому, что происходит при импортировании анимации в Unity из внешних программ. Учтите, что такое запекание кривых может добавить дополнительные ключи в процессе и касательные типа Constant могут быть не полностью точны на sub-frame уровне.
Copyright © 2023 Unity Technologies
优美缔软件(上海)有限公司 版权所有
"Unity"、Unity 徽标及其他 Unity 商标是 Unity Technologies 或其附属机构在美国及其他地区的商标或注册商标。其他名称或品牌是其各自所有者的商标。
公安部备案号:
31010902002961