Graphics Command Buffers
It is possible to extend Unity’s rendering pipeline with so called “command buffers”.
A command buffer holds list of renderingThe process of drawing graphics to the screen (or to a render texture). By default, the main camera in Unity renders its view to the screen. More info
See in Glossary commands (“set render target, draw mesh, …”), and can be
set to execute at various points during cameraA component which creates an image of a particular viewpoint in your scene. The output is either drawn to the screen or captured as a texture. More info
See in Glossary rendering.
For example, you could render some additional objects into deferred shadingA rendering path that places no limit on the number of lights that can affect a GameObject. All lights are evaluated per-pixel, which means that they all interact correctly with normal maps and so on. Additionally, all lights can have cookies and shadows. More info
See in Glossary
G-buffer after all regular objects are done.
A high-level overview of how cameras render sceneA Scene contains the environments and menus of your game. Think of each unique Scene file as a unique level. In each Scene, you place your environments, obstacles, and decorations, essentially designing and building your game in pieces. More info
See in Glossary in Unity is shown below. At each point
marked with a green dot, you can add command buffers to execute your commands.
See CommandBuffer scripting class and CameraEvent enum for more details.
Command buffers can also be used as a replacement for, or in conjunction with image effects.
Example Code
Sample project demonstrating some of the techniques possible with command buffers: RenderingCommandBuffers.zip.
Blurry Refractions
This scene shows a “blurry refraction” technique.

After opaque objects and skyboxA special type of Material used to represent skies. Usually six-sided. More info
See in Glossary is rendered, current image is copied into a temporary
render target, blurred and set up a global shader property. ShaderA small script that contains the mathematical calculations and algorithms for calculating the Color of each pixel rendered, based on the lighting input and the Material configuration. More info
See in Glossary on the glass
object then samples that blurred image, with UV coordinates offset based on a normal map
to simulate refraction.
This is similar to what shader GrabPass does does, except you can do more custom things (in this case, blurring).
Custom Area Lights in Deferred Shading
This scene shows an implementation of “custom deferred lights”: sphere-shaped lights, and tube-shaped lights.

After regular deferred shading light pass is done, a sphere is drawn for each custom light, with a shader that computes illumination and adds it to the lighting buffer.
Decals in Deferred Shading
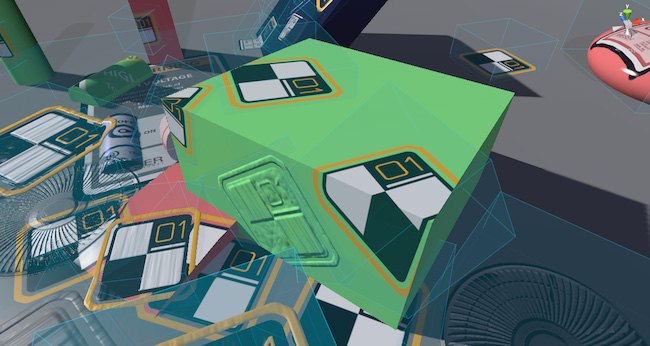
This scene shows a basic implementation of “deferred decals”.

The idea is: after G-buffer is done, draw each “shape” of the decal (a box) and modify the G-buffer contents. This is very similar to how lights are done in deferred shading, except instead of accumulating the lighting we modify the G-buffer textures.

Each decal is implemented as a box here, and affects any geometry inside the box volume.