Bind with UXML and C# script
Version: 2021.3+
This example demonstrates how to create a binding and set the binding path with UXML, and call the Bind() method with a C# script.
Example overview
This example creates a custom Editor window with a TextField that binds to the name property of any GameObjectThe fundamental object in Unity scenes, which can represent characters, props, scenery, cameras, waypoints, and more. A GameObject’s functionality is defined by the Components attached to it. More info
See in Glossary in a sceneA Scene contains the environments and menus of your game. Think of each unique Scene file as a unique level. In each Scene, you place your environments, obstacles, and decorations, essentially designing and building your game in pieces. More info
See in Glossary.
You can find the completed files that this example creates in this GitHub repository.
Prerequisites
This guide is for developers familiar with the Unity Editor, UI(User Interface) Allows a user to interact with your application. Unity currently supports three UI systems. More info
See in Glossary Toolkit, and C# scripting. Before you start, get familiar with the following:
- Visual TreeAn object graph, made of lightweight nodes, that holds all the elements in a window or panel. It defines every UI you build with the UI Toolkit.
See in Glossary - UXML
bindingPathBind()
Define the binding path in UXML
Define the visual elementsA node of a visual tree that instantiates or derives from the C# VisualElement class. You can style the look, define the behaviour, and display it on screen as part of the UI. More info
See in Glossary and the binding path in UXML.
Create a project in Unity with any template.
In your Project windowA window that shows the contents of your
Assetsfolder (Project tab) More info
See in Glossary, create a folder namedbind-with-uxml-csharpfolder to store all your files.-
Create a UI Document named
binding_example.uxmland replace its content with the following:<UXML xmlns:ui="UnityEngine.UIElements"> <ui:VisualElement name="top-element"> <ui:Label name="top-label" text="UXML-Defined Simple Binding"/> <ui:TextField name="GameObjectName" label="Name" text="" binding-path="m_Name"/> </ui:VisualElement> </UXML>
Create the binding in C#
Create the binding in a C# script and make an explicit call to the Bind() method.
Create a folder named
Editor.In the Editor folder, create a C# script file named
SimpleBindingExampleUXML.cs.-
Replace the contents of
SimpleBindingExampleUXML.cswith the following:using UnityEditor; using UnityEngine; using UnityEditor.UIElements; using UnityEngine.UIElements; namespace UIToolkitExamples { public class SimpleBindingExampleUXML : EditorWindow { [SerializeField] VisualTreeAsset visualTree; [MenuItem("Window/UIToolkitExamples/Simple Binding Example UXML")] public static void ShowDefaultWindow() { var wnd = GetWindow<SimpleBindingExampleUXML>(); wnd.titleContent = new GUIContent("Simple Binding UXML"); } public void CreateGUI() { visualTree.CloneTree(rootVisualElement); OnSelectionChange(); } public void OnSelectionChange() { GameObject selectedObject = Selection.activeObject as GameObject; if (selectedObject != null) { // Create the SerializedObject from the current selection SerializedObject so = new SerializedObject(selectedObject); // Bind it to the root of the hierarchy. It will find the right object to bind to. rootVisualElement.Bind(so); } else { // Unbind the object from the actual visual element rootVisualElement.Unbind(); // Clear the TextField after the binding is removed var textField = rootVisualElement.Q<TextField>("GameObjectName"); if (textField != null) { textField.value = string.Empty; } } } } } In the Project window, select
SimpleBindingExampleUXML.csand dragbinding_example.uxmlto the Visual Tree field in the InspectorA Unity window that displays information about the currently selected GameObject, asset or project settings, allowing you to inspect and edit the values. More info
See in Glossary.
Test the binding
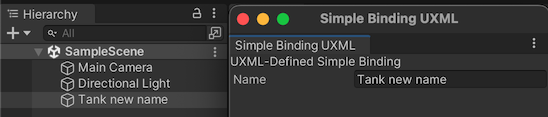
- In Unity, select Window > UIToolkitExamples > Simple Binding Example UXML. A custom Editor window appears with a text field.
- Select any GameObject in your scene. The name of the GameObject appears in your Editor window’s text field.
- If you change the name of the GameObject in the text field, the name of the GameObject changes.
Additional resources
Copyright © 2023 Unity Technologies
优美缔软件(上海)有限公司 版权所有
"Unity"、Unity 徽标及其他 Unity 商标是 Unity Technologies 或其附属机构在美国及其他地区的商标或注册商标。其他名称或品牌是其各自所有者的商标。
公安部备案号:
31010902002961