Blending clips
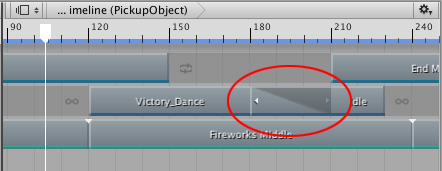
Blend two clips on the same track to create a smooth transition between two Animation clips, two Audio clips, or two Playable clips. To blend two clips, select the Mix Clip Edit mode and position or trim one clip until it overlaps an adjacent clip.
In a blend, the first clip is referred to as the outgoing clip and the second clip is referred to as the incoming clip. The area where the outgoing clip transitions to the incoming clip is referred to as the blend area. The blend area sets the duration of the transition.
Although the Clips view represents a blend area as a single linear curve, the transition between clips is actually comprised of two blend curves. The blend curve for the outgoing clip is referred to as the Blend Out curve. The blend curve for the incoming clip is referred to as the Blend In curve. By default, each blend curve is automatically set to an ease-in and ease-out curve.
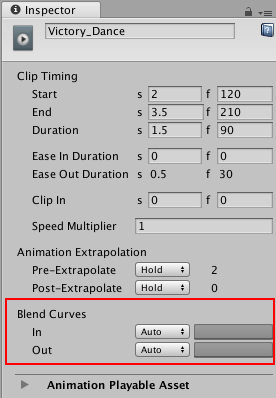
Use the Blend Curves in the Inspector window to change the shape for either the Blend In or Blend Out curve of the selected clip. However, the Inspector window only allows you to edit the properties of one clip at a time. You cannot simultaneously customize both blend curves from the same blend area.
To customize the Blend Curves for the transition between two clips:
Select the outgoing clip to customize its Blend Out curve (labelled Out).
Select the incoming clip to customize its Blend In curve (labelled In).
To customize either the Blend Out curve or Blend In curve, use the drop-down menu to switch from Auto to Manual. With Manual selected, the Inspector window shows a preview of the blend curve. Click the curve preview to open the Curve Editor below the Inspector window.
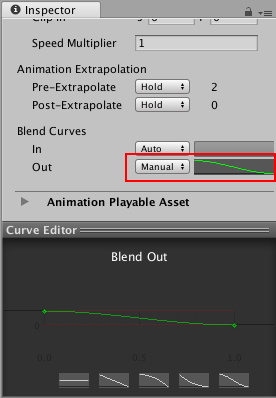
使用曲线编辑器 (Curve Editor) 可自定义混合曲线的形状。默认情况下,混合曲线包括曲线开头的关键点和曲线末尾的关键点。曲线编辑器 (Curve Editor) 提供了以下修改混合曲线的不同方法:
Select the key at the start or end of the blend curve and use the tangent handles to adjust the interpolation between keys.
添加其他关键点以通过添加更多插值点来更改混合曲线的形状。在曲线编辑器 (Curve Editor) 中添加关键点的方法与在曲线视图中添加关键点的方法相同。
Right-click a key to delete or edit the key. Editing keys in the Curve Editor is the same as editing keys in the Curves view. Note that you cannot delete the first and last keys.
从曲线编辑器 (Curve Editor) 的底部选择一个形状模板。
曲线编辑器 (Curve Editor) 还将根据要修改混入曲线还是混出曲线而包括相应的形状模板。选择形状模板,将混合曲线更改为选定的形状模板。
- 2019–08–20 页面已发布并只进行了有限的编辑审查
Copyright © 2023 Unity Technologies
优美缔软件(上海)有限公司 版权所有
"Unity"、Unity 徽标及其他 Unity 商标是 Unity Technologies 或其附属机构在美国及其他地区的商标或注册商标。其他名称或品牌是其各自所有者的商标。
公安部备案号:
31010902002961