渐进 GPU 光照贴图 (Progressive GPU Lightmapper)(预览)
注意:这是一个预览功能,将来可能会更改。如果有使用此功能的场景,可能需要在以后的发行版中更新这些场景。在该功能尚未正式发布之前,请勿在大规模生产环境中依赖此功能。
The GPU Lightmapper gives you an interactive workflow when you’re setting up and tweaking the lighting in your Scene. Because this lightmapper uses the GPU in your computer to generate baked lightmaps and Light probes, it’s a faster alternative to the CPU Progressive Lightmapper.
设置
To use the Progressive GPU (Preview) Lightmapper, go to Window > Rendering > Lighting Settings, navigate to Lightmapping Settings, and set Lightmapper to Progressive GPU (Preview). See Lightmapping Settings for more information about this window.
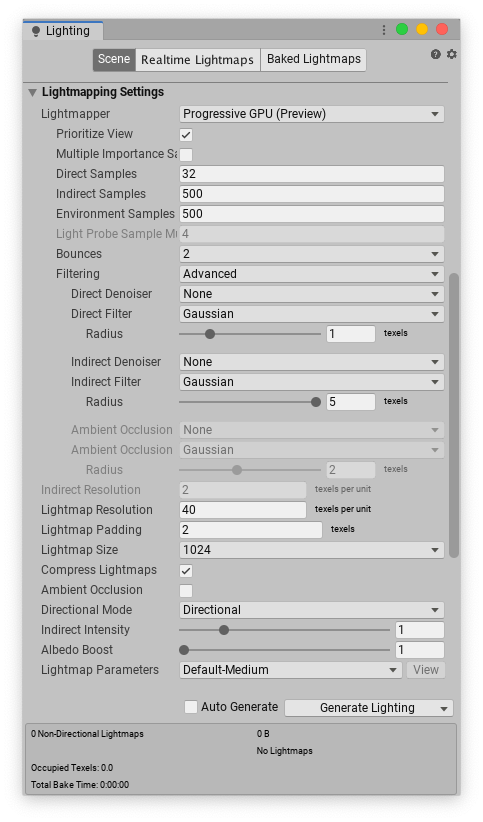
| Setting | Description | |
|---|---|---|
| Lightmapper | Use this to specify which internal lighting calculation software to use to calculate lightmaps in the Scene. The options are: Progressive CPU Progressive GPU Enlighten (deprecated) The default value is Progressive CPU. |
|
| Prioritize View | Enable this to make the Progressive Lightmapper apply changes to the texels that are currently visible in the Scene View, then apply changes to the out-of-view texels. | |
| Multiple Importance Sampling | Enable this to use multiple importance sampling for sampling the environment. This generally leads to faster convergence when generating lightmaps, but can lead to noisier results in certain low frequency environments. This is disabled by default. | |
| Direct Samples | The number of samples (paths) shot from each texel. This setting controls the number of samples Progressive Lightmapper uses for direct lighting calculations. Increasing this value can improve the quality of lightmaps, but increases the baking time. | |
| Indirect Samples | The number of samples (paths) shot from each texel. This setting controls the number of samples Progressive Lightmapper uses for indirect lighting calculations. For some Scenes, especially outdoor Scenes, 100 samples should be enough. For indoor Scenes with emissive geometry, increase the value until you see the result you want. | |
| Environment Samples | Define the number of samples the lightmapper uses for environment lighting calculations. Higher values can improve the quality of the lightmaps, but increase the time required for baking to complete. This is set to 500 by default. | |
| Light Probe Sample Multiplier | Controls how many samples are used for Light Probes as a multiplier of the sample values above. Higher values improve the quality of Light Probes, but they will take longer to bake. To enable this feature, go to Project Settings > Editor and disable Use legacy Light Probe sample counts. The default value is 4. | |
| Bounces | Use this value to specify the number of indirect bounces to do when tracing paths. For most Scenes, two bounces is enough. For some indoor Scenes, more bounces might be necessary. | |
| Filtering | Configure the way the Progressive Lightmapper applies post-processing to lightmaps to limit noise. For lightmap post-processing, the lightmap is split into Direct, Indirect and Ambient Occlusion targets that Unity applies post-processing to individually, before it composites them together into a single lightmap. - Direct: Any light that arrives directly from a Light to a sensor (usually the Camera). - Indirect: Any light that arrives indirectly from a Light to a sensor. This most commonly applies to light that reflects off other GameObjects. - Ambient Occlusion: Any ambient light that the lighting system calculates. See Ambient Occlusion for more information. |
|
| None | Select this to use no filter or denoising for the lightmap. | |
| Auto | Select this to use a platform-dependent preset for post-processing the lightmap. If your development machine fulfils the requirements to run OptiX (the NVIDIA OptiX AI-Accelerated Denoiser), the Progressive Lightmapper uses the denoiser with a Gaussian filter that has a 1-texel radius for all targets. If your development machine cannot run OptiX, the Progressive Lightmapper uses a Gaussian filter that has a 1-texel radius for Direct, 5-texel radius for Indirect, and 2-texel radius for Ambient Occlusion. |
|
| Advanced | Select Advanced to manually configure options for each type of lightmap target. The targets types are Direct, Indirect and Ambient Occlusion. For more information, see Advanced Filtering settings, below. | |
| Indirect Resolution | Use this to specify the number of samples the lightmapper uses for indirect lighting calculations. Higher values can improve the quality of the lightmaps, but increase the time it takes to bake them. | |
| Lightmap Resolution | Use this to specify the number of texels per unit to use for lightmaps. Increasing this value improves lightmap quality, but also increases bake times. Note that doubling this value causes the number of texels to quadruple (because the value refers to both the height and width of the lightmap). See the Occupied texels count in the statistics area at the bottom of the Lighting window. | |
| Lightmap Padding | Use this to specify the separation (in texel units) between separate shapes in the baked lightmap. The default value is 2. | |
| Lightmap Size | The size (in pixels) of the full lightmap texture, which incorporates separate regions for the individual GameObject textures. The default value is 1024. | |
| Compress Lightmaps | A compressed lightmap requires less storage space, but the compression process can introduce unwanted visual effects into the texture. Tick this checkbox to compress lightmaps, or untick it to keep them uncompressed. The checkbox is ticked by default. | |
| Ambient Occlusion | Tick this checkbox to open a group of settings which allow you to control the relative brightness of surfaces in ambient occlusion. Higher values indicate a greater contrast between the occluded and fully lit areas. This only applies to the indirect lighting calculated by the GI system. This setting is enabled by default. | |
| Max Distance | Set a value to control how far the lighting system casts rays in order to determine whether or not to apply occlusion to an object. A larger value produces longer rays and contributes more shadows to the lightmap, while a smaller value produces shorter rays that contribute shadows only when objects are very close to one another. A value of 0 casts an infinitely long ray that has no maximum distance. The default value is 1. | |
| Indirect Contribution | Use the slider to scale the brightness of indirect light as seen in the final lightmap (that is, ambient light, or light bounced and emitted from objects) from a value between 0 and 10. The default value is 1. Values less than 1 reduce the intensity, while values greater than 1 increase it. | |
| Direct Contribution | Use the slider to scale the brightness of direct light from a value between 0 and 10. The default value is 0. The higher this value is, the greater the contrast applied to the direct lighting. | |
| Directional Mode | You can set the lightmap up to store information about the dominant incoming light at each point on the objects’ surfaces. See documentation on Directional Lightmapping for further details. The default mode is Directional. | |
| Directional | In Directional mode, Unity generates a second lightmap to store the dominant direction of incoming light. This allows diffuse normal mapped materials to work with the GI. Directional mode requires about twice as much storage space for the additional lightmap data. Directional lightmaps cannot be decoded on SM2.0 hardware or when using GLES2.0. They fall back to Non-Directional lightmaps. | |
| Non-directional | Non-directional mode disables Unity’s ability to generate a second lightmap to store the dominant direction of incoming light. | |
| Indirect Intensity | Use this slider to control the brightness of indirect light stored in realtime and baked lightmaps, from a value between 0 and 5. A value above 1 increases the intensity of indirect light while a value of less that 1 reduces indirect light intensity. The default value is 1. | |
| Albedo Boost | Use this slider to control the amount of light Unity bounces between surfaces, from a value between 1 and 10. To do this, Unity intensifies the albedo of materials in the Scene. Increasing this draws the albedo value towards white for indirect light computation. The default value of 1 is physically accurate. | |
| Lightmap Parameters | Unity uses a set of general parameters for the lightmapping in addition to properties of the Lighting window. A few defaults are available from the menu for this property but you can also create your own lightmap parameter file using the Create New option. See the Lightmap Parameters page for further details. The default value is Default-Medium. | |
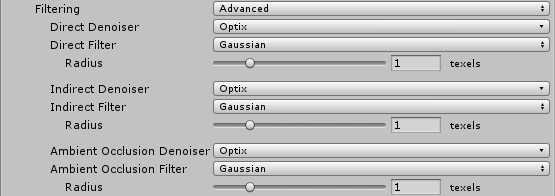
高级过滤设置
| 设置 | 描述 | |
|---|---|---|
| Advanced | Set Filtering to Advanced to manually configure options for each type of lightmap target. The target types are: - Direct: Any light that arrives directly from a Light to a sensor (usually the Camera). - Indirect: Any light that arrives indirectly from a Light to a sensor. This most commonly applies to light that reflects off other GameObjects. - Ambient Occlusion: Any ambient light that the lighting system calculates. See Ambient Occlusion for more information. |
|
| Denoiser | 选择用于光照贴图目标的降噪器。选项为: Optix:NVIDIA Optix 降噪器是一种 AI 加速降噪器,可减少烘焙光照贴图中的噪点。它需要一个 NVIDIA GPU(包含 4GB 以上的 VRAM 和版本 390 以上的驱动程序),并且仅在 Windows 平台上受支持。 RadeonPro:RadeonPro 降噪器是一种 AI 加速降噪器,可减少烘焙光照贴图中的噪点。它需要一个支持 OpenCL 的 GPU(包含 4GB 以上的 VRAM)。 - OpenImageDenoise:Intel Open Image 降噪器是一种 AI 加速降噪器,可减少烘焙光照贴图中的噪点。 - None:不使用降噪器。 |
|
| Filter | 选择要用于光照贴图目标的过滤器: - Gaussian:选择此选项可将 Gaussian 过滤器用于光照贴图目标。Gaussian 过滤器将双向 Gaussian 过滤器应用于光照贴图。这会使光照贴图模糊并减少可见噪点。 - A-Trous:选择此选项可将 A-Trous 过滤器用于光照贴图目标。A-Trous 过滤器可以将模糊程度降至最低,同时可以消除光照贴图中的可见噪点。 - None:选择此选项可禁用对光照贴图目标的所有过滤。 |
|
| Radius | 仅当 Filter 设置为 Gaussian 时,此选项才可用。使用 Radius 值可设置 Gaussian 过滤器内核的半径(以纹素为单位)。较高的 Radius 值可以提高模糊强度并减少可察觉的噪点,但可能导致光照中的细节丢失。 | |
| Sigma | 仅当 Filter 设置为 A-Trous 时,此选项才可用。使用 Sigma 值可调整保留细节或使光照模糊的程度。较高的 Sigma 值可以提高模糊强度并减少可察觉的噪点,但可能导致光照中的细节丢失。 | |
硬件和软件要求
要使用渐进 GPU 光照贴图,计算机必须具有:
- 至少一个支持 OpenCL 1.2 的 GPU
- 至少 2GB 的专用 GPU 内存
- 一个支持 SSE4.1 指令的 CPU
如果您的计算机具有多个 GPU,则 Unity 选择 Editor 使用的 GPU。您还可以选择一个 GPU 进行渲染,并选择其他 GPU 进行光照烘焙。有关如何更改此设置的信息,请参阅本页中的配置要使用的 GPU 部分。
注意:如果烘焙过程使用的 GPU 内存超过可用的 GPU 内存,该过程可回退到 CPU 光照贴图。一些具有虚拟内存支持的图形驱动程序将切换为 CPU 内存,这会使烘焙过程变慢。
配置要使用的 GPU
您可以选择一个 GPU 来渲染场景,并选择另一个 GPU 进行光照烘焙。如果自动的 GPU 分配不符合您的需要,您可以指定用于烘焙的显卡。
要查看 Unity 当前用于烘焙的 GPU,请在 Editor 中执行以下操作:
- 在项目中,打开 Lighting 窗口(菜单:__Window > Rendering > Lighting Settings__)。在 Bake Performance 旁边,可以看到 GPU。
要查看计算机中可用的 GPU,请执行以下操作:
1.在 Lighting Settings 窗口中选择 Progressive GPU (Preview) 光照贴图。 1.在场景中生成光照。 1.打开文件资源管理器,然后导航到以下路径:_C:\Users\USER\AppData\Local\Unity\Editor。打开名为 Editor.log_ 的文件。 1.在该文件中,搜索 Listing OpenCL platforms 行。此时应该跳转到日志的一部分,其中包含有关 OpenCL 设备的信息。在此处,可以看到可用的 GPU 及其相应的平台和设备索引。
要选择特定的 GPU 进行烘焙,请在命令行中输入以下命令(用相应的数字替换 platform 和 device index):
Unity.exe "-OpenCL-PlatformAndDeviceIndices" <platform> <device index>
在处理场景时,您选择的分配应取决于您的需求。如果将最强 GPU 分配给任一活动,则可能会对其他活动的性能造成影响。如果遇到问题,请尝试重新分配 GPU。
Progressive GPU limitations
渐进 GPU 光照贴图 (Progressive GPU Lightmapper) 不支持:
- Baked LOD
- A-Trous filtering (it only uses Gaussian filtering)
- 自定义烘焙 API(实验性)
Copyright © 2023 Unity Technologies
优美缔软件(上海)有限公司 版权所有
"Unity"、Unity 徽标及其他 Unity 商标是 Unity Technologies 或其附属机构在美国及其他地区的商标或注册商标。其他名称或品牌是其各自所有者的商标。
公安部备案号:
31010902002961