- Unity User Manual 2021.3 (LTS)
- 在 Unity 中操作
- Create Gameplay
- 游戏对象
- Use components
Use components
You can use different components to change or add functions to your GameObjects. You can use the Inspector window to change the properties of any component, or you can use scripts.
For more information on how to use your components with scripts, see the components script reference page.
Add components
You can add components to the selected GameObject through the Component menu. To add a Rigidbody component, select the GameObject and select Component > Physics > Rigidbody from the menu. The Inspector displays the Rigidbody’s properties. If you press Play while you have the empty GameObject selected, the Y position of the GameObject’s transform decreases. This is because the physics system in Unity causes the GameObject to fall under gravity.

You can also add components in the Component browser. To open the Component browser, select Add Component in the Inspector.

You can navigate the components by category in the browser or use the search box to locate components by name.
You can attach any number or combination of components to a single GameObject. Some components work best in combination with others. For example, the Rigidbody works with a Collider.
For more information about a particular component, see the relevant Component reference page. You can also access the reference page for a component from Unity if you select the help icon (?) on the component’s header in the Inspector.
Edit components
When you attach a component to a GameObject, the component’s properties contain default values. You can edit these values in the Editor while you build a game, or in scripts when you run the game.
There are two main types of properties: values and references.
You can edit value properties in the Inspector. There are various types of values, including text, toggles and dropdowns.
For reference properties, you can drag a file from the Project view into the property, or use the object picker (circle icon) on the property. Reference properties can reference other types of components, GameObjects, or assets.
For more information about the different property types, see Editing Properties.
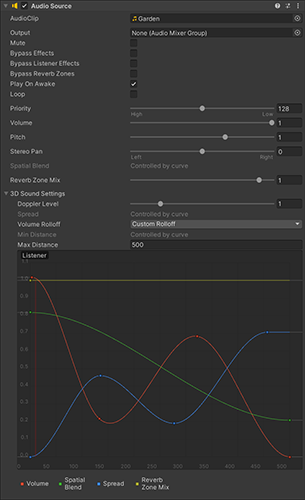
The image below shows a GameObject with an Audio Source component. The values of the Audio Source in the Inspector show how you can adjust aspects of a component to suit your project.

Component context menu commands
Right click on a component for the context menu with several useful commands.
The same commands are also available from the kebab menu (⋮) in the top-right of the component panel in the Inspector window.
The table below describes the commands available so you can adjust your components:
| Command: | 描述: |
|---|---|
| Reset | Restores the values the component’s properties had before the most recent editing session. |
| Remove Component | Removes the component from the GameObject. Note: Some combinations of components depend on each other (Hinge Joint only works when attached to a Rigidbody); a warning message is displayed if you try to remove components that others depend on. |
| Move Up | Moves the component up in the Inspector. You can also drag and drop components in the Inspector to reorder them. |
| Move Down | Moves the component down in the Inspector. |
| Copy Component | Copies the type and current property settings of a component. |
| Paste Component As New | Pastes the copied property settings of a component as a new component. |
| Paste Component Values | Pastes the copied property settings of a component into another component of the same type. |
Testing properties
In Play Mode, you can change properties of a component in the Inspector. This lets you see how different values for a property affect gameplay. For example, you can experiment with different heights of jumping. If you create a Jump Height property in a script, you can enter Play Mode, change the value, and press the jump button to see what happens. Then, without exiting Play Mode, you can change it again and see the results within seconds. When you exit Play Mode, the properties revert to their pre-Play Mode values. With this workflow, you can experiment, adjust, and refine your gameplay in less time.