- Unity User Manual 2022.1
- Create user interfaces (UI)
- UI 工具包
- UI Builder
- Styling UI
- Set background images
Set background images
UI Builder doesn’t have a dedicated “image” element. To create an image, do the following:
- Import background image into your project.
- Create a regular visual element in UI Builder.
- Set the element’s background image to the imported image.
When you set the background image, you must select a supported background image types:
- Textures
- Sprites
- Render textures
- SVG Vector images
Note: To use a SVG image as a background for a visual element, you must install a package. To do so, in the Package Manager window, install the package com.unity.vectorgraphics from git URL.
Image import settings
After you have imported an image to your project, for the most intuitive results, Unity recommends you to apply certain import settings for Textures, Sprites, and Vector images before you use them as a background for a visual element in the UI Builder.
Texture
The recommended import settings for a Texture image that you use as a background for a visual element:
| 属性: | 值: | |
|---|---|---|
| Texture Type | Default | |
| Non-Power of 2 | 无 | |
| Compression | 无 | |
| Alpha Is Transparency | true | |
| Texture Type | Editor GUI and Legacy GUI | |
| Non-Power of 2 | 无 | |
| Compression | 无 | |
| Alpha Is Transparency | true | |
| Texture Type | Sprite (2D and UI) | |
| Compression | 无 | |
| Alpha Is Transparency | true | |
| Sprite Mode | Single | |
| Mesh Type | Tight | |
Sprites
The recommended import settings for a Sprite image that you use as a background for a visual element:
| 属性: | 值: | |
|---|---|---|
| Texture Type | Sprite (2D and UI) | |
| Compression | 无 | |
| Alpha Is Transparency | true | |
| Sprite Mode | Multiple if file contains multiple sprites, Single otherwise | |
| Mesh Type | Tight | |
Vector images
The recommended import settings for a SVG Vector image that you use as a background for a visual element:
| 属性: | 值: |
|---|---|
| Generated Asset Type | UI Toolkit Vector Image |
| Tessellation Settings | Basic |
| Target Resolution | Lowest value that produces satisfactory results |
Tip:
- You can apply default presets to Assets by folder to automatically set your desired import settings.
- All image types are subject to dynamic atlasing if they’re not already in an atlas. (An image is in an atlas if imported as a Sprite with Sprite Mode set to Multiple, or if you have manually added it to a Sprite Atlas asset.) You can configure dynamic atlasing in a Panel Settings asset.
9-Slice images with UI Toolkit
Generally, you can only 9-slice a regular 2D Sprite. With UI Toolkit however, you can also 9-slice Texture, Render Texture, and SVG Vector images.
To 9-slice an image:
- For a Sprite image, use Sprite Editor or USS.
- For other types of images, use USS.
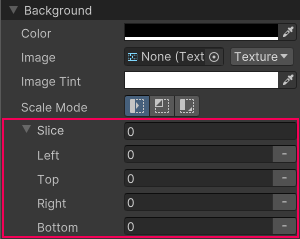
To 9-slice a selected image using USS:
- Open UI Builder .
- In the Background section in the Inspector, specify the Left, Right, Top, and Bottom slice values.

You can also specify the slice values directly in USS, UXML, or C# files for the following properties:
-unity-slice-left-unity-slice-right-unity-slice-top-unity-slice-bottom
Important:
- Slice values set using USS apply only to the image in the associated visual element. The values don’t apply to the same image used in other visual elements, in other UI documents, or in a scene.
- Unset slice value is zero. For example, if you set the Top,Bottom, and Right slice attributes but leave the Left slice empty, the Left slice is zero.
- Slice values set in USS override slice values set in the Sprite Editor. For the example above, no matter what value you added to the Left slice in the Sprite Editor, the Left slice value is zero.