视觉树
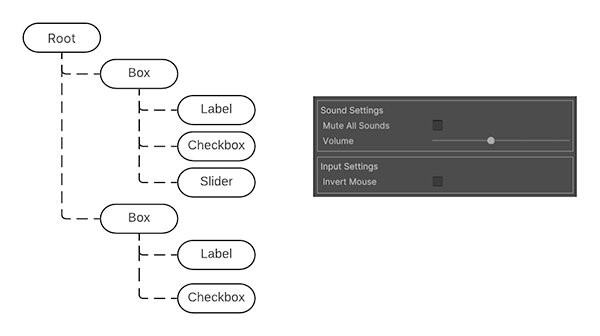
UI 工具包中最基本的构建块是视觉元素。视觉元素被组织为具有父子关系的层级结构树。下图显示了层级结构树的简化示例,以及 UI 工具包中的渲染结果。

视觉元素
The VisualElement class is the base for all nodes in the visual tree. The VisualElement base class contains properties such as styles, layout data, and event handlers. Visual elements can have children and descendant visual elements. For example, in the diagram above, the first Box visual element has three child visual elements: Label, Checkbox, and Slider.
您可以通过样式表自定义视觉元素的外观。还可以使用事件回调修改视觉元素的行为。
VisualElement 派生出若干定义了额外行为和功能的子类,如控件。UI 工具包提供了各种具有特定行为的内置控件。例如,以下项目是可用的内置控件:
- Buttons(按钮)
- Toggles(开关)
- Text input fields(文本输入字段)
您还可以将视觉元素组合在一起并修改其行为以创建自定义控件。有关内置控件的列表,请参阅控件参考页面。
面板
The panel is the parent object of the visual tree. A visual tree must connect to a panel for the visual elements inside a tree to render. All panels belong to either an Editor Window or a runtime UIDocument. The panel also handles focus control and the event dispatching for the visual tree.
视觉树中的每个元素都包含对包含视觉树的面板的直接引用。为了验证 VisualElement 是否已连接到面板,可以测试此元素的 panel 属性。当视觉元素未连接时,测试将返回 null。
绘制顺序
The draw order of elements in the visual tree follows a depth-first search. Child visual elements appear on top of parent elements. UI Toolkit draws child elements in the order of the sibling list. The draw order is the following:
- 顶级视觉元素。
- 该视觉元素的第一个子元素。
- 后代元素的子元素。
下图显示了上一示例的绘制顺序:

要更改视觉元素绘制顺序,请使用以下函数:
对于同级视觉元素,请使用以下函数:
坐标和位置系统
UI Toolkit uses a powerful layout system that automatically calculates the position and size of individual elements based on the layout parameters in their style properties. This is based on Flexbox, a web layout model. For more information, see Layout Engine.
UI 工具包有两种坐标:
- Relative: Coordinates relative to the element’s calculated position. The layout system calculates the position of the element, then adds the coordinates as an offset. Child elements can influence the position and size of the parent element, as the layout engine takes them into account when it calculates the element position.
- 绝对:相对于父元素的坐标。这样就绕过了自动布局计算,直接设置了元素的位置。同一父级下的子元素对元素的位置没有影响。同样,该元素不会影响同一父级下其他同级元素的位置和大小。
每个视觉元素确定用于计算其位置的坐标系。您可以在元素样式表中配置要使用的坐标系。
下面的代码演示如何通过代码设置一个视觉元素的坐标空间和位置:
    var newElement = new VisualElement();
        newElement.style.position = Position.Relative;
        newElement.style.left = 15;
        newElement.style.top = 35;
元素的原点是其左上角。
布局系统为每个元素计算 VisualElement.layout 属性 (type Rect),其中包括元素的最终位置。这会考虑元素的相对或绝对位置。
layout.position 以点 (point) 表示,相对于其父级的坐标空间。
每个 VisualElement 都有一个变换属性 (ITransform),您可以使用它为元素的位置和旋转添加额外的局部偏移。偏移量并不在计算的布局属性中表示。默认情况下,transform 是标识。
使用 worldBound 属性检索 VisualElement 的最终窗口空间坐标,同时考虑布局位置和变换。此位置包括窗口标题的高度。
示例
以下代码示例演示了相对定位和绝对定位之间的区别。它使用自动布局系统将一些方框添加到窗口并计算它们的位置。一个方框演示 25 px 的相对偏移,而另一个方框演示 25 px, 25 px 的绝对位置。

要查看此示例运行效果,请执行以下操作:
- Under Assets > Scripts > Editor, create a C# script called
PositioningTestWindow. - 将下方的代码复制到 C# 脚本。
- 从编辑器工具栏中,选择 Window > UI Toolkit > Positioning Test Window。
using UnityEditor;
using UnityEngine;
using UnityEngine.UIElements;

public class PositioningTestWindow : EditorWindow
{
    [MenuItem("Window/UI Toolkit/Positioning Test Window")]
    public static void ShowExample()
    {
        var wnd = GetWindow<PositioningTestWindow>();
        wnd.titleContent = new GUIContent("Positioning Test Window");
    }

    public void CreateGUI()
    {
        for (int i = 0; i < 2; i++)
        {
            var temp = new VisualElement();
            temp.style.width = 70;
            temp.style.height = 70;
            temp.style.marginBottom = 2;
            temp.style.backgroundColor = Color.gray;
            rootVisualElement.Add(temp);
        }

        // Relative positioning
        var relative = new Label("Relative\nPos\n25, 0");
        relative.style.width = 70;
        relative.style.height = 70;
        relative.style.left = 25;
        relative.style.marginBottom = 2;
        relative.style.backgroundColor = new Color(0.2165094f, 0, 0.254717f);
        rootVisualElement.Add(relative);

        for (int i = 0; i < 2; i++)
        {
            var temp = new VisualElement();
            temp.style.width = 70;
            temp.style.height = 70;
            temp.style.marginBottom = 2;
            temp.style.backgroundColor = Color.gray;
            rootVisualElement.Add(temp);
        }

        // Absolute positioning
        var absolutePositionElement = new Label("Absolute\nPos\n25, 25");
        absolutePositionElement.style.position = Position.Absolute;
        absolutePositionElement.style.top = 25;
        absolutePositionElement.style.left = 25;
        absolutePositionElement.style.width = 70;
        absolutePositionElement.style.height = 70;
        absolutePositionElement.style.backgroundColor = Color.black;
        rootVisualElement.Add(absolutePositionElement);
    }
}
坐标系之间的变换
VisualElement.layout.position 和 VisualElement.transform 属性用于定义如何在局部坐标系和父坐标系之间进行转换。
VisualElementExtensions 静态类提供了以下扩展方法在坐标系之间转换点和矩形:
-
WorldToLocal将Vector2或Rect从Panel空间转换为元素内的参照。 -
LocalToWorld将Vector2或Rect转换为Panel空间参照。 -
ChangeCoordinatesTo将Vector2或Rect从一个元素的局部空间转换为另一个元素的局部空间。