Bind to a list with ListView
Version: 2021.3+
The ListView control is the most efficient way to create lists. To bind to a list with ListView, set the binding path of the ListView to the name of the property that contains the list.
This example demonstrates how to bind to a list with ListView.
Example overview
The example creates a list of toggles and binds the list to an underlying list of GameSwitch objects.
You can find the completed files that this example creates in this GitHub repository.
先决条件
This guide is for developers familiar with the Unity Editor, UI Toolkit, and C# scripting. You are recommended to have a basic understanding of the following:
Create an object with a list
Create a GameSwitch object and a serialized object that has a list of GameSwitch objects as a property.
Create a Unity project with any template.
In your Project window, create a folder named
bind-to-listto store all your files.-
Create a C# script named
GameSwitch.csand replace its content with the following:using System; [Serializable] public struct GameSwitch { public string name; public bool enabled; } -
Create a UI Document named
game_switch.uxmland replace its contents with the following:<UXML xmlns="UnityEngine.UIElements" xmlns:ue="UnityEditor.UIElements"> <Box style="flex-direction: row;"> <Toggle binding-path="enabled" /> <TextField binding-path="name" readonly="true" style="flex-grow: 1;"/> </Box> </UXML> -
Create a C# script named
GameSwitchListAsset.csand replace its contents with the following:using System.Collections.Generic; using UnityEngine; namespace UIToolkitExamples { [CreateAssetMenu(menuName = "UIToolkitExamples/GameSwitchList")] public class GameSwitchListAsset : ScriptableObject { public List<GameSwitch> switches; public void Reset() { switches = new() { new() { name = "Use Local Server", enabled = false }, new() { name = "Show Debug Menu", enabled = false }, new() { name = "Show FPS Counter", enabled = true }, }; } public bool IsSwitchEnabled(string switchName) => switches.Find(s => s.name == switchName).enabled; } }
Create a custom Editor and set the binding
Create a custom Editor that can create an asset with a list of toggles. Bind the toggle list to the GameSwitch list by setting the binding-path attribute of the UI Document to the property name of the GameSwitch list, which is switches.
Create a folder named
Editor.-
In the Editor folder, create a C# script named
GameSwitchListEditor.csand replace its contents with the following:using UnityEditor; using UnityEngine; using UnityEngine.UIElements; namespace UIToolkitExamples { [CustomEditor(typeof(GameSwitchListAsset))] public class GameSwitchListEditor : Editor { [SerializeField] VisualTreeAsset m_ItemAsset; [SerializeField] VisualTreeAsset m_EditorAsset; public override VisualElement CreateInspectorGUI() { var root = m_EditorAsset.CloneTree(); var listView = root.Q<ListView>(); listView.makeItem = m_ItemAsset.CloneTree; return root; } } } -
Create a UI Document named
game_switch_list_editor.uxmland replace its contents with the following:<UXML xmlns="UnityEngine.UIElements" xmlns:ue="UnityEditor.UIElements"> <ListView virtualization-method="DynamicHeight" reorder-mode="Animated" binding-path="switches" show-add-remove-footer="true" show-border="true" show-foldout-header="true" header-title="Switches" /> </UXML> In the Project window, select GameSwitchListEditor.cs.
Drag game_switch.uxml to Item Asset in the Inspector.
Drag game_switch_list_editor.uxml to Editor Asset in the Inspector.
Test the binding
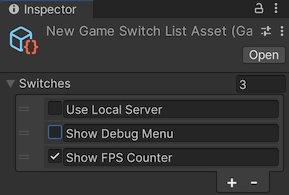
- From the menu, select Assets > Create > UIToolkitExamples > GameSwitchList. This creates an asset named New Game Switch List Asset.
- In the Project window, select New Game Switch List Asset. This shows a list of toggles in the Inspector. You can reorder the list, collapse it, add entries to or remove entries from the list, and change the number of entries in the list. If you make changes in the Inspector UI, the
switchesproperty of theGameSwitchListAssetobject changes.
其他资源
Copyright © 2023 Unity Technologies
优美缔软件(上海)有限公司 版权所有
"Unity"、Unity 徽标及其他 Unity 商标是 Unity Technologies 或其附属机构在美国及其他地区的商标或注册商标。其他名称或品牌是其各自所有者的商标。
公安部备案号:
31010902002961