Inverse Kinematics (Cinemática Inversa)
Muchas animaciones son producidas mediante la rotación de los ángulos de las articulaciones en un esqueleto a determinados valores. La posición de una articulación hija cambia de acuerdo a la rotación de su padre, y de esta forma el punto final de una cadena de articulaciones puede ser determinada a partir de los ángulos y las posiciones relativas de las articulaciones individuales que contenga. Este método de posar un esqueleto es conocido como forward kinematics.
Sin embargo, con frecuencia es útil observar la tarea de posar articulaciones desde un punto de vista opuesto -dada una posición escogida en el espacio, trabajar hacia atrás y encontrar una forma válida de orientar las articulaciones para que el punto final termine en esa posición. Esto puede ser útil cuando uno quiere que un personaje toque un objeto en un punto seleccionado por el usuario, o colocar su pie convincentemente en una superficie no uniforme. Este enfoque es conocido como Inverse Kinematics (IK) y es soportado en Mecanim para cualquier personaje humanoide con un Avatar correctamente configurado.

To set up IK for a character, you typically have objects around the scene that a character interacts with, and then set up the IK through script, in particular, Animator functions like SetIKPositionWeight, SetIKRotationWeight, SetIKPosition, SetIKRotation, SetLookAtPosition, bodyPosition, bodyRotation
En la ilustración de arriba, se muestra a un personaje agarrando un objeto cilíndrico. ¿Cómo hacer que esto ocurra?
Nosotros comenzamos con un personaje que tiene un Avatar válido.
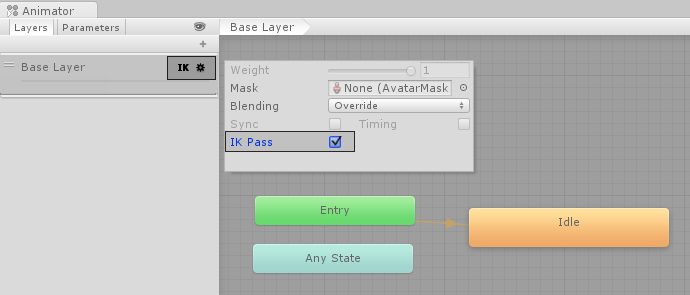
Luego cree un Animator Controller que contenga al menos una animación para el personaje. Luego en el panel de Layers (capas) de la ventana Animator, haga click en el ícono de engranaje de ajustes de la capa y marque la casilla de verificación IK Pass en el menú que emerge.
Make sure the Animator Controller is assigned to the character’s Animator Component:

Lo que sigue, adjunte un script que de verdad se preocupa por el IK, llamémoslo IKControl. Este script configura el objetivo IK para la mano derecha del personaje, y su posición de vista para hacerlo mirar para el objeto que está manteniendo:
using UnityEngine;
using System;
using System.Collections;

[RequireComponent(typeof(Animator))]

public class IKControl : MonoBehaviour {

    protected Animator animator;

    public bool ikActive = false;
    public Transform rightHandObj = null;
    public Transform lookObj = null;

    void Start ()
    {
        animator = GetComponent<Animator>();
    }

    //a callback for calculating IK
    void OnAnimatorIK()
    {
        if(animator) {

            //if the IK is active, set the position and rotation directly to the goal.
            if(ikActive) {

                // Set the look target position, if one has been assigned
                if(lookObj != null) {
                    animator.SetLookAtWeight(1);
                    animator.SetLookAtPosition(lookObj.position);
                }

                // Set the right hand target position and rotation, if one has been assigned
                if(rightHandObj != null) {
                    animator.SetIKPositionWeight(AvatarIKGoal.RightHand,1);
                    animator.SetIKRotationWeight(AvatarIKGoal.RightHand,1);
                    animator.SetIKPosition(AvatarIKGoal.RightHand,rightHandObj.position);
                    animator.SetIKRotation(AvatarIKGoal.RightHand,rightHandObj.rotation);
                }

            }

            //if the IK is not active, set the position and rotation of the hand and head back to the original position
            else {
                animator.SetIKPositionWeight(AvatarIKGoal.RightHand,0);
                animator.SetIKRotationWeight(AvatarIKGoal.RightHand,0);
                animator.SetLookAtWeight(0);
            }
        }
    }
}
Como no queremos que la mano del personaje, alcance dentro del objeto su centro (el punto de pivote del cilindro), nosotros posicionamos objetos hijos vacío (en este caso, nombrado “Cylinder Grab Handle”) dónde la mano debería estar en el cilindro, y lo gire de acuerdo. La mano luego marca, y apunta a este objeto hijo.

Este Game Object para la “manija para agarrar” debería luego asignarse como la propiedad “Right Hand Obj” del script IKControl.
In this example, we have the look target set to the cylinder itself, so the character looks directly towards the centre of the object even though the handle is near the bottom.

Entre al modo de reproducción, y usted debería ver el IK venir a la vida. Observe cómo el personaje agarra y des-agarra el objeto a medida que hace click en la casilla de verificación IKActive , e intente mover el cilindro alrededor en el modo de reproducción para ver cómo el brazo y la mano siguen el objeto.
Copyright © 2023 Unity Technologies
优美缔软件(上海)有限公司 版权所有
"Unity"、Unity 徽标及其他 Unity 商标是 Unity Technologies 或其附属机构在美国及其他地区的商标或注册商标。其他名称或品牌是其各自所有者的商标。
公安部备案号:
31010902002961