Progressive GPU Lightmapper (Preview)
Note: This is a preview feature and is subject to change. If you have Scenes that use this feature, you might need to update them in a future release. Do not rely on this feature for full-scale production until it is officially released.
The GPU Lightmapper gives you an interactive workflow when you’re setting up and tweaking the lighting in your Scene. Because this lightmapper uses the GPU in your computer to generate baked lightmaps and Light probes, it’s a faster alternative to the CPU Progressive Lightmapper. Sampling and noise patterns look slightly different than those produced by the CPU lightmapper, because the sampling algorithm is different.
Configuraciones
To use the Progressive GPU (Preview) Lightmapper, go to Window > Rendering > Lighting Settings, navigate to Lightmapping Settings, and set Lightmapper to Progressive GPU (Preview). See Lightmapping Settings for more information about this window.

| Propiedad: | Función: | |
|---|---|---|
| Prioritize View | Enable this to make the Progressive Lightmapper apply changes to the texels that are currently visible in the Scene View, then apply changes to the out-of-view texels. | |
| Multiple Importance Sampling | Enable this to use multiple importance sampling for sampling the environment. This generally leads to faster convergence when generating lightmaps, but can lead to noisier results in certain low frequency environments. This is disabled by default. | |
| Direct Samples | The number of samples (paths) shot from each texel. This setting controls the number of samples Progressive Lightmapper uses for direct lighting calculations. Increasing this value can improve the quality of lightmaps, but increases the baking time. | |
| Indirect Samples | The number of samples (paths) shot from each texel. This setting controls the number of samples Progressive Lightmapper uses for indirect lighting calculations. For some Scenes, especially outdoor Scenes, 100 samples should be enough. For indoor Scenes with emissive geometry, increase the value until you see the result you want. | |
| Environment Samples | Define the number of samples the lightmapper uses for environment lighting calculations. Higher values can improve the quality of the lightmaps, but increase the time required for baking to complete. This is set to 500 by default. | |
| Bounces | Use this value to specify the number of indirect bounces to do when tracing paths. For most Scenes, two bounces is enough. For some indoor Scenes, more bounces might be necessary. | |
| Filtering | Configure the way the Progressive Lightmapper applies post-processing to lightmaps to limit noise. For lightmap post-processing, the lightmap is split into Direct, Indirect and Ambient Occlusion targets that Unity applies post-processing to individually, before it composites them together into a single lightmap. - Direct: Any light that arrives directly from a Light to a sensor (usually the Camera). - Indirect: Any light that arrives indirectly from a Light to a sensor. This most commonly applies to light that reflects off other GameObjects. - Ambient Occlusion: Any ambient light that the lighting system calculates. See Ambient Occlusion for more information. The Progressive Lightmapper supports the NVIDIA OptiX AI-Accelerated Denoiser, which reduces perceptible noise in the lightmap without causing blurring. It requires an NVIDIA GPU with 4GB+ VRAM and driver version 390+. It is not supported for the NVIDIA Series 20x GPUs (Turing RTX). It is only supported on the Windows platform. |
|
| None | Select this to use no filter or denoising for the lightmap. | |
| Auto | Select this to use a platform-dependent preset for post-processing the lightmap. If your development machine fulfils the requirements to run OptiX (the NVIDIA OptiX AI-Accelerated Denoiser), the Progressive Lightmapper uses the denoiser with a Gaussian filter that has a 1-texel radius for all targets. If your development machine cannot run OptiX, the Progressive Lightmapper uses a Gaussian filter that has a 1-texel radius for Direct, 5-texel radius for Indirect, and 2-texel radius for Ambient Occlusion. |
|
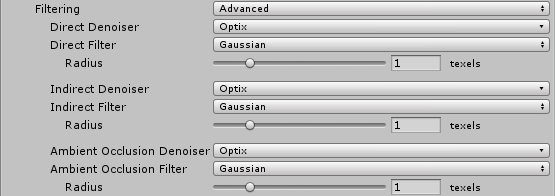
| Advanced | Select Advanced to manually configure options for each type of lightmap target. The targets types are Direct, Indirect and Ambient Occlusion. For more information, see Advanced Filtering settings, below. | |
Advanced Filtering settings
| Ajuste | Descripción | |
|---|---|---|
| Advanced | Set Filtering to Advanced to manually configure options for each type of lightmap target. The target types are: - Direct: Any light that arrives directly from a Light to a sensor (usually the Camera). - Indirect: Any light that arrives indirectly from a Light to a sensor. This most commonly applies to light that reflects off other GameObjects. - Ambient Occlusion: Any ambient light that the lighting system calculates. See Ambient Occlusion for more information. |
|
| Denoiser | Select a denoiser to use for the lightmap target: - Optix: If your development machine fulfils the requirements to support the NVIDIA OptiX AI-Accelerated Denoiser, you can select it here. If your system cannot run it, this option is greyed out and set to None by default. - None: Select this to use no denoising for the lightmap target. |
|
| Filter | Select a filter to use for the lightmap target: - Gaussian: Select this to use a Gaussian filter for the lightmap target. The Gaussian filter applies a bilateral Gaussian filter on the lightmap. This blurs the lightmap and reduces the visible noise. - A-Trous: Select this to use an A-Trous filter for the lightmap target. The A-Trous filter minimizes the amount of blur while it removes visible noise in the lightmap. - None: Select this to disable all filtering for the lightmap target. |
|
| Radius | This option is only available when Filter is set to Gaussian. Use the Radius value to set the radius of the Gaussian filter kernel in texels. A higher Radius increases the blur strength and reduces the perceptible noise, but might cause detail to be lost in the lighting. | |
| Sigma | This option is only available when Filter is set to A-Trous. Use the Sigma value to adjust how much to preserve detail or blur the lighting. A higher Sigma increases the blur strength and reduces the perceptible noise, but might cause detail to be lost in the lighting. | |
Hardware and software requirements
To use the Progressive GPU Lightmapper, your computer must have:
- At least one GPU with OpenCL 1.2 support
- At least 2GB of dedicated GPU memory
- A CPU that supports SSE4.1 instructions
If your computer has more than one GPU, Unity selects the same GPU that the Editor uses. It is possible to choose one GPU for rendering and a different GPU for light baking. For information on how to change this, see the section below, Configure which GPU to use.
Note: If the baking process uses more than the available GPU memory, the process can fall back to the CPU Lightmapper. Some graphics drivers with virtual memory support swap to CPU memory instead, which makes the baking process slower.
Configure which GPU to use
It is possible to select one GPU for rendering the Scene and another GPU for baking lighting. If the automatic GPU assignment don’t fit your needs, you can specify which graphics card to use for baking.
To see which GPU Unity currently uses for baking, in the Editor: In your Project, open the Lighting window. Next to Bake Performance, you can see the GPU.
To see the available GPUs in your machine:
- Make sure you’ve selected the Progressive GPU lightmapper in the Editor.
- Generate the lighting in your Scene.
- Open File Explorer, and navigate to the following path: C:\Users\USER\AppData\Local\Unity\Editor. Open the file called Editor.log.
- In the file, search for the line Listing OpenCL platforms. This should jump to the part of the log with information about OpenCL devices. Here, you can see your available GPUs along with their corresponding platform and device indexes.
To select a specific GPU for baking, enter this command at the command line (replace platform and device index with the relevant numbers):
Unity.exe "-OpenCL-PlatformAndDeviceIndices" <platform> <device index>
Your choice of assignment should depend on your needs while you’re working on the Scene. If you assign the strongest GPU to either activity, this can incur a performance impact on the other activity. If you encounter issues, try re-assigning GPUs.
Progressive GPU limitations
The Progressive GPU Lightmapper does not support:
- Baked LOD
- A-Trous filtering (it only uses Gaussian filtering)
- The custom bake API (experimental)
- Submeshes (the lightmapper uses Material properties on the first submesh)
2019–05–07 Page published with editorial review
2019–04–18 Page published with editorial review
Preview of Progressive GPU Lightmapper added in 2018.3 NewIn2018X
Copyright © 2023 Unity Technologies
优美缔软件(上海)有限公司 版权所有
"Unity"、Unity 徽标及其他 Unity 商标是 Unity Technologies 或其附属机构在美国及其他地区的商标或注册商标。其他名称或品牌是其各自所有者的商标。
公安部备案号:
31010902002961