Utilizando Sistemas de Partículas en Unity
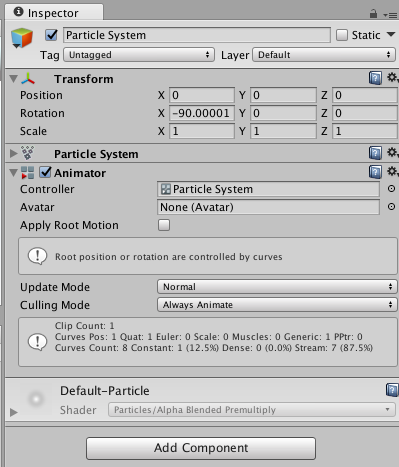
Unity implementa sistemas de partículas con un componente, por lo que colocar un sistema de partículas en una escena es cuestión de agregar un GameObject prefabricado (menú: GameObject > Effects > Particle System) o agregar el componente a un GameObject existente (menú: Componet > Effects > Particle System). Debido a que el componente es bastante complicado, el Inspector se divide en una serie de subsecciones plegables o módulos que contienen un grupo de propiedades relacionadas. Además, puede editar uno o más sistemas al mismo tiempo utilizando una ventana del Editor independiente a la que se accede mediante el botón Open Window en el Inspector. Consulte la documentación sobre el Componente del sistema de partículas y los Módulos de sistema de partículas para obtener más información.
Cuando un GameObject con un Particle System se selecciona, el Scene view contiene un panel pequeño de Particle Effect, con unos controles simples que son útiles para visualizar los cambios que le hace a las configuraciones del sistema.
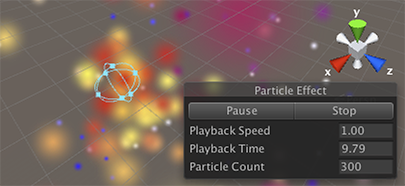
El Playback Speed (velocidad de reproducción) le permite a usted acelerar o disminuir la simulación de las partículas, para que rápidamente pueda ver cómo se verá en un estado avanzado. El Playback Time indica el tiempo que ha pasado desde que el sistema empezó; esto puede ser más rápido y más lento que el tiempo real dependiendo en la playback speed.
Variación de las propiedades en el tiempo
Muchas de las propiedades numéricas de las partículas o incluso el Particle System completo puede variar en el tiempo. Unity proporciona varios métodos para especificar cómo esta variación sucede:
- Constant: El valor de la propiedad es fijo a lo largo de su vida útil.
- Curve: El valor se especifica por una Curva/Grafo.
- Random Between Two Constants: Dos valores constantes define los limites superiores e inferiores para el valor; el valor en realidad varia aleatoriamente en el tiempo entre esos dos limites.
- Random Between Two Curves: Two curves define the upper and lower bounds of the value at a given point in its lifetime; the current value varies randomly between those bounds.
When you set a property to Curve or Random Between Two Curves, the Particle System Curves editor appears at the bottom of the Inspector:
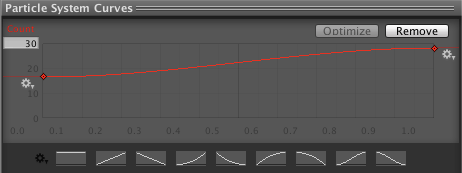
To edit a curve, click and drag an end point or key to reshape the curve:

Particle System curves are similar to Animation curves. For information on using curves, see the documentation on Editing Curves.
The Particle System Curves editor has the following buttons:
- Optimize: Fits the curve into four or fewer keys to build a fast evaluator called a Polynomial, which is more efficient than reading the unoptimized curve.
- Remove: Deletes the selected curve.
To edit the way in which the Particle System plays curves, click the cog next to a selected key and choose one of the following options:
- Loop: Plays the curve the specified number times over a particle’s life. For example, if you make a curve that scales a particle’s size up and down, you can tell it to loop multiple times, which causes the “up and down” animation to happen multiple times before the particle dies, instead of just once.
- Ping Pong: Similar to Loop, but plays the curve forwards then backwards in a continuous oscillation.
- Clamp: Limits particle queries that fall outside the curve time range to the first or last value of the curve.
The Start Color property in the main module has the following options:
- Color: All particles start with this color throughout the lifetime of the Particle System. Particles can still change color during their lifetime.
- Gradient: The Particle System emits particles which start with the colour at the beginning of the gradient, and end at the colour at the end of the gradient. The gradient line represents the lifetime of the Particle System; the Particle System picks a color from the gradient at the point corresponding to the current age of the Particle System.
- Random Between Two Colors: The Particle System chooses a starting particle color from a random linear interpolation between the two given colors.
- Random Between Two Gradients: The Particle System chooses a color from each of the given gradients at the point corresponding to the current age of the system. The starting particle color is chosen as a random linear interpolation between the two chosen colors.
- Random Color: Similar to Gradient mode, where particles take their initial color from the defined Gradient. However, in this mode, the Particle System does not choose samples based on the age of the Particle System, but instead it selects them at random. This mode also works well with the Fixed Gradient Mode, which is inside the Gradient Editor. When enabled, you can select a predefined list of precise starting colors, and apply a probability to each color.
Other color properties, such as Color over Lifetime, can use the Gradient or Random Between Two Gradients modes.
To calculate the final particle color result, the Particle System multiplies color properties in various modules together per channel.
When you set the Gradient color for particles, the Gradient Editor appears:

- Mode: Determines whether the particle color settings are blended or not.
- Color: Displays the color of the currently selected key in the Gradient. Use this to edit the color at that position of the Gradient.
- Location: Shows how far along on the Gradient the currently selected key is.
- Presets: Allows you to save Gradient settings. Click New to make the current set of values a Gradient preset.
Las propiedades de color en varios módulos se multiplican junto por canal para calcular el resultado del color final de la partícula.
Enlaces de animación
Todas las propiedades de la partícula se acceden por el sistema de Animation (animación), significando que las puede keyframe y controlarlas desde sus animaciones.
Para acceder a las propiedades del Particle System, debe haber un componente Animator adjunto al GameObject del Particle System. Un Animation Controller y una Animation también se requiere.
Para animar una propiedad del Particle System, abra el Animation Window con el GameObject que contiene el Animator y el Particle System seleccionado. Oprime Add Property para agregar las propiedades.
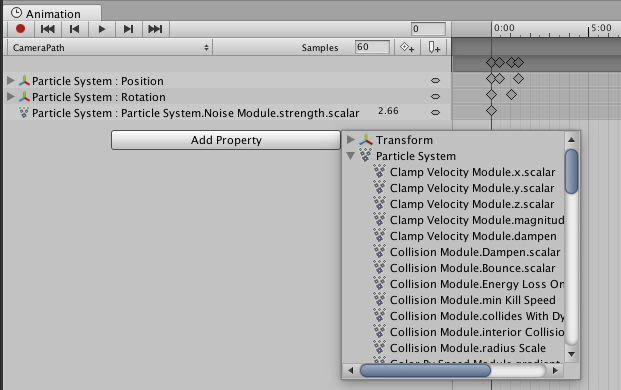
Desplácese a la derecha para revelar los add controls (controles de agregar).

Tenga en cuenta que para las curvas, usted solo puede keyframe el curve multiplier, el cual se puede encontrar alado del editor de curvas en el Inspector.
2019–04–16 Page amended
Menú GameObject cambiado en Unity 4.6
Particle System loop/ping-pong curve playing added in 2018.3 NewIn20183
Copyright © 2023 Unity Technologies
优美缔软件(上海)有限公司 版权所有
"Unity"、Unity 徽标及其他 Unity 商标是 Unity Technologies 或其附属机构在美国及其他地区的商标或注册商标。其他名称或品牌是其各自所有者的商标。
公安部备案号:
31010902002961