App Thinning
Apple App Store と iOSは、ユーザーの特定のデバイスの機能に合わせてアプリを配信することによって iOS、tvOS、watchOS アプリケーションのインストールを最適化します。この最適化は “App thinning” と呼ばれます。App thinning を使用すると、ほとんどのデバイス機能を使用し、使用するディスク容量が最小で、Apple が行う将来の更新に対応できるアプリケーションを作成できます。この最適化プロセスの詳細については、App Thinning に関する Apple Developer Library ページ を参照してください。
Unity lets you implement the following two major components for app thinning:
オンデマンドリソース
On-demand resources (ODR) is a feature available for the iOS and tvOS platforms, from version 9.0 of iOS and tvOS onwards. It allows you to reduce the size of your application by separating the core Assets (those that are needed from application startup) from Assets which may be optional, or which appear in later levels of your game. These additional Assets are called AssetBundles that are available across all Unity build targets, but you must take additional steps to enable them for hosting from the App Store.
AssetBundles can contain Asset files such as models, Materials, Textures, and Scenes, but they can’t include scripts. Therefore, all your scripting logic must reside in the main application. Apple recommends that an AssetBundle be no larger than 64MB in size, to reduce loading time (particularly over-the-air) and minimize the amount of storage space used on the device.
ODR の設定
プロジェクトを ODR 用に設定するには、まず、ビルドタイプが iOS に設定されていることを確認してください。メニューバーから File > Build Settings の順に選択します。

まだ選択されていない場合は、iOS をクリックし、Switch Platform ボタンをクリックします。次に、Player Settings ボタンをクリックします。 Inspector ウィンドウで Other Settings を開き、Configuration セクションに移動し、Use on demand resources チェックボックスにチェックを入れます。

アセットバンドルの作成
まず、AssetBundle (アセットバンドル) に入れたいアセットをまとめるための新しいフォルダーを 1 つ作成してください。フォルダーを作成するには、Project ウィンドウ内で右クリックし、 Create > Folder (または、Project ウィンドウ左上で Create > Folder) の順に選択してください。

アセットバンドルに追加したいアセットファイルを選択し、新しく作成したフォルダーにそれらをドラッグアンドドロップします。
アセットバンドル作成の際は、それにタグを 1 つ割り当てる必要があります。このタグは、そのアセットバンドルのダウンロードをリクエストする際の識別子として使用されます。バンドルのファイル名と一致するラベルを作成することをお勧めします。そうすれば確実に他と重複しないラベルとなり、後に使用する際に特定し易くなります。
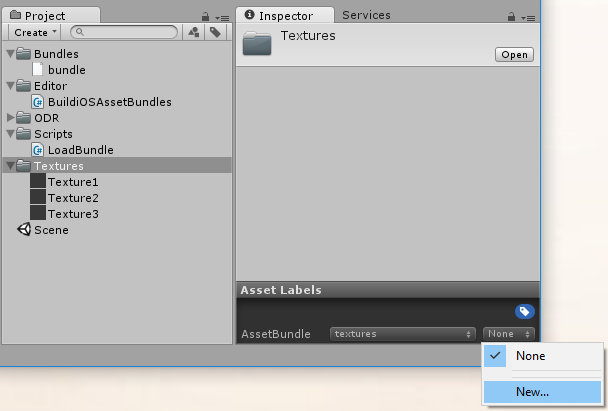
タグを作成したり割り当てるには、新しいフォルダーを選択し、 Inspector ウィンドウの下部にある Asset Labels セクションに移動します。左のドロップダウンメニューをクリックし、New を選択し、新しいラベルの名前を入力します。アセットバンドルのラベルは小文字にする必要があります。

In this example, a folder called Textures is being given a new label.
To generate the new AssetBundle file, you must references the new label in an Editor script. To create an Editor script, create a new folder inside the Project window called Editor. Right-click on the Editor folder and select Create > C# Script. Name the new script BuildiOSAssetBundles.cs.

In this example, the Textures folder has the label textures and the new script BuildiOSAssetBundles.cs is created in the Editor folder.
Open BuildiOSAssetBundles.cs and copy in the code below. In this example, the label textures is used; change this throughout with the name of your label (in lower-case text).
Note that this example uses uncompressed bundles; however, this isn’t a requirement for app thinning.
using UnityEngine;
using UnityEditor;


public class BuildiOSAssetBundles : MonoBehaviour
{
    [InitializeOnLoadMethod]
    static void SetupResourcesBuild( )
    {
        UnityEditor.iOS.BuildPipeline.collectResources += CollectResources;
    }

    static UnityEditor.iOS.Resource[] CollectResources( )
    {
        return new UnityEditor.iOS.Resource[]
        {
            new UnityEditor.iOS.Resource( "textures", "Assets/ODR/textures" ).AddOnDemandResourceTags( "textures" ),
            new UnityEditor.iOS.Resource( "bundle", "Assets/Bundles/bundle.unity3d" ).AddOnDemandResourceTags( "bundle" ),
        };
    }

    [MenuItem( "Bundle/Build iOS AssetBundle" )]
    static void BuildAssetBundles( )
    {
        var options = BuildAssetBundleOptions.None;

        bool shouldCheckODR = EditorUserBuildSettings.activeBuildTarget == BuildTarget.iOS;

# if UNITY_TVOS
            shouldCheckODR |= EditorUserBuildSettings.activeBuildTarget == BuildTarget.tvOS;
# endif

        if( shouldCheckODR )
        {
# if ENABLE_IOS_ON_DEMAND_RESOURCES
            if( PlayerSettings.iOS.useOnDemandResources )
                options |= BuildAssetBundleOptions.UncompressedAssetBundle;
# endif

# if ENABLE_IOS_APP_SLICING
            options |= BuildAssetBundleOptions.UncompressedAssetBundle;
# endif
        }

        BuildPipeline.BuildAssetBundles( "Assets/ODR", options, EditorUserBuildSettings.activeBuildTarget );
    }

}
上のコードサンプルの重要な行は以下の行です。textures ラベルでタグ付けされたファイルを取得し、Assets/ODR フォルダー内に textures というアセットバンドルファイルを作成します。
new UnityEditor.iOS.Resource( "textures", "Assets/ODR/textures" ).AddOnDemandResourceTags( "textures" )
For demonstration purposes, the above code sample also includes the following line, which adds an AssetBundle called bundle that’s already built - for example, from another project or a third-party vendor:
new UnityEditor.iOS.Resource( "bundle", "Assets/Bundles/bundle.unity3d" ).AddOnDemandResourceTags( "bundle" )
コードサンプル全体が、Unity エディターのメニューバーに新しいメニューを作成します。 Bundle > Build iOS AssetBundle の順に移動します。これにより、ODR フォルダーにアセットバンドルが生成されます。

The following script downloads the textures ODR AssetBundle, assigning it to the public member TextureBundle. Place this somewhere in your project.
using UnityEngine;
using UnityEngine.iOS;
using System;
using System.Collections;

public class LoadBundle : MonoBehaviour
{
    public AssetBundle     TextureBundle;


    void Start( )
    {
        StartCoroutine( LoadAsset( "textures", "textures" ) );
    }

    public IEnumerator LoadAsset( string resourceName, string odrTag )
    {
        // リクエストを作成する
        OnDemandResourcesRequest request = OnDemandResources.PreloadAsync( new string[] { odrTag } );

        // リクエストが完了するまで待機する
        yield return request;

        // エラーをチェックする
        if( request.error != null )
            throw new Exception( "ODR request failed: " + request.error );

        TextureBundle = AssetBundle.LoadFromFile( "res://" + resourceName );

        request.Dispose( );
    }
}
次の手順は、 Xcode プロジェクトを 1 つ生成し、.IPA を 1 つビルドしてそれを iTunes Connect の TestFlight にアップロードする方法です。TestFlight の処理手続の一環として、埋め込まれた ODR アセットバンドルがアプリケーションから削除されて Apple のサーバー上にホスティングされ、ダウンロードが可能な状態になります。
Xcode で .IPA をビルドする前に、まず XCode の Build Settings (ビルド設定) の Assets のセクションで Embed Asset packs In Product Bundle が No に設定されていることと、Enable On Demand Resources が Yes に設定されていることを確認してください。

iTunes Connect によるアプリケーションのアップロード処理が完了したら、 TestFlight の Builds のセクションで該当のバージョンのビルドをクリックして詳細情報を確認します。

App Slicing
App slicing はオンデマンドリソースに似た処理を行い、アプリケーションが実行されているデバイスの仕様に基づいて動的にアセットをダウンロードすることができます (例えば、Retina iPad では、高解像度アセットをダウンロードし、iPhone や iPad Mini などの小さい解像度のデバイスでは、低解像度アセットをダウンロードするなど)。これは、アセットバンドルを定義し、追加の variants を定義することで実現されます。こうすることで、起動時にどのバリアントを使用するかを決めることができ、ダウンロード時に自動的にアセットファイル名に加えることができます。
バリアントを作成するには、作成した新しいフォルダーをクリックし、Inspector ウィンドウ下部の Asset Labels セクションに移動します。右のドロップダウンメニューをクリックし、New を選択し、新しいバリアントの名前を入力します。アセットバンドルのバリアント名は小文字にする必要があります。
新しいバリアントはエディタースクリプトで参照される必要があります。エディタースクリプトを作成するには、Project ウィンドウ内に Editor という名の新しいフォルダーを作成します。Editor フォルダーを右クリックし、Create > C# Script の順に選択します。新しいスクリプトの名前を BuildiOSAppSlices.cs にします。
下のコードをコピーアンドペーストし、サンプルのラベル (“textures”) とバリアント (“hd” と “sd”) を、独自のものに差し替えてください。このサンプルコードでは、複数のフォルダーが参照されています。HD テクスチャを含むものと、SD テクスチャを含むものです。これらに、バリアント “hd” と “sd” がそれぞれ含まれています。
using UnityEngine;
using UnityEditor;


public class BuildiOSAppSlices : MonoBehaviour
{
    [InitializeOnLoadMethod]
    static void SetupResourcesBuild( )
    {
        UnityEditor.iOS.BuildPipeline.collectResources += CollectResources;
    }

    static UnityEditor.iOS.Resource[] CollectResources( )
    {
        return new UnityEditor.iOS.Resource[]
        {
            new UnityEditor.iOS.Resource("textures").BindVariant( "Assets/ODR/textures.hd", "hd" )
                                     .BindVariant( "Assets/ODR/textures.sd", "sd" )
                     .AddOnDemandResourceTags( "textures" ),
    };
    }

    [MenuItem( "Bundle/Build iOS App Slices" )]
    static void BuildAssetBundles( )
    {
        var options = BuildAssetBundleOptions.None;

        bool shouldCheckODR = EditorUserBuildSettings.activeBuildTarget == BuildTarget.iOS;

# if UNITY_TVOS
            shouldCheckODR |= EditorUserBuildSettings.activeBuildTarget == BuildTarget.tvOS;
# endif

        if( shouldCheckODR )
        {
# if ENABLE_IOS_ON_DEMAND_RESOURCES
            if( PlayerSettings.iOS.useOnDemandResources )
                options |= BuildAssetBundleOptions.UncompressedAssetBundle;
# endif

# if ENABLE_IOS_APP_SLICING
            options |= BuildAssetBundleOptions.UncompressedAssetBundle;
# endif
        }

        BuildPipeline.BuildAssetBundles( "Assets/ODR", options, EditorUserBuildSettings.activeBuildTarget );
    }

}
上によって、 Unity エディターのメニューバーに Bundle というメニュー項目が新しく作成されます。これをクリックし、リストにある唯一のアイテム Build iOS App Slices を選択してください。これにより ODR フォルダー内にアセットバンドルが生成されます。
その後、このクラスをプロジェクトのどこかに配置し、読み込みたいバリアントの名前を渡すと、アセットが読み込まれます。
using UnityEngine;
using UnityEngine.iOS;
using System;
using System.Collections;

public class LoadBundle : MonoBehaviour
{
    public AssetBundle     TextureBundle;


    void Start( )
    {
        StartCoroutine( LoadAsset( "textures", "textures" ) );
    }

    public IEnumerator LoadAsset( string resourceName, string odrTag )
    {
        // リクエストを作成する
        OnDemandResourcesRequest request = OnDemandResources.PreloadAsync( new string[] { odrTag } );

        // リクエストが完了するまで待機する
        yield return request;

        // エラーをチェックする
        if( request.error != null )
            throw new Exception( "ODR request failed: " + request.error );

        TextureBundle = AssetBundle.LoadFromFile( "res://" + resourceName );

        request.Dispose( );
    }
}
You can now see and modify variants in Player Settings > Other Settings > Configuration in a Variant map for app slicing drop-down menu. The Variant map for app slicing menu is visible only if Use on demand resources is enabled in Player Settings.

Additional resources:
Copyright © 2023 Unity Technologies
优美缔软件(上海)有限公司 版权所有
"Unity"、Unity 徽标及其他 Unity 商标是 Unity Technologies 或其附属机构在美国及其他地区的商标或注册商标。其他名称或品牌是其各自所有者的商标。
公安部备案号:
31010902002961