Bind to nested properties
Version: 2021.3+
This example demonstrates how to use the binding-path attribute of a BindableElement in UXML to bind fields to nested properties of a SerializedObject.
Example overview
This example creates a custom Inspector UI with the following:
- Two fields that bind to a GameObject’s name and the scale of a USS transform
- Two fields that bind to nested properties of a SerializedObject
You can find the completed files that this example creates in this GitHub repository.
要件
This guide is for developers familiar with the Unity Editor, UI Toolkit, and C# scripting. Before you start, get familiar with the following:
Create the destructible tank object
Create a C# script to define a class for a tank that has health values to make it destructible.
Create a project in Unity with any template.
In your Project window, create a folder named
bind-nested-propertiesto store all the files.-
Create a C# script named
DestructibleTankScript.csand replace its content with the following:using System; using UnityEngine; using UnityEngine.Serialization; [Serializable] public struct Health { public int armor; public int life; } [ExecuteInEditMode] public class DestructibleTankScript : MonoBehaviour { public string tankName = "Tank"; public float tankSize = 1; public Health health; private void Update() { gameObject.name = tankName; gameObject.transform.localScale = new Vector3(tankSize, tankSize, tankSize); } public void Reset() { health.armor = 100; health.life = 10; } }
Create the UXML and the Inspector UI
Create a UXML file with a BindableElement. Set the BindableElement’s binding-path to the health property and set each child element’s binding-path of the BindableElement to the armor and life properties of health.
In the bind-nested-properties folder, create a folder named
Editor.-
In the Editor folder, create a USS file named
tank_inspector_styles.ussand replace its contents with the following:.container { background-color: rgb(80, 80, 80); flex-direction: column; } Label { background-color: rgb(80, 80, 80); } TextField:hover { background-color: rgb(255, 255, 0); } FloatField { background-color: rgb(0, 0, 255); } -
Create a UI Document named
destructible_tank_editor.uxmland replace its contents with the following:<UXML xmlns="UnityEngine.UIElements" xmlns:ue="UnityEditor.UIElements"> <Style src="tank_inspector_styles.uss"/> <VisualElement name="row" class="container"> <Label text="Tank Script - Custom Inspector" /> <ue:PropertyField binding-path="tankName" name="tank-name-field" /> <ue:PropertyField binding-path="tankSize" name="tank-size-field" /> <BindableElement binding-path="health"> <ue:PropertyField binding-path="armor"/> <ue:PropertyField binding-path="life"/> </BindableElement> </VisualElement> </UXML>
Create the custom Editor
Create a C# script that registers a custom Editor for the DestructibleTankScript.
-
Create a C# script named
DestructibleTankEditor.csand replace its content with the following:using UnityEditor; using UnityEngine; using UnityEngine.UIElements; [CustomEditor(typeof(DestructibleTankScript))] public class DestructibleTankEditor : Editor { [SerializeField] VisualTreeAsset visualTreeAsset; public override VisualElement CreateInspectorGUI() { return visualTreeAsset.CloneTree(); } } Select
DestructibleTankEditor.csin the Project window.Drag
destructible_tank_editor.uxmlto Visual Tree Asset in the Inspector.
Test the binding
- In Unity, add an empty GameObject to a scene.
- Select the GameObject.
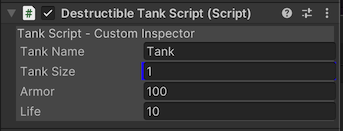
- Add the Destructible Tank Script component in the Inspector. The Armor and Life fields are bound to the
health.armorandhealth.lifeproperties. If you change the values in the Inspector, the values of the underlying properties change.
その他の参考資料
Copyright © 2023 Unity Technologies
优美缔软件(上海)有限公司 版权所有
"Unity"、Unity 徽标及其他 Unity 商标是 Unity Technologies 或其附属机构在美国及其他地区的商标或注册商标。其他名称或品牌是其各自所有者的商标。
公安部备案号:
31010902002961