プロパティの編集
プロパティとは、ゲームオブジェクトのコンポーネントやアセットに対する設定やオプションのことです。プロパティの編集は、Inspector ウィンドウ で行います。
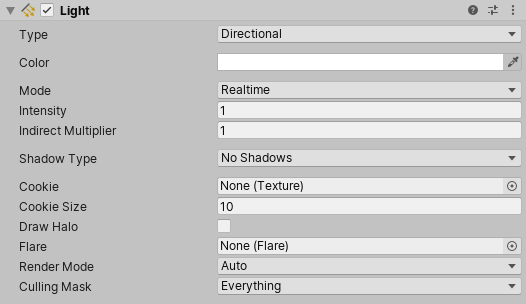
プロパティは大きく分けて以下のように分類されます。
- 参照: 他のゲームオブジェクトやアセットへのリンク。
- 値: 数字、色、オン/オフの設定、テキスト、など。
参照
参照プロパティは、互換性のあるプロジェクトのアセットやシーンのゲームオブジェクトを入力として取ります。例えば、Mesh Filter コンポーネントは、Project のどこかにあるMesh アセットを参照します。
コンポーネントを作成する時、その参照プロパティは割り当てられていません。

プロパティへの参照の割り当ては、オブジェクトやアセットを参照プロパティフィールドに ドラッグアンドドロップ するか、オブジェクトピッカーウィンドウ を使って行います。
参照プロパティの中には、特定のタイプのコンポーネント (例えば、Transform ) を受け取るものがあります。これらのプロパティにゲームオブジェクトを割り当てると、Unity はゲームオブジェクト上で必要なタイプの最初のコンポーネントを探し、それを参照プロパティに割り当てます。ゲームオブジェクトに適切なタイプのコンポーネントがない場合、そのゲームオブジェクトをプロパティに割り当てることはできません。
ドラッグアンドドロップによる参照の割り当て
プロパティに参照を割り当てるには、互換性のあるゲームオブジェクトやアセットを Inspector のプロパティフィールドにドラッグアンドドロップします。

オブジェクトピッカーウィンドウによるリファレンスの割り当て
オブジェクトピッカーウィンドウを使って、割り当てたい参照オブジェクトを探して選択します。

- Inspector でプロパティの右側にある小さな丸いアイコンをクリックすると、オブジェクトピッカーウィンドウが表示されます。
- 参照したいオブジェクトやアセットを探して、ダブルクリックしてプロパティに割り当てます。
値
ほとんどの値のプロパティは、簡易な操作で編集します。例えば、以下のようなものです。
フィールド でテキストや数値を入力します。

プロパティフィールドに直接数値を入力したり、プロパティラベルをクリックアンドドラッグして値を増減できます。

また、一部のプロパティには、数値を調節するための スライダー があります。

チェックボックス でプロパティのオンとオフを切り替えることができます。

ドロップダウン と ポップアップ で複数の可能な値の中から 1 つを選択すします。

Numeric field expressions
Numeric field input controls also accept mathematical expressions, for example entering 2+3 into a field will
result in value 5. See ExpressionEvaluator C# class documentation for details on
which expressions are supported.
Numeric fields also support special functions that are useful when editing multiple selected objects at once:
-
L(a,b)results in linear ramp betweenaandb.

EnteringL(-6,6)into X coordinate distributes the ten selected capsules between –6 and 6. -
R(a,b)results in a random value betweenaandb.

EnteringR(-2,2)into Z coordinate sets the Z coordinate of the selected capsules to a random value between –2 and 2. -
+=,-=,*=,/=expressions can be used to modify the current value, for example entering*=2makes all the the field value twice as large.

Entering/=3into Z coordinate makes all Z coordinates 3x smaller.
You can combine math expressions. For example, you could use the expression, L(0,2*pi), which produces a
linear distribution of values between 0 and 2pi radians, as the argument of a trigonometric function.
To illustrate, the following example uses this linear ramp function as the argument to sine and cosine functions
in order to distribute a set of selected objects in a circle:

Entering cos(L(0,2*pi))*5 into X and sin(L(0,2*pi))*5 into Z coordinates places the ten selected capsules in a circle.
When writing custom inspectors, all EditorGUI.PropertyField and EditorGUILayout.PropertyField controls automatically get support for the numeric expressions.
ゲームオブジェクトやアセットの中には、より複雑なプロパティを持っているものがあり、専用の操作やエディターで編集します。このセクションの残りの部分では、これらの複雑なプロパティを設定する方法を説明します。
色の値
Inspector ウインドウには、カラープロパティがスウォッチとして表示されます。

任意のスウォッチをクリックすると、コンテキストに応じてカラーピッカーまたは HDR カラーピッカーが開きます。例えば、Unity では、スタンダードシェーダー で エミッション のカラープロパティを編集する場合は、HDR カラーピッカーウィンドウが表示されます。
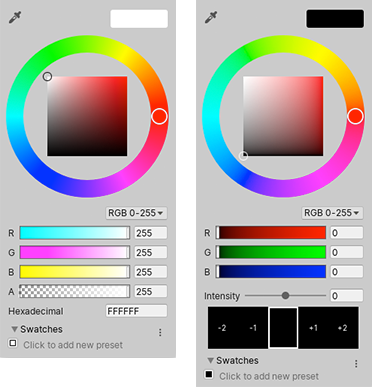
また、スポイトツールを使って、画面上の任意の場所から色の値を選ぶこともできます。

色を選ぶには、カラープロパティの横にあるスポイトボタンをクリックしてから、画面上の任意の場所をクリックします。Unity は、クリックしたピクセルの色をカラープロパティに設定します。
設定した色を再利用可能な スウォッチライブラリ に保存し、プロジェクト間で共有することができます。
グラデーションの値
グラデーションとは、色の連続的な変化を視覚的に表現したものです。空間や時間の経過とともに、ある色を別の色に徐々に混ぜていくのに便利です。
In Unity, gradient values are used by the particle system, line renderer and a few other components. You can also have public Gradient class variables in your C# scripts, and the inspector will display a gradient editor for them.
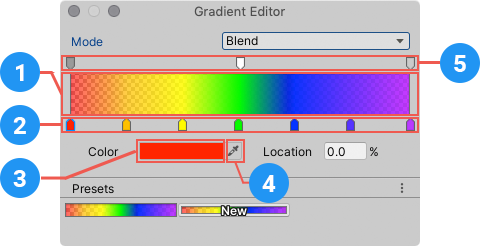
The gradient editor shows the main colors, called keys, and all the intermediate shades between them in the gradient bar (1).
Upward-pointing arrows along the bottom of the gradient bar represent color keys (2).
- Click a key to select it. Unity displays its color value in the Color field.
- カラースウォッチ (3) をクリックすると、標準の カラーピッカー を使って色を編集することができます。
- また、スポイトツール (4) を使用して、画面の任意の場所から色を選択できます。スポイトボタンをクリックしてから、画面上の任意の場所をクリックします。Unity は、クリックしたピクセルの色をカラープロパティに設定します。
- Click an empty area under the gradient bar to add a key.
- Click and drag a key to move it.
- To delete a key, select it and use the Ctrl/Cmd + Delete shortcut.
Downward-pointing arrows above the gradient bar represent alpha keys (5) that control the gradient’s transparency at a given point. You add and edit alpha keys the same way you edit color keys. When you select an alpha key, the gradient editor displays an Alpha slider instead of the Color field.
By default, a gradient has two keys set to 100% alpha, which makes the gradient fully opaque. You can edit a key to adjust the transparency, and add additional keys as needed.
A gradient can use several different color interpolation modes:
- Blend mode linearly interpolates between the color keys.
- Blend (Perceptual) mode interpolates between the color keys using a perceptually uniform “Oklab” color space.
- Fixed mode does not interpolate the colors; the value of the color or alpha key is used until the next key.


カーブ
カーブ は、入力 (X 軸) の値の変化に対する応答 (Y 軸) を示す線グラフです。
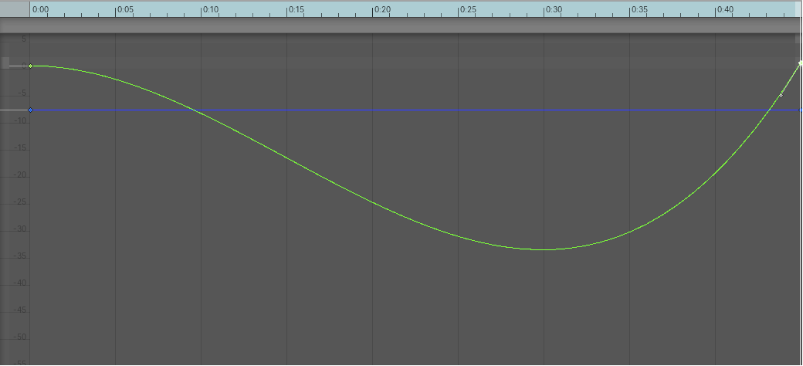
Unity では、特にアニメーションにおいて、様々な場面でカーブを使用しています。カーブエディターには、さまざまなオプションやツールがあります。詳しくは、曲線の編集 を参照してください。
スライダー
スライダーは、特定のリソースを視覚的に割り当てることができる特殊なコントロールです。例えば LOD Group コンポーネント では、スライダーを使ってゲームオブジェクトの LOD レベル間の遷移を定義します。

セグメントのエッジをドラッグして、バーの各セグメントの相対的な値を調整します。一部のスライダーには、ドラッグ可能なつまみが付いています。
配列
スクリプトがパブリック変数として配列を公開している場合、インスペクターには、配列の項目数 (Size) と、配列内の値や参照の両方を編集できるコントロールが表示されます。
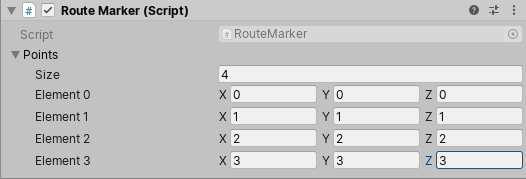
Size の値を減じると、Unity は配列の最後尾から値を削除します。 Size の値を増やすと、Unity は現在の最後尾の値を、追加するすべての新しい要素にコピーします。
| ヒント: |
|---|
| ほとんどの値が同じである配列を設定するには、最初の要素を加えた後、サイズを変更してその値を後続の要素にコピーします。 |
スウォッチライブラリの作成
カラー、グラデーション、アニメーションカーブの再利用、保存、共有にはスウォッチライブラリを使用します。スウォッチの保存と選択は、カラーピッカー、グラデーションエディター、カーブエディター で行うことができます。

スウォッチライブラリは、ファイルに保存するスウォッチのコレクションです。スウォッチ部分には、一度に 1 つのライブラリだけが表示されます。
スウォッチを保存する方法は以下の通りです。
- カラーピッカー、グラデーションエディター、カーブエディターのいずれかを開きます。例えば、Hierarchy ウィンドウで Main Camera を選択します。
- Inspector ウィンドウで、Background Color をクリックします。
- ピッカーウィンドウで、好みの色、グラデーション、カーブを調整します。
- Swatches で、輪郭のあるボックスをクリックします。
- ビューがリストモードの場合は、任意でスウォッチの名前を入力します。

順序を変更するには、スウォッチをドラッグアンドドロップします。スウォッチを右クリックすると、上に移動、置き換え、名前の変更、削除できます。Alt/Option を押しながらクリックしてスウォッチを削除することもできます。
Swatch のドロップダウンメニューを使用して以下を行えます。
- ビューを変更するには、List か Grid を選択します。リストビューには、スウォッチの名前も表示されます。
- スウォッチライブラリを選択します。
- Create a Library を選択すると、新しいスウォッチライブラリとその保存場所が作成されます。
- Windows エクスプローラー/Mac OS Finder で現在のライブラリを表示するには Reveal Current Library Location を選択します。
デフォルトでは、Unity はユーザー設定にスウォッチライブラリを保存します。また、プロジェクトにスウォッチライブラリを保存することもできます。プロジェクトのスウォッチライブラリは Assets フォルダーの Editor フォルダーに保存されます。プロジェクトスウォッチライブラリをユーザー間で共有したり、パッケージに加えるには、それらをリビジョン管理リポジトリに追加します。
Project のスウォッチライブラリを編集するには、以下の手順を行います。
- Unity 2020.1 で Inspector セクションを再編成