AudioGroup Inspector
AudioGroup ヒエラルキーの AudioGroup を選択することで、AudioGroup ビューまたはプロジェクトウィンドウ(サブアセットとして)が、AudioGroup のインスペクターを表示します。
AudioGroup のためのインスペクターは、いくつかのコンポーネントで構成されています。
Inspector Header
AudioGroup インスペクターの上部には、すべてのオブジェクトインスペクターに共通のギアドロップダウンメニューと一緒に AudioGroup の名前があります。

ギアメニューには、以下の機能があります。
- Copy all effect settings to all snapshots: This lets you to copy all of the effect parameter, volume and pitch settings of this AudioGroup to all of the other snapshots present within the Audio Mixer. This lets you to quickly make all snapshots ‘like this one’ for this AudioGroup.
- Toggle CPU usage display: This toggles CPU performance information for all of the effects present in the AudioGroup inspector. This is used to get an idea of which effects within your DSP setup are consuming the most resources.
Edit in Playmode


When in Playmode within Unity, the Inspector for an AudioGroup includes a button at the top called Edit in Playmode. By default, the parameter values of an Audio Mixer are not editable in Playmode and are fully controlled by the current snapshot within the game.
Edit in Playmode allows you to override the snapshot system and make edits to the current snapshot directly during playmode. This is a great way to mix and master a game while playing it in realtime.
Pitch slider
すべての AudioGroup インスペクターの上部に、その AudioGroup を通して再生のピッチを定めるスライダーがあります。ピッチを変更するには、どのスライダーを使用するか、右側にあるテキストフィールドにマニュアルでピッチ値を入力してください。

Attenuation Unit
Every AudioGroup within an Audio Mixer has exactly 1 Attenuation Unit.
減衰ユニットは、AudioGroup を通過したオーディオ信号に減衰/ゲインを適用できるところです。減衰は計算され、’その部分に’信号に適用されます(他の減衰設定とは結合せず、音声ソースに適用されます)。Receives とノンリニア DSP エフェクトを結合すると、非常に複雑で面白いセットアップをつくることができます。減衰は–80dB(無音)まで適用でき、ゲインは+20デシベルまで適用できます。

すべての減衰ユニットは、インスペクターに VU メーターを持っています。このメーターは、信号チェーン内のその時点での(減衰が適用された直後の)オーディオ信号のレベルを示します。DSP エフェクトを有する場合または、減衰ユニットの後に受信した場合、その AudioGroup 用 AudioGroup ストリップで見られるメーターの情報は、減衰ユニットでのメーターの情報とは異なります。減衰ユニットを左右にドラッグして、処理のチェーンが異なる点でメーターを表示させるこの方法は AudioGroup のシグナルチェーンのデバッグに最適な方法です。
VU メーターは、実効値(RMS)とピークホールド値の両方を示しています。
- To move the Attenuation Unit (or any effect) up or down the signal chain, select the Unit’s header and drag up or down the inspector to reposition it.
- 減衰の設定を変更するには、メータリングの上でスライダーを移動したり、テキストボックスに値を入力します。
Effect Units
エフェクトユニットは、AudioGroup を通して再生されている音声信号を変調する一般的な DSP エフェクトです。例えば、Highpass または Reverb です。エフェクトユニットはまた、Send Unit から送信されているサイドチェーンの信号情報を処理することもできます。各エフェクトユニットにつきインタフェースは異なり、ほとんどの部分は、どのようにエフェクトが信号に適用されるか、変調を変更するためのパラメーターのコレクションを公開します。たとえば、パラメータの EQ エフェクトには、信号の処理方法を変更する3つのパラメータがあります:

Unity comes with a collection of in-built effects that you can use within an AudioGroup. There is also the ability to create custom DSP effect plugins that can be used within an Audio Mixer.
- To add an effect to the AudioGroup, select Add Effect button at the bottom of the AudioGroup Inspector.

To change the ordering of the effect within the AudioGroup, select the effect header and drag up or down to place it in a different position.
To remove the effect from the AudioGroup, right-click on the effect header and select Remove this effect.
Send Units
Send はオーディオ信号のフローを分岐することができ、他のエフェクトユニット内のサイドチェーンとして使用される信号の減衰したコピーを送信します。例えば、サイドチェーンコンプレッサーです。シグナル·チェーンのどこにでも Send を挿入することができ、いずれの点でも信号の分岐ができます。

Initially, when Sends are added to an AudioGroup, they don’t send to anything, and the Send Level is set to 80dB. To send to another Effect Unit, you must already have an Effect Unit that can accept side-chain signals in the Audio Mixer somewhere. After the destination Effect Unit has been selected, you need to increase the Send Level to send signal to the destination.
- To add a Send to an AudioGroup, select Add Effect at the bottom of the AudioGroup Inspector and choose Send.
- (信号を受信することができる)別のエフェクトユニットの Send に接続するには、Send Unit Inspector のドロップダウンメニューから届け先を選択します。
- “Send Level”で届け先に送られる信号のレベルを設定します。
Receive Units
Receives are the signal sinks of Sends. They take the audio signal that is sent to them from Sends and mix it with the current signal passing through their AudioGroup. There are no parameters to a Receive.

Note: If you Solo a Receive unit, the sound stops playing. This is by design.
Duck Volume Units
Duck Volume Units allow you to create side-chain compression from signal sent from Sends. Duck Volume is a great way to control the attenuation of a signal based on audio being played somewhere else in the Audio Mixer.

Duck Volume ユニットは、他のエフェクトユニットのように追加することができ、少なくとも使える一つの send から信号がそれらに送られている必要があります。
Common options
AudioGroup インスペクター内の各ユニットは、多くの共通の特徴があります。
Gear options
- Allow Wet Mixing - このオプションに切り替えると、エフェクトの周りの dry チャネルを作成します。dictates を有効にすると、表示されるスライダーで、信号の何パーセントかは wet/dry コンポーネントに渡されます。
- Bypass - 切り替えると、完全にエフェクトユニットをバイパスし、シグナル·チェーンでそれを効果的に無効にします。
- Copy Effect Settings to all Snapshots - Selecting this will copy all the parameter values within this Effect Unit to all the other Snapshots in the Audio Mixer. This is useful when adding a new Effect Unit, making changes to that Effect Unit and wanting those settings to be the same across all Snapshots.
- Add Effect Before - AudioGroup において現在のエフェクトユニットの前にエフェクトユニットを挿入することができ、表示されたメニューから目的のエフェクトを選択します。
- Add Effect After - AudioGroup において現在のエフェクトユニットの後にエフェクトユニットを挿入することができ、表示されたメニューから目的のエフェクトを選択します。
- Remove This Effect - Remove this Effect Unit completely from the Audio Mixer. Attenuation Units cannot be removed from AudioGroups.
Wet Mixing
Allowing Wet Mixing on a DSP effect allows you to decide how much of the audio signal that is to enter the effect actually is processed by the effect. Enabling Wet Mixing effectively creates a dry channel around the effect. You can then select the effect slot and drag left and right to increase or decrease the percentage of audio signal that is passed through the DSP effect unit. The rest of the signal is passed through the dry channel. The following diagram illustrates this concept:
Wet mixing は、ユーザーがエフェクトがミックスに与える影響を制御し、元の信号の割合を維持したいときに適しています。

Exposed parameters
Exposed parameters allow you to bypass the Snapshot system of an Audio Mixer and set the value of any parameter within an Audio Mixer from script. When an exposed parameter is set via script, that parameter is locked to that value and will not change as the the game transitions Snapshots.
Exposing a parameter with an Audio Mixer is done in the AudioGroup Inspector. For any parameter shown in the Inspector (including Pitch, Volume, Send Level and Wet Level), you can right-click on the name of the parameter and choose ‘Expose X to script’.

After a parameter is exposed, it shows up in the Exposed Parameter drop down in the top right corner of the Audio Mixer Window. Selecting on this drop down reveals all the exposed parameters in the Audio Mixer.

- To rename an exposed parameter, right-click on the name of the exposed parameter and select Rename. This name will be how you reference the parameter from the AudioMixer API.
- To delete an exposed parameter, right-click on the name of the exposed parameter and select Delete.
Transition overrides
When transitioning between Snapshots, by default all transitions are done with linear interpolation from the beginning to target values. In some cases this transition behaviour is not desired however, for example when it’s preferable to brick-wall the change at the start or end of the transition.
All of the parameters available within the Audio Mixer can have their transition behaviour changed. Transition behaviours are defined per-Snapshot, with the target Snapshot defining the transition behaviour.
To set the transition override for a particular parameter for the current Snapshot, right-click on the parameter name and select the required transition type.
![]()
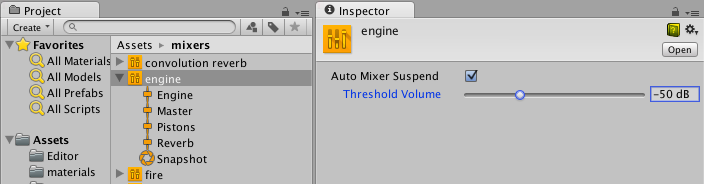
Audi Mixer inspector
オーディオ ミキサー アセットには独自にインスペクターがあり、ミキサーの全般的なアクティベーション、または、一時停止ビヘイビアを特定できます。アセットなので、オーディオ ミキサーはオーディオ ソースがミキサーで再生されるときアクティブ化され、オーディオ データをミキサーに提供するドライバがある限り、オーディオ ミキサーは基本的にアクティブであり続けます。ミキサーは、シーン ビューのオーディオ プレビュー ボタンでもアクティブ化できるので、アクティベーション ビヘイビアは MonoBehavior などのシーン オブジェクトとは異なります。したがって、ミキサーは停止モードでもアクティブなこと (そのため CPU を消費する) があります。
To avoid running out of CPU resources in a project that contains a large number of mixers that are not supposed to be running all at the same time (say, because specific levels use certain specialized mixers), the audio mixers have functionality built-in to put themselves into suspended mode in which all processing stops. To do this in a natural way that doesn’t lead to audible artefacts such as clicks or missing reverb/echo tails each mixer uses the following strategy:
As long as any audio source is playing into this mixer or the mixer is receiving audio data from other sub-mixers the mixer will keep itself active. After the last sound source has finished playing, the mixer will wait for a second and then continually use loudness-measurement at its own output to decide if it should suspend itself. This is needed because reverb and echo tails can potentially decay very slowly. The loudness threshold at which the mixer suspends itself is determined by enabling Auto Mixer Suspend and setting the Threshold Volume parameter on the mixer asset’s inspector which is shown then the mixer asset is selected in the project browser (not when selecting a sub-asset like a mixer group or snapshot). The value of –80 dB is chosen as the default and matches the lowest value of the faders in the mixer. In practice it is often possible to set it to a significantly larger value to get quicker deactivation and avoid intermediate CPU spikes that could cause stutter.
Copyright © 2023 Unity Technologies
优美缔软件(上海)有限公司 版权所有
"Unity"、Unity 徽标及其他 Unity 商标是 Unity Technologies 或其附属机构在美国及其他地区的商标或注册商标。其他名称或品牌是其各自所有者的商标。
公安部备案号:
31010902002961