Importing a model with non-humanoid (generic) animations
This page contains guidance on importing a model for use with Unity’s Animation System. For information on creating a model for use with the Animation System, see Creating models for animation.
The Animation System works with two types of models:
- A Humanoid model is a specific structure, containing at least 15 bones organized in a way that loosely conforms to an actual human skeleton. For information on importing this type of model, see Importing a model with humanoid animations.
- A Generic model is everything else. This might be anything from a teakettle to a dragon. This page contains guidance on importing this type of model.
For general importing guidance that is applicable to all types of models, see Importing a model.
개요
When Unity imports a Generic model, you must tell it which bone is the Root node. This effectively defines the model’s center of mass.
Since there is only one bone to map, Generic setups do not use the Humanoid Avatar window. As a result, preparing to import your non-Humanoid model file into Unity requires fewer steps than for Humanoid models.
- 릭을 Generic 으로 설정합니다.
- 필요하면 아바타 마스크를 정의하여 특정 뼈대에 임포트되는 애니메이션을 제한할 수 있습니다.
- Animation 탭에서 Import Animation 옵션을 사용 설정한 다음 나머지 에셋 관련 프로퍼티를 설정합니다.
- 파일이 여러 애니메이션 또는 액션으로 구성된 경우 특정 프레임 범위를 애니메이션 클립으로 정의할 수 있습니다.
- 파일에 정의된 각 애니메이션 클립마다 다음 작업을 수행할 수 있습니다.
- 포즈와 루트 트랜스폼 설정
- 루핑 최적화
- 다른 항목의 타이밍을 애니메이션화하기 위해 클립에 커브 추가
- 특정 액션을 애니메이션과 함께 정해진 시간 내에 트리거하기 위해 클립에 이벤트 추가
- 애니메이션 일부 폐기. 런타임 아바타 마스크를 사용하는 것과 유사하지만 임포트 시에 적용됩니다.
- 액션을 결정할 다른 루트 모션 노드 선택
- 클립 임포트에 대한 Unity 메시지 읽기
- 애니메이션 클립 미리보기 확인
- Import Settings 창 하단의 Apply 버튼을 클릭하여 변경 사항을 저장하거나 Revert 를 클릭하여 변경 사항을 취소합니다.
릭 설정
인스펙터 창의 Rig 탭에서 Avatar (애니메이션) 타입을 Generic 으로 설정합니다. Avatar Definition 프로퍼티의 기본 설정은 Create From This Model 이고 Root node 옵션의 기본 설정은 None 입니다.
경우에 따라 Avatar Definition 옵션을 Copy From Other Avatar 로 변경하여 다른 모델 파일에 대해 이미 정의된 아바타를 사용할 수 있습니다. 예를 들어 3D 모델링 애플리케이션에서 여러 상이한 애니메이션을 사용하여 메시(스킨)를 생성하면 이 메시를 FBX 파일 하나로 익스포트하고 각 애니메이션을 자체 FBX 파일로 익스포트할 수 있습니다. 이런 파일을 Unity로 임포트하면 임포트하는 첫 파일(일반적으로 메시)에 대해 아바타를 하나만 생성하면 됩니다. 파일에서 동일한 뼈대 구조를 사용하는 한, 해당 아바타를 나머지 파일(예: 모든 애니메이션)에 다시 사용할 수 있습니다.
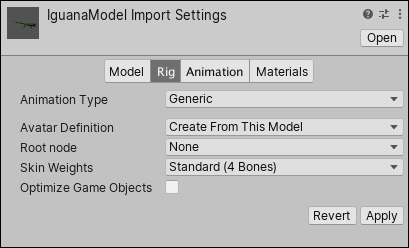
Create From This Model 옵션을 유지하면 Root node 프로퍼티에서 뼈대를 선택해야 합니다.
Avatar Definition 옵션을 Copy From Other Avatar 로 변경하기로 결정하면 Source 프로퍼티를 설정하여 사용할 아바타를 지정해야 합니다.
Skin Weights 프로퍼티를 사용하여 특정 버텍스에 영향을 줄 수 있는 최대 뼈대 수를 변경할 수도 있습니다. 기본적으로 이 프로퍼티는 영향을 줄 수 있는 뼈대를 네 개로 제한하지만, 더 많거나 적게 지정할 수도 있습니다.
When you click the Apply button, Unity creates a Generic Avatar and adds an Avatar sub-Asset under the Model Asset, which you can find in the Project view.
참고: 제네릭 아바타는 휴머노이드 아바타와 같지 않지만, 프로젝트 뷰에 표시되고 루트 노드 매핑을 포함합니다. 하지만 프로젝트 뷰에서 아바타 아이콘을 클릭하여 아바타 프로퍼티를 인스펙터 에 표시하려고 하면 아바타 이름만 표시되고 Configure Avatar 버튼은 없습니다.
아바타 마스크 생성
임포트 시간 중이나 런타임에 애니메이션 클립에 마스킹을 적용할 수 있습니다. 임포트하는 중에 마스킹을 적용하면 폐기된 애니메이션 데이터를 빌드에서 제외할 수 있어 파일 크기와 메모리 사용량이 줄어들기 때문에 더 바람직합니다. 또한 런타임에 블렌드할 애니메이션 데이터가 더 적기 때문에 처리 속도도 빨라집니다. 하지만 때로는 임포트 중에 마스킹을 하는 방법이 목적에 부합하지 않을 수 있습니다. 이 경우 Avatar Mask 에셋을 만들고 Animator Controller 의 레이어 설정에 사용하여 런타임에 마스크를 적용할 수 있습니다.
빈 아바타 마스크 에셋을 생성하려면 다음 작업 중 하나를 수행합니다.
- Assets 메뉴에서 Create > Avatar Mask 를 선택합니다.
- Project 뷰에서 마스크를 정의할 모델 오브젝트를 클릭한 다음 마우스 오른쪽 버튼을 클릭하고 Create > Avatar Mask 를 선택합니다.
새 에셋이 Project 뷰에 표시됩니다.
이제 트랜스폼 계층 구조에 포함시키거나 제외할 뼈대를 선택한 다음 애니메이션(Animation) 탭의 마스크 섹션에서 마스크를 애니메이션 레이어에 추가하거나 레퍼런스를 마스크에 추가할 수 있습니다.
Copyright © 2023 Unity Technologies
优美缔软件(上海)有限公司 版权所有
"Unity"、Unity 徽标及其他 Unity 商标是 Unity Technologies 或其附属机构在美国及其他地区的商标或注册商标。其他名称或品牌是其各自所有者的商标。
公安部备案号:
31010902002961