- Unity User Manual 2020.3 (LTS)
- 그래픽스
- 모델(Models)
- Creating models outside of Unity
- Creating models for animation
Creating models for animation
This page contains guidance on creating a model for use with Unity’s Animation System.
For general best practice guidance on creating all types of models, see Creating models for optimal performance. For information on importing a model with animations into Unity, see Importing a model with humanoid animations or Importing a model with non-humanoid (generic) animations.

There are two types of models that you can use with Unity’s Animation System:
- A Humanoid model is a specific structure, containing at least 15 bones organized in a way that loosely conforms to an actual human skeleton.
- A Generic model is everything else. This might be anything from a teakettle to a dragon.
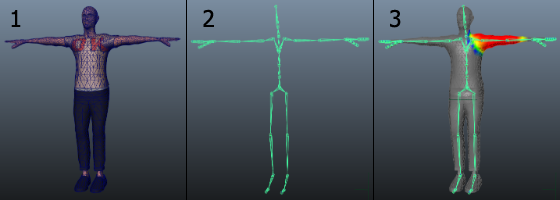
Both require a rigged, skinned model. The stages of creating such a model are:
- Modeling: Creating the model. The model contains the mesh, textures, and so on.
- Rigging: Creating the skeleton, also called the rig or joint hierarchy. This defines the bones inside the mesh, and their movement in relation to one another.
- Skinning: Joining the mesh to the skeleton. This defines which parts of the character mesh move when a given joint is animated.
You usually perform all of these steps in 3D modeling software (such as Autodesk® 3ds Max®, Autodesk® Maya®, or Blender), export the resulting model, and import it into Unity.
Modeling
There are a few guidelines you can follow to ensure a model works well with animation in a Unity Project:
- Use a topology with a well-formed structure. Generally, you should consider how the vertices and triangles of the model distort as it animates. A good topology allows the model to move without distorting the mesh. Study existing character meshes to see how the topology is arranged and why.
- Check the scale of your mesh. Do a test import and compare the size of your imported Model with a “meter cube”. The standard Unity cube primitive has a side length of one unit, so it can be taken as a 1m cube for most purposes. Check the units your 3D modeling software uses and adjust the export settings so that the size of the Model is in correct proportion to the cube.
- While you are building, clean up your model. Where possible, cap holes, weld vertices, and remove hidden faces. This helps with skinning, especially automated skinning processes.
- If your character has feet, arrange the mesh so that they stand on the local origin or “anchor point” of the model. It makes walking much easier to handle if a character’s anchor point (that is, its transform position) is directly on the floor.
- If your character is a biped, model in a T-pose. This gives you space to refine polygon detail where you need it (such as the underarms). This also makes it easier to position your rig inside the Mesh.

Rigging
3D modeling software provides a number of ways to create joints for your rig.
For a Humanoid model, there are specific requirements for the skeleton so that Unity can match it to a Humanoid Avatar:
- A minimum of 15 bones. Your skeleton needs to have at least the required bones in place.
- In order to improve your chances for finding a match to the Avatar, name your bones in a way that reflects the body parts they represent. For example, “LeftArm” and “RightForearm” make it clear what these bones control.
- The joint/bone hierachy should follow a natural structure for the character you are creating. Given that arms and legs come in pairs, you should use a consistent convention for naming them (for example, “arm_L” for the left arm, “arm_R” for the right arm). Possible structures for the hierarchy include:
- HIPS - spine - chest - shoulders - arm - forearm - hand
- HIPS - spine - chest - neck - head
- HIPS - UpLeg - Leg - foot - toe - toe_end

For a Generic model, the only requirement is that the skeleton contains a bone that you can designate as the Root node when you import the model. This effectively defines the model’s center of mass.
Skinning
The initial setup is typically automated. Skinning usually requires a fair amount of work and testing with animations in order to ensure satisfactory results for the skin deformation.

이 프로세스에 대한 일반적인 가이드라인은 다음과 같습니다.
- 처음에는 자동화된 프로세스를 사용하여 일부 스키닝을 설정합니다(3D 모델링 소프트웨어에서 제공하는 스키닝 튜토리얼 참조).
- 릭의 간단한 애니메이션을 만들거나 애니메이션 데이터를 임포트하여 스키닝 테스트를 수행합니다. 그러면 동작 중에 스키닝이 좋아 보이는지 간편하게 평가할 수 있습니다.
- 스키닝 솔루션을 점진적으로 편집하고 다듬습니다.
- 성능상의 이유로 소프트 바인딩을 사용할 때 인플루언스 수를 Unity가 지원하는 최대 개수인 4개로 제한합니다. Unity는 기본적으로 최대 4개를 지원합니다. 메시가 4개가 넘는 인플루언스를 사용하면 다음 옵션 중에서 하나를 선택할 수 있습니다.
- Skin Weights 프로퍼티를 사용하여 최대 인플루언스 수를 증가시킵니다.
- Bake Deformer 툴(Maya의 상단 메뉴에서 Skin > Skin > Bake Deformers to Skin Weights로 이동)을 사용하여 Maya에서 모델을 익스포트하기 전에 변형 조인트를 베이크하십시오. 자세한 내용은 Autodesk 문서의 캐릭터에서 디포머 베이크를 참조하십시오.
Exporting and verifying your model
Unity imports a number of different generic and native 3D file formats, but the recommended file format is .fbx. For more information, see Model file formats.
When you use .fbx, you can:
- 골격 계층 구조, 노멀, 텍스처 및 애니메이션이 있는 메시를 익스포트합니다.
- 메시를 3D 모델링 소프트웨어에 다시 임포트하여 애니메이션화된 모델이 예상하는 대로 구현되었는지 검증합니다.
- 메시 없이 애니메이션을 익스포트합니다.