- Unity User Manual 2022.1
- 2D
- 타일맵
- 아이소메트릭 타일맵
- 아이소메트릭 타일맵용 스프라이트 임포트 및 준비
아이소메트릭 타일맵용 스프라이트 임포트 및 준비
Import the individual Tiles or Tilesheet images for your Isometric Tilemap into your Unity Project by placing the Textures into the Assets folder. Select the imported images to view their Texture Importer settings in the Inspector window.

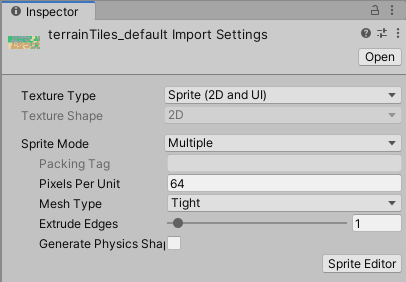
When importing Sprites for use in an Isometric Tilemap, use the following recommended settings. For further information about each setting, refer to the documentation on Texture Type: Sprite (2D and UI).
- Texture Type - Sprite (2D and UI)로 설정합니다. 다른 텍스처 타입은 타일맵에서 지원되지 않습니다.
- Sprite Mode - Set this to Single if the Texture contains only a single Sprite. Set to Multiple if it contains multiple Sprite Textures, for example a Sprite sheet with multiple Tile Textures.
- Pixels Per Unit (PPU) - This value is the number of pixels that make up one Unity unit for the selected Sprite. This determines the size of the Sprite when it is rendered on the Tilemap. This is also affected by the Cell Size setting of the Grid that contains the Tilemap, which determines how many Unity units make up a single Cell. Refer to the example below to see how PPU values and the Grid’s Cell Size settings interact.
- Mesh Type - Set to Tight to ensure the Tile Meshes follow the outline of the imported Sprites, and the Tiles are drawn flush together on the Tilemap. Due to the general diamond shape of most Isometric Tiles, setting this to Full Rect may result in drawing of wasted transparent spaces at the corners of an Isometric Tile, and is not recommended.
- Generate Physics Shape - If the Tiles do not need to interact with Physics2D, then clear this option. Leave this option enabled to generate a Physics Shape based on the shape of the Tile Sprite, for use with the Tilemap Collider component. To make the generated Physics Shape match the cell of the Tilemap instead, select the Tile Asset and set its Collider Type property to Grid.
In the example below, the imported Sprite is a 256x128 image, and the Isometric Tilemap has a Cell Size of (XYZ: 1, 0.5, 1) Unity units. To make the Sprite fit exactly on a single Cell of the Tilemap, set its PPU value to 256. Its entire width then corresponds to one Unity unit, which is equal to the width (X value: 1) of a single Cell.

스프라이트의 PPU 값이 128로 설정되면 너비가 Unity 단위로 2(256픽셀/128)가 됩니다. 그러면 타일맵에 페인팅된 스프라이트가 너비 기준으로 셀 2개를 차지하는 것으로 보이게 됩니다. 하지만 타일의 원래 셀 포지션은 변경되지 않습니다.
After the Sprites are imported, refine the outlines of the Sprites by opening the Sprite Editor for each of them and editing their outlines. For Sprites in an Isometric Tilemap, you should set the Pivot of the Sprite so that the ‘ground’ is relative to the Sprite.
If the Texture is imported with Sprite Mode set to Multiple and contains multiple Sprites, then edit the outline of each Sprite in the Sprite Editor.
- [2018.3]에 아이소메트릭 타일맵 추가됨(https://docs.unity.cn/2018.3/Documentation/Manual/30_search.html?q=newin20183) NewIn20183