Migrate from Unity UI (uGUI) to UI Toolkit
This page guides developers with experience in Unity UI (uGUI) to transition to the new UI Toolkit system. It explores the similarities and differences between uGUI and the UI Toolkit.
As uGUI is a runtime-only UI system, this page focuses on runtime UI. UI Toolkit can create both runtime and Editor UI. This guide applies to both use cases for UI Toolkit.
UI hierarchy
Both uGUI and UI Toolkit build and maintain the UI inside a hierarchy tree structure. In uGUI, all elements in this hierarchy are visible as individual GameObjects in the hierarchy view panel. In UI Toolkit, visual elements organize into a visual tree. The visual tree isn’t visible in the panel.
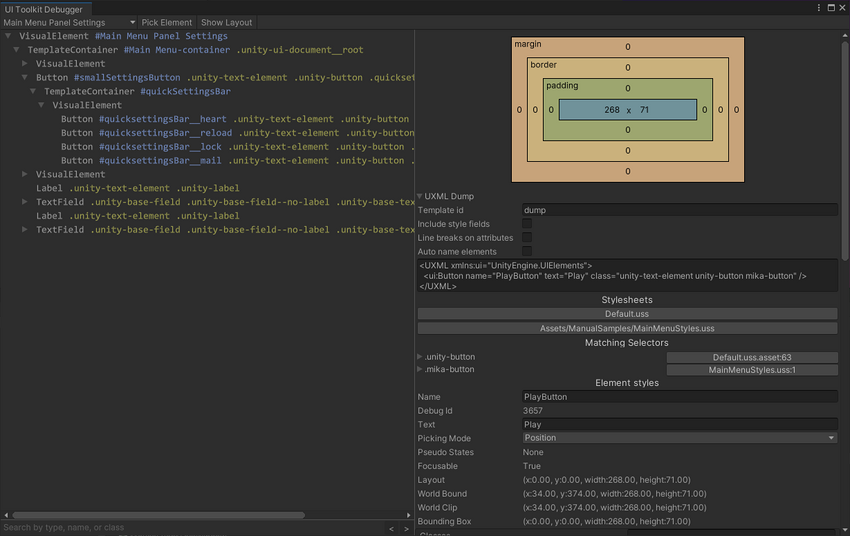
UI 툴킷에서 UI 계층 구조를 확인하고 디버깅하려면 UI 디버거를 사용하십시오. 에디터 툴바의 Window > UI Toolkit > Debugger에서 UI 디버거를 찾을 수 있습니다.
주요 차이점
캔버스 vs. UIDocument
The Canvas component in uGUI is similar to the UIDocument component in UI Toolkit. Both are MonoBehaviours that attach to GameObjects.
In uGUI, a Canvas component sits at the root of the UI tree. It works with the Canvas Scaler component to determine the sort order, rendering, and scaling mode of the UI underneath.
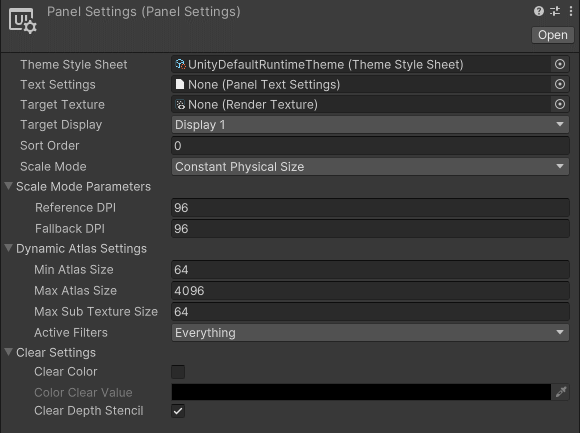
UI 툴킷의 UIDocument 컴포넌트에는 PanelSettings 오브젝트에 대한 레퍼런스가 포함되어 있습니다. PanelSettings에는 스케일 모드, 정렬 순서를 포함하여 UI에 대한 렌더링 설정이 포함되어 있습니다. 여러 UIDocument 컴포넌트는 동일한 PanelSettings 오브젝트를 가리킬 수 있으므로, 동일한 씬에서 여러 UI 화면을 사용할 때 성능이 최적화됩니다.
In uGUI, the UI tree hierarchy sits underneath the GameObject holding the Canvas component. In UI Toolkit, the UIDocument component holds a reference to the root element of the Visual Tree.
또한 UIDocument 컴포넌트에는 런타임에 시각적 트리가 빌드되는 UI 레이아웃을 정의하는 UXML 파일에 대한 레퍼런스도 포함되어 있습니다. 자세한 내용은 UI 만들기 섹션을 참조하십시오.
Note: For Editor UI, no UIDocument component is needed. You can derive your custom class from EditorWindow, then implement CreateGUI(). For a practical example, see the guide on Creating custom Editor windows.
GameObject components vs visual elements
UI 툴킷은 UI 요소를 컨트롤 또는 시각적 요소라고 지칭합니다. UI 요소의 예는 다음과 같습니다.
- 컨트롤
- 버튼
- 텍스트 레이블
uGUI builds the UI hierarchy from GameObjects. Adding new UI elements requires adding new GameObjects to the hierarchy. The individual controls are implemented as MonoBehaviour components.
In UI Toolkit, the visual tree is virtual and doesn’t use GameObjects. You can no longer build or view the UI hierarchy in the hierarchy view, but it removes the overhead of using a GameObject for each UI element.
In uGUI, UI elements derive (directly or indirectly) from the UIBehavior base class. Similarly, in UI Toolkit all UI elements derive from a base class called VisualElement. The key difference is the VisualElement class doesn’t derive from MonoBehaviour. You can not attach visual elements to GameObjects.
Working with UI Toolkit controls in script is similar to working with uGUI controls. The following table shows common script interactions with UI controls in uGUI, and their UI Toolkit counterparts.
| 액션 | uGUI | UI 툴킷 |
|---|---|---|
| 레이블에 텍스트를 작성합니다. | m_Label.text = "My Text"; |
m_Label.text = "My Text"; |
| 토글 상태를 읽습니다. | bool isToggleChecked = m_Toggle.isOn; |
bool isToggleChecked = m_Toggle.value; |
| 버튼에 콜백을 할당합니다. | m_Button.onClick.AddListener(MyCallbackFunc); |
m_Button.clicked += MyCallbackFunc_1;or m_Button.RegisterCallback<ClickEvent>(MyCallbackFunc_2);
|
컨트롤과 해당 프로퍼티 및 이벤트에 대한 자세한 내용은 컨트롤 개요 페이지를 참조하십시오.
Access UI elements
In uGUI, there are two ways scripts can access UI elements:
- 에디터에서 UI 컴포넌트에 대한 레퍼런스를 할당합니다.
-
GetComponentInChildren<T>()과 같은 헬퍼 함수를 사용하여 계층 구조에서 컴포넌트를 찾습니다.
UI 툴킷에는 게임 오브젝트 또는 컴포넌트가 없으므로 에디터에서 컨트롤에 대한 레퍼런스를 직접 할당할 수 없습니다. 쿼리 함수를 사용하여 런타임에 확인해야 합니다.
대신에 UIDocument 컴포넌트를 통해 시각적 트리에 액세스하십시오.
UIDocument is a MonoBehaviour, so you can assign it as a reference and make it part of a Prefab. The UIDocument component holds a reference to the root visual element. From the root, scripts can find child elements by type or by name, similar to uGUI.
아래 표는 Unity UI와 UI 툴킷에서 UI 컨트롤에 액세스하는 작업을 직접 비교하여 보여줍니다.
| 액션 | uGUI | UI 툴킷 |
|---|---|---|
| 이름별로 UI 요소를 찾습니다. | transform.FindChild("childName"); |
rootVisualElement.Query("childName"); |
| 타입별로 UI 요소를 찾습니다. | transform.GetComponentInChildren<Button>(); |
rootVisualElement.Query<Button>(); |
| 에디터에서 레퍼런스를 직접 할당합니다. | 가능 | 불가능 |
Create UI
One of the biggest differences between uGUI and UI Toolkit is the creation of user interfaces.
Both uGUI and UI Toolkit allow you to visually build the UI and preview it in the Editor. In uGUI, the UI is then saved inside a Prefab, along with any logic scripts attached to individual UI controls.
UI 툴킷에서 UI 레이아웃은 UI 빌더에서 생성된 후 하나 또는 여러 개의 UXML 파일로 저장됩니다. 런타임 시점에 UIDocument 컴포넌트는 시각적 트리가 메모리에서 어셈블하는 UXML 파일을 로드합니다.
For a method similar to uGUI, you can create UI controls directly from a script, then add them to a Visual Tree at runtime.
프리팹
uGUI uses GameObjects for individual UI controls and Prefabs that both contain visuals and logic. UI Toolkit takes a different approach to re-usability, as it separates logic and layout. You can create reusable UI components through UXML and custom controls.
UI 툴킷에서 프리팹과 유사한 템플릿을 생성하려면 다음 단계를 따르십시오.
- 부분 UI 요소에 대한 UXML 파일을 생성합니다.
-
UIDocument컴포넌트를 사용하여 게임 오브젝트를 생성합니다. - 게임 오브젝트에서 UXML 파일을 참조합니다.
- 동일한 게임 오브젝트에 UI 컴포넌트 로직을 처리하는 스크립트를 추가합니다.
- 게임 오브젝트를 프리팹으로 저장합니다.
UI layout
Arranging individual UI elements on screen in uGUI is a manual process. By default, UI controls are free floating and are only affected by their direct parent. Other UI controls under the same parent don’t affect their siblings positions or sizes. Pivots and anchors control the position and size of an element.
UI 툴킷 레이아웃 시스템은 웹 디자인의 영향을 받았으며 자동 레이아웃 생성을 기반으로 합니다. 자동 레이아웃 시스템은 기본적으로 모든 요소에 영향을 미치며, 요소의 크기와 포지션은 동일한 부모 아래의 다른 요소에 영향을 줍니다.
The default behavior in UI Toolkit is comparable to placing all elements inside a VerticalLayoutGroup in uGUI, and adding a LayoutElement component to each.
You can disable automatic layout generation by changing the IStyle position property of the visual element. All visual elements have this property. See Visual Tree for a code sample.
UI Toolkit has no direct equivalents for anchoring and pivots of UI elements, due to the fundamental layout differences compared to uGUI.
The size and position of an element is controlled by the layout engine. For more information, see Layout Engine and Coordinate and position systems.
렌더링 순서
In uGUI, the order of the GameObjects in the hierarchy determines the rendering order. Objects further down in the hierarchy render last and appear on top. In a scene with multiple Canvases, the Sort Order on the root Canvas component determines the render order of the individual UI trees.
The render order in a visual tree in UI Toolkit operates the same way. Parent elements render before their children, and children render from the first to the last, so that the last appears on top. In a scene with multiple UI Documents, the render order is determined by the Sort Order setting on the root UIDocument component.
To change the rendering order of an element in uGUI, such as making an element appear on top, you can call the sibling functions on the Transform component of the GameObject. The VisualElement class offers comparable functions to control the rendering order. As all UI Toolkit controls derive from this class, all controls have access to this function.
The table below shows the uGUI functions to control render order and the equivalent functions in UI Toolkit:
| 액션 | uGUI | UI 툴킷 |
|---|---|---|
| 다른 모든 형제 아래에서 요소가 렌더링되도록 만듭니다. | transform.SetAsFirstSibling(); |
myVisualElement.SendToBack(); |
| 다른 모든 형제 위에서 요소가 렌더링되도록 만듭니다. | transform.SetAsLastSibling(); |
myVisualElement.BringToFront(); |
| 해당 형제를 기준으로 요소의 렌더링 순서를 수동으로 제어합니다. | transform.SetSiblingIndex(newIndex); |
myVisualElement.PlaceBehind(sibling);myVisualElement.PlaceInFront(sibling);
|
이벤트
Just like in uGUI, user interactions in UI Toolkit trigger events. The code can subscribe to receive a callback on events, such as pressing a button or moving a slider.
In uGUI, all UI elements are based on MonoBehaviour, and can expose their events in the Editor. This allows to set up logic with other GameObjects, for example to hide or show other UI elements, or to assign callback functions.

UI 툴킷에서는 로직과 UI 레이아웃이 별도로 저장됩니다. 이제 콜백은 게임 오브젝트에서 직접 설정하거나 프리팹에 저장할 수 없습니다. 런타임 시점에 모든 콜백을 설정하고, 스크립팅을 통해 처리해야 합니다.
Button playButton = new Button("Play");
playButton.RegisterCallback<ClickEvent>(OnPlayButtonPressed);
...
private void OnPlayButtonPressed(ClickEvent evt)
{
  // Handle button press
}
The event dispatching system in UI Toolkit differs from events in uGUI. Depending on the event type, events aren’t just sent to the target UI control, but also to all the parent controls.
To learn more about this, see Dispatch events.
Use uGUI and UI Toolkit in the same project
It’s possible that you use uGUI and UI Toolkit in the same project.
In its current version, UI Toolkit doesn’t support 3D world space picking and rendering. You should make your entire game menu and Network Manager HUD with UI Toolkit, and make your 3D world space with uGUI.
You can also make your entire project with uGUI and only make some menu items with UI Toolkit.
You can use either UI Toolkit or uGUI for any item that doesn’t interact outside of its own boundaries. For example, for a runtime UI, you can use uGUI to create on-screen buttons, such as the joystick for mobile, and use UI Toolkit to create a modal window.
However, advanced interactions between mixed UI don’t work:
- You can’t only use a keyboard to navigate freely between focused element in UI Toolkit and a uGUI selected object. To navigate, you must use C# scripts to register events on the boundary elements, and manually select or focus the next element from the other domain.
- You can’t embed uGUI inside a UI Toolkit hierarchy or UI Toolkit in a uGUI hierarchy. You can use a
RenderTextureto draw, but the events won’t catch up. - Styling and event conventions in UI Toolkit are different from uGUI. It is difficult to make a project that has a UI that feels unified if you use a scattered mixture of uGUI and UI Tookit.
추가 리소스
Copyright © 2023 Unity Technologies
优美缔软件(上海)有限公司 版权所有
"Unity"、Unity 徽标及其他 Unity 商标是 Unity Technologies 或其附属机构在美国及其他地区的商标或注册商标。其他名称或品牌是其各自所有者的商标。
公安部备案号:
31010902002961