UI 툴킷 시작하기
Want to create your first UI with UI Toolkit? Use this basic UI Toolkit workflow example to get started.
Note: For demonstration purpose, this guide describes how to add UI controls for the Editor UI. However, the instructions on adding UI controls to a UI Document also apply to runtime UI. For more information, see Get started with runtime UI.
If you perform a specific task often, you can use UI Toolkit to create a dedicated UI for it. For example you can create a custom Editor window. The example demonstrates how to create a custom Editor window and add UI controls into your custom Editor window with UI Builder, UXML, and C# script.
이 예시에서 생성한 완성된 파일은 GitHub 저장소에서 확인할 수 있습니다.
커스텀 에디터 창 생성
- Create a project in Unity Editor with any template.
- In the Project window, right-click in the
Assetsfolder, and then select Create > UI Toolkit > Editor Window. - In UI Toolkit Editor Window Creator, enter
MyCustomEditor. - Clear the USS checkbox.
- Confirm을 클릭합니다.
This creates a custom Editor window with two labels. You can open the Editor window from the menu (Window > UI Toolkit > MyCustomEditor). You can find the source files for it in the Assets/Editor folder.
창에 UI 컨트롤 추가
다음과 같은 방법으로 창에 UI 컨트롤을 추가할 수 있습니다.
You can use any of these methods individually, or combine. The following examples create three sets of labels, buttons, and toggles with a combination of these methods.
UI 빌더를 사용하여 UI 컨트롤 추가
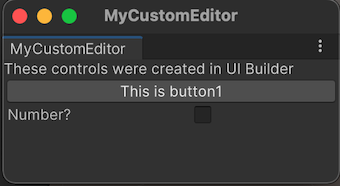
To visually add UI controls to your window, use UI Builder. The following steps add a button and a toggle into your custom Editor window in addition to the default label.
-
Editor폴더에서MyCustomEditor.uxml을 더블 클릭하여 UI 빌더를 엽니다. - UI 빌더에서, Library > Controls의 Button과 Toggle을 Hierarchy 또는 Viewport의 창 미리보기로 드래그합니다.
- In the Hierarchy window, select Label.
- In the Inspector window, change the default text to
These controls were created in UI Builderin the Text field. - In the Hierarchy window, select Button.
- In the Inspector window, enter
This is button1in the Text field. - Enter
button1in the Name field. - In the Hierarchy window, select Toggle.
- In the Inspector window, enter
Number?in the Label field. - Enter
toggle1in the Name field. - Save and close the UI Builder window.
- Close your custom Editor window if you haven’t done so.
- Select Window > UI Toolkit > MyCustomEditor to re-open your custom Editor window to see the button and the toggle you just added.
UXML을 사용하여 UI 컨트롤 추가
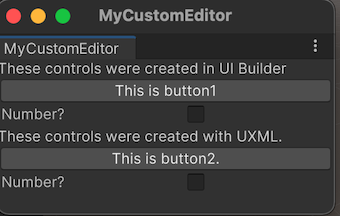
If you prefer to define your UI in a text file, you can edit the UXML to add the UI controls. The following steps add another set of label, button, and toggle into your window.
Editor폴더에서 Assets > Create > UI Toolkit > UI Document를 클릭하여MyCustomEditor_UXML.uxml이라는 UXML 파일을 만듭니다.Click the arrow on
MyCustomEditor_UXML.uxmlin the Project window.Double-click
inlineStyleto openMyCustomEditor_UXML.uxmlin a text editor.-
Replace the contents of
MyCustomEditor_UXML.uxmlwith the following:<?xml version="1.0" encoding="utf-8"?> <engine:UXML xmlns:xsi="http://www.w3.org/2001/XMLSchema-instance" xmlns:engine="UnityEngine.UIElements" xmlns:editor="UnityEditor.UIElements" xsi:noNamespaceSchemaLocation="../../UIElementsSchema/UIElements.xsd" > <engine:Label text="These controls were created with UXML." /> <engine:Button text="This is button2" name="button2"/> <engine:Toggle label="Number?" name="toggle2"/> </engine:UXML> MyCustomEditor.cs를 엽니다.-
m_UXMLTree라는 프라이빗VisualTreeAsset필드를MyCustomEditor클래스에 추가합니다. 그 위에[SerializeField]속성을 부여합니다.[SerializeField] private VisualTreeAsset m_UXMLTree; -
Add the following code to the end of
CreateGUI().root.Add(m_UXMLTree.Instantiate()); 프로젝트 창에서
MyCustomEditor.cs를 선택합니다.MyCustomEditor_UXML.uxml을 프로젝트 창에서 Inspector의 UXML Tree 필드로 드래그합니다. 이렇게 하면 UXML을 시각적 트리에 할당하게 됩니다.Select Window > UI Toolkit > MyCustomEditor. This opens your custom Editor window with three labels, two buttons, and two toggles.
C# 스크립트를 사용하여 UI 컨트롤 추가
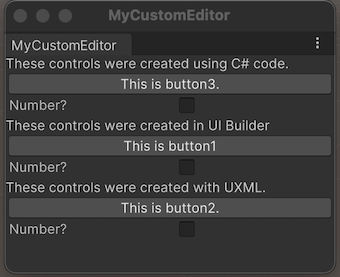
If you prefer coding, you can add UI Controls to your window with a C# script. The following steps add another set of label, button, and toggle into your window.
MyCustomEditor.cs를 엽니다.-
Unity는 기본 UI 컨트롤(예: 레이블, 버튼, 토글 등)에
UnityEngine.UIElements를 사용합니다. UI 컨트롤을 사용하여 작업하려는 경우 다음 선언이 아직 없다면 반드시 추가해야 합니다.using UnityEngine.UIElements; 기존 레이블의 텍스트를
"Hello World! From C#"에서"These controls were created using C# code."로 변경합니다.-
EditorWindow 클래스에는
rootVisualElement라는 프로퍼티가 있습니다. UI 컨트롤을 창에 추가하려면 먼저 몇 가지 속성으로 요소 클래스를 인스턴스화한 다음rootVisualElement의Add메서드를 사용합니다.완성된
CreateGUI()메서드는 다음과 같이 작성되어야 합니다.public void CreateGUI() { // Each editor window contains a root VisualElement object VisualElement root = rootVisualElement; // VisualElements objects can contain other VisualElements following a tree hierarchy. Label label = new Label("These controls were created using C# code."); root.Add(label); Button button = new Button(); button.name = "button3"; button.text = "This is button3."; root.Add(button); Toggle toggle = new Toggle(); toggle.name = "toggle3"; toggle.label = "Number?"; root.Add(toggle); // Import UXML var visualTree = AssetDatabase.LoadAssetAtPath<VisualTreeAsset>("Assets/Editor/MyCustomEditor.uxml"); VisualElement labelFromUXML = visualTree.Instantiate(); root.Add(labelFromUXML); } Close your custom Editor window if you haven’t done so.
Select Window > UI Toolkit > MyCustomEditor to re-open your custom Editor window to see three labels, three buttons, and three toggles.
UI 컨트롤의 동작 정의
버튼을 클릭하고 토글을 선택하거나 선택을 취소하면 UI 컨트롤이 일부 작업을 수행하도록 UI 컨트롤에 대한 이벤트 핸들러를 설정할 수 있습니다.
In this example, set up event handlers that:
- 버튼을 클릭했을 때 에디터 콘솔에 메시지가 표시됩니다.
- 토글을 선택했을 때 콘솔에 버튼이 클릭된 횟수가 표시됩니다.
Your finished MyCustomEditor.cs looks like the following:
using UnityEditor;
using UnityEngine;
using UnityEngine.UIElements;
public class MyCustomEditor : EditorWindow
{
[MenuItem("Window/UI Toolkit/MyCustomEditor")]
public static void ShowExample()
{
MyCustomEditor wnd = GetWindow<MyCustomEditor>();
wnd.titleContent = new GUIContent("MyCustomEditor");
}
[SerializeField]
private VisualTreeAsset m_UXMLTree;
private int m_ClickCount = 0;
private const string m_ButtonPrefix = "button";
public void CreateGUI()
{
// Each editor window contains a root VisualElement object
VisualElement root = rootVisualElement;
// VisualElements objects can contain other VisualElement following a tree hierarchy.
Label label = new Label("These controls were created using C# code.");
root.Add(label);
Button button = new Button();
button.name = "button3";
button.text = "This is button3.";
root.Add(button);
Toggle toggle = new Toggle();
toggle.name = "toggle3";
toggle.label = "Number?";
root.Add(toggle);
// Import UXML
var visualTree = AssetDatabase.LoadAssetAtPath<VisualTreeAsset>("Assets/Editor/MyCustomEditor.uxml");
VisualElement labelFromUXML = visualTree.Instantiate();
root.Add(labelFromUXML);
root.Add(m_UXMLTree.Instantiate());
//Call the event handler
SetupButtonHandler();
}
//Functions as the event handlers for your button click and number counts
private void SetupButtonHandler()
{
VisualElement root = rootVisualElement;
var buttons = root.Query<Button>();
buttons.ForEach(RegisterHandler);
}
private void RegisterHandler(Button button)
{
button.RegisterCallback<ClickEvent>(PrintClickMessage);
}
private void PrintClickMessage(ClickEvent evt)
{
VisualElement root = rootVisualElement;
++m_ClickCount;
//Because of the names we gave the buttons and toggles, we can use the
//button name to find the toggle name.
Button button = evt.currentTarget as Button;
string buttonNumber = button.name.Substring(m_ButtonPrefix.Length);
string toggleName = "toggle" + buttonNumber;
Toggle toggle = root.Q<Toggle>(toggleName);
Debug.Log("Button was clicked!" +
(toggle.value ? " Count: " + m_ClickCount : ""));
}
}
To try the example, select Window > UI Toolkit > MyCustomEditor.
추가 리소스
Copyright © 2023 Unity Technologies
优美缔软件(上海)有限公司 版权所有
"Unity"、Unity 徽标及其他 Unity 商标是 Unity Technologies 或其附属机构在美国及其他地区的商标或注册商标。其他名称或品牌是其各自所有者的商标。
公安部备案号:
31010902002961