런타임 권한 요청
This page explains how to request the user’s permission for your application to access data on the device or use a device feature such as a built-in camera or microphone.
Google의 권한 요청 가이드라인에 따르면, 사용자가 최초로 권한 요청을 거부하는 경우 이러한 권한을 요청하는 이유를 표시하고 요청을 다시 표시하는 방법이 권장됩니다.
For more information on when and how to request permissions on an Android device, refer to App permissions best practices in the Android developer guide.
선행 조건
런타임 권한 API에는 Android 버전 6(API 레벨 23)이 필요합니다. 애플리케이션의 타겟 API를 변경하려면 다음 단계를 따르십시오.
- Edit > Project Settings를 선택합니다.
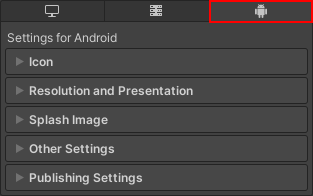
- Project settings 창에서 Player 탭을 선택한 다음 아래와 같이 Android Player Settings를 엽니다.

- In the Other Settings > Identification section, set Target API Level to at least level 23.
Before the application requests permission to use restricted data or a particular device feature, it must declare the permission in its Android App Manifest. For more information, refer to Declare permissions for an application.
런타임 시 권한 요청
Android.Permission API는 애플리케이션이 현재 가지고 있는 권한을 확인하고 애플리케이션에 필요하지만 가지고 있지는 않은 권한을 요청하는 데 사용할 수 있는 기능을 제공합니다.
런타임 시 권한을 요청하는 프로세스에 대한 개요는 다음과 같습니다.
- Check whether the user has already granted the application permission. If they have, you don’t need to request it again.
- If the user hasn’t granted the permission, check if you need to display the rationale for requesting the permission. If the rationale isn’t necessary, directly send a request for permission to access the data or use the device feature that the application requires.
- If the user denies the application permission, disable the application’s functionality that requires the specific permission. If the application can’t work without this functionality, inform the user.
- If the user still denies the application permission, it’s best practice to provide a method that lets the user manually trigger the permission request again from inside the application.
애플리케이션의 권한 유무 확인
Use Permission.HasUserAuthorizedPermission to check if the user has already granted permission for the data or feature the application requires.
For a code example that shows how to use this API, refer to Permission.HasUserAuthorizedPermission.
Check whether to display the rationale for permission request
Use Permission.ShouldShowRequestPermissionRationale to check whether you need to display the rationale for a specific permission request.
If the rationale is necessary, display a message with reason why your application requires access to specific device features. After you display the message, send a request for permission.
If the rationale isn’t necessary, directly proceed to send a request for permission.
For a code example that shows how to use this API, refer to Permission.ShouldShowRequestPermissionRationale.
권한 요청 전송
Use Permission.RequestUserPermission to request permission to use the data or feature. When you call this method, Android opens the system permission dialog that the user can use to grant or deny the permission.
For a code example that shows how to use this API, refer to Permission.RequestUserPermission.
Use Permission.RequestUserPermissions to request permissions to access multiple resources on the user’s device at once. This method uses an array of strings with each string representing a specific permission to access a particular resource such as the device’s camera , microphone, or location.
These methods can accept a PermissionCallbacks object that you can use to specify code to run after the user grants or denies the permission. You can use this to start using a device feature as soon as the user grants the permission request. For example, you can start recording from the microphone.
팁: 권한을 요청할 때 사용자에게 애플리케이션에 해당 기능이 필요한 이유를 설명하는 메시지를 표시하는 것이 가장 좋습니다.
Note: If the user has enabled the Do not ask me again option on the system permission dialog, or has denied the permission more than once, RequestUserPermission() doesn’t open the system dialog. In this case, the user must go into the application permission settings and manually enable the permission.
권한 요청을 수동으로 트리거하는 방법 제공
If the user denies the permission that the application requires, provide a way for the user to manually display the permission request dialog. How to do this depends on the application, but one solution is to provide a button that calls Permission.RequestUserPermission.