Using the Animation view
Use the Animation view to preview and edit Animation Clips for animated GameObjects in Unity. To open the Animation view in Unity, go to Window > Animation.
Viewing Animations on a GameObject
The Animation window is linked to the Hierarchy window, the Project window, the Scene view, and the Inspector window. Like the Inspector, the Animation window shows the timeline and keyframes of the Animation for the currently selected GameObject or Animation Clip Asset. You can select a GameObject using the Hierarchy window or the Scene View, or select an Animation Clip Asset using the Project Window.
The Animated Properties list
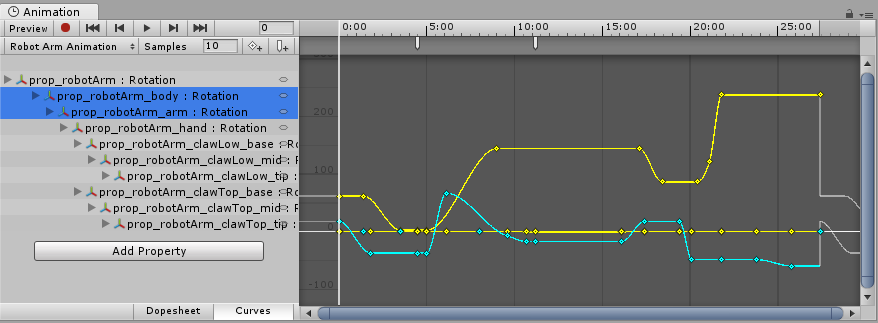
아래 이미지에서 애니메이션 뷰(왼쪽)는 현재 선택된 게임 오브젝트가 사용하는 애니메이션을 보여주며, 자식 게임 오브젝트도 이 애니메이션이 조절한다면 같이 보여줍니다. 씬 뷰와 계층 구조 뷰는 오른쪽에 있으며, 애니메이션 뷰는 현재 선택된 게임 오브젝트에 연결된 애니메이션을 보여줍니다.
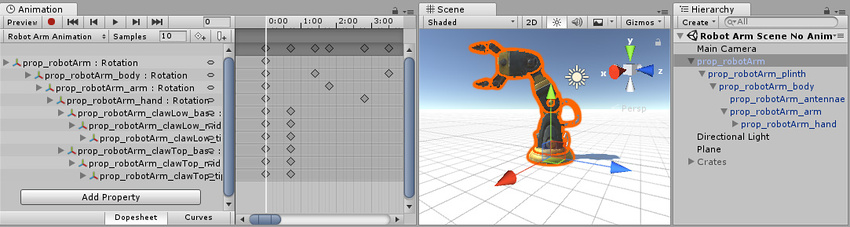
애니메이션 뷰의 왼쪽에는 애니메이션화 프로퍼티 리스트가 있습니다. 아직 레코딩된 애니메이션 정보가 없는 새로 만들어진 클립에서는 이 리스트가 비어있습니다.
이 클립에서 다양한 프로퍼티를 애니메이션화하면 애니메이션화 프로퍼티가 여기에 나타납니다. 애니메이션이 여러 자식 오브젝트를 조작한다면 리스트에는 각 자식 오브젝트의 애니메이션화 프로퍼티는 계층 구조의 하위 리스트를 가지고 이 하위 리스트를 포함합니다. 위의 예제에서 로봇 팔 중 다양한 부분의 게임 오브젝트 계층 구조는 같은 애니메이션 클립에서 모두 애니메이션화되었습니다.
이처럼 하나의 클립을 가지는 계층 구조적 게임 오브젝트를 애니메이션화할 때는 반드시 계층 구조에서 루트 게임 오브젝트에 애니메이션을 생성합니다.
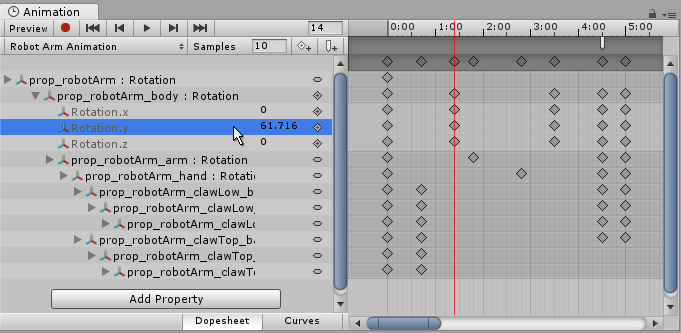
각 프로퍼티는 각 키프레임에 레코딩된 정확한 값을 드러내기 위해 접거나 펼 수 있습니다. 값 필드에는 재생 헤드(하얀 선)가 키프레임 사이에 있다면 보간된 값이 표시됩니다. 이 필드를 직접 편집할 수 있습니다. 재생 헤드가 키프레임 위에 있을 때 변경이 된다면 키프레임 값이 수정됩니다. 재생 헤드가 키프레임 사이에 있고 (해당값이 보간된 값이라면) 사용자가 입력한 새 값을 가진 그 위치에 새로운 키프레임이 생성됩니다.
The Animation Timeline
On the right side of the Animation View is the timeline for the current clip. The keyframes for each animated property appear in this timeline. The timeline view has two modes, Dopesheet and Curves. To toggle between these modes, click Dopesheet or Curves at the bottom of the animated property list area:

이를 통해 애니메이션 타임라인과 키프레임 데이터의 두 가지 다른 뷰를 제공합니다.
Dopesheet mode
Dopesheet mode offers a more compact view, allowing you to view each property’s keyframe sequence in an individual horizontal track. This allows you to view a simple overview of the keyframe timing for multiple properties or GameObjects.
자세한 내용은도프시트 모드에서 키 조정 문서를 참조하십시오.
Curves mode
Curves mode displays a resizable graph containing a view of how the values for each animated property changes over time. All selected properties appear overlaid within the same graph view. This mode allows you to have great control over viewing and editing the values, and how they are interpolated between.
Fitting your selection to the window
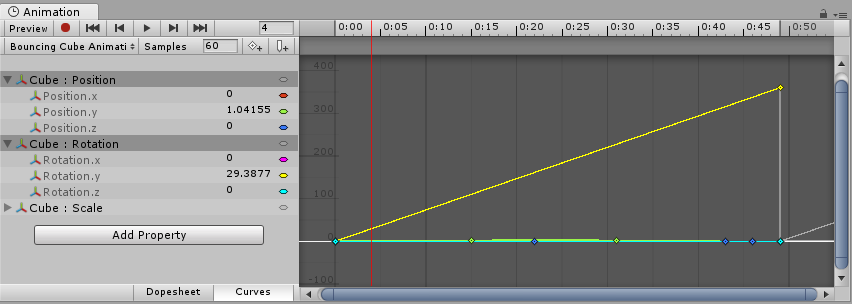
When using Curves mode to view your Animation, it’s important to understand that sometimes the various ranges for each property can differ greatly. For example, consider a simple Animation clip for a spinning bouncing cube. The bouncing Y position value may vary between the range 0 to 2 (meaning the cube bounces 2 units high during the animation); however, the rotation value goes from 0 to 360 (representing its degrees of rotation). When viewing these two curves at the same time, the animation curves for the position values will be very difficult to make out because the view will be zoomed out to fit the 0–360 range of the rotation values within the window:
Press F on the keyboard to zoom the view to the currently selected keyframes. This is useful as a quick way to focus and re-scale the window on a portion of your Animation timeline for easier editing.
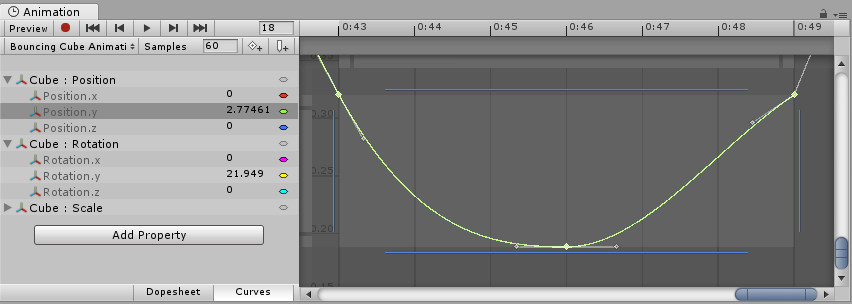
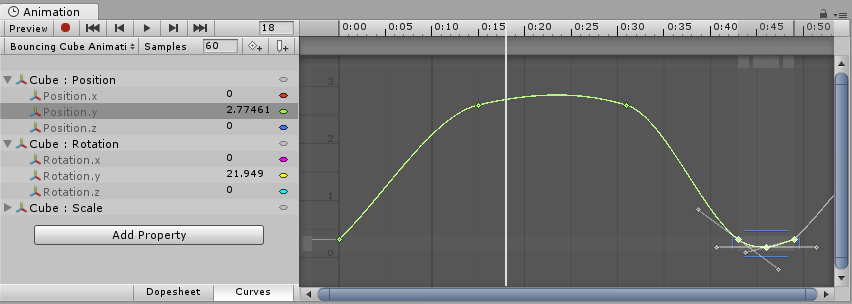
Click on individual properties in the list and press F on the keyboard to automatically re-scale the view to fit the range for that value. You can also manually adjust the zoom of the Curves window by using the drag handles at each end of the view’s scrollbar sliders. In the image below, the Animation Window is zoomed in to view the bouncing Y position Animation. The start of the yellow rotation curve is still visible, but now extends way off the top of the view:

Press A on the keyboard to fit and re-scale the window to show all the keyframes in the clip, regardless of which ones are selected. This is useful if you want to view the whole timeline while preserving your current selection:
Playback and frame navigation controls
To control playback of the Animation Clip, use the Playback Controls at the top left of Animation view.

왼쪽에서 오른쪽 순서로 조작은 다음과 같습니다.
- Preview mode (toggle on/off).
- Record mode (toggle on/off). Note: Preview mode is on when record mode is on.
- Move playback head to the beginning of the clip.
- Move playback head to the previous keyframe.
- Play Animation.
- Move playback head to the next keyframe.
- Move playback head to the end of the clip.
다음 키보드 단축키로도 재생 헤드를 조작할 수 있습니다.
- Press Comma (,) to go to the previous frame.
- Press Period (.) to go to the next frame.
- Hold Alt (macOS: Option) and press Comma (,) to go to the previous keyframe.
- Hold Alt (macOS: Option) and press Period (.) to go to the next keyframe.
Locking the window
애니메이션 에디터 창을 잠가서 계층 구조 또는 씬에서 현재 선택된 게임 오브젝트가 자동으로 반영되지 않게 할 수 있습니다. 창 잠그기는 애니메이션이나 특정 게임 오브젝트 하나에 집중하고자 할 때 유용하며, 여전히 씬의 다른 게임 오브젝트를 선택하고 조정할 수 있습니다.

커브 뷰에 대한 자세한 내용은 애니메이션 커브 사용 문서를 참조하십시오.
Copyright © 2023 Unity Technologies
优美缔软件(上海)有限公司 版权所有
"Unity"、Unity 徽标及其他 Unity 商标是 Unity Technologies 或其附属机构在美国及其他地区的商标或注册商标。其他名称或品牌是其各自所有者的商标。
公安部备案号:
31010902002961