- Unity User Manual 2023.1 (beta)
- 2D game development
- Work with sprites
- 스프라이트 에디터
- Use the Sprite Editor
Use the Sprite Editor
When you have an image that is a single character with different parts, such as a car with wheels which each move independently, you can use the Sprite Editor to extract different parts from that image into separate sprites from the same texture.
Note: Make sure the graphic you want to edit has its Texture Type set to Sprite (2D and UI). For more information on importing and setting up sprites, refer to Set up sprites.
Sprite textures with multiple components need the Sprite Mode to be set to Multiple in the Inspector.
Open the Sprite Editor
Sprite Editor를 열려면 다음 단계를 따르십시오.
Select the 2D image you want to edit from the Project View (Fig 1: Project View).
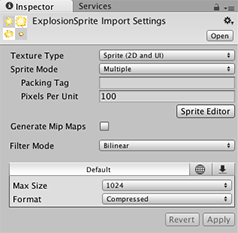
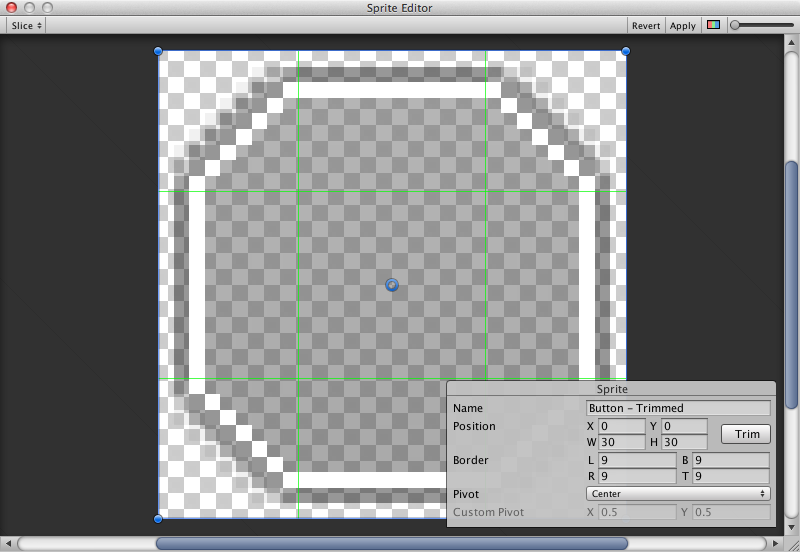
Note: You can’t edit a sprite by selecting it in the Scene View.Texture Import Inspector에 있는 Sprite Editor (그림 2: 텍스처 임포트 인스펙터) 버튼을 클릭하면 Sprite Editor가 나타납니다 (그림 3: 스프라이트 에디터).
참고: Sprite Editor 버튼은 선택한 이미지의 Texture Type이 Sprite (2D and UI)로 설정된 경우에만 표시됩니다.


참고: 이미지의 요소가 여러 개라면 Texture Import Inspector의 Sprite Mode를 Multiple로 설정해야 합니다.

Along with the composite image, you will see a number of controls in the bar at the top of the window. The slider at the top right controls the zoom, while the color bar button to its left chooses whether you view the image itself or its alpha levels. The right-most slider controls the pixilation (mipmap) of the Texture. Moving the slider to the left reduces the resolution of the Sprite Texture. The most important control is the Slice menu at the top left, which gives you options for separating the elements of the image automatically.
Select the Apply and Revert buttons to keep or discard any changes you have made in the Sprite Editor window respectively. You set these buttons to display a confirmation dialog before applying their effects in Unity’s Preferences window (menu: Edit > Preferences…). In the Preferences window, go to 2D > Sprite Editor Window to open the Sprite Editor window options.

Select the respective option to have a dialog appear after selecting Apply or Revert to confirm your selection, preventing accidental saving or discarding of changes made.
Use the Editor
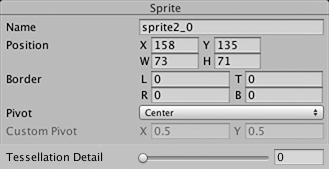
에디터를 사용하는 가장 직접적인 방법은 요소를 수동으로 식별하는 방법입니다. 이미지를 클릭하면 모서리에 핸들이 있는 사각형 선택 영역이 나타납니다. 핸들 또는 SpriteRect의 변을 드래그하여 특정 요소를 둘러싸도록 크기를 조절할 수 있습니다. 요소를 격리한 후에는 이미지의 다른 부분에서 새 SpriteRect를 드래그하여 다른 요소를 추가할 수 있습니다. SpriteRect를 선택하고 나면 창의 오른쪽 하단에 패널이 나타납니다.

The controls in the panel let you choose a name for the Sprite graphic and set the position and size of the SpriteRect by its coordinates. A border width, for left, top, right and bottom can be specified in pixels. The borders are useful when 9-Slicing Sprites. There are also settings for the Sprite’s pivot, which Unity uses as the coordinate origin and main “anchor point” of the graphic. You can choose from a number of default SpriteRect-relative positions (for example, Center, Top Right, etc) or use custom coordinates.
슬라이스 메뉴 아이템 옆의 Trim 버튼은 SpriteRect의 크기를 조절하여 투명도를 바탕으로 하여 그래픽 가장자리에 딱 들어맞도록 만듭니다.
참고: 테두리는 UI 시스템에서만 지원되며 2D 스프라이트 렌더러에서는 지원되지 않습니다.