- Unity User Manual 2023.2 (beta)
- User interface (UI)
- UI 툴킷
- Structure UI
- Structure UI examples
- Create a drag-and-drop list and tree views between windows
Create a drag-and-drop list and tree views between windows
Version: 2023.2+
Drag-and-drop is a common feature in UI design. You can use UI Toolkit to create a drag-and-drop UI inside a custom Editor window or inside an application built by Unity. This example demonstrates how to create a drag-and-drop UI with ListView and TreeView inside a custom Editor window.
개요 예시
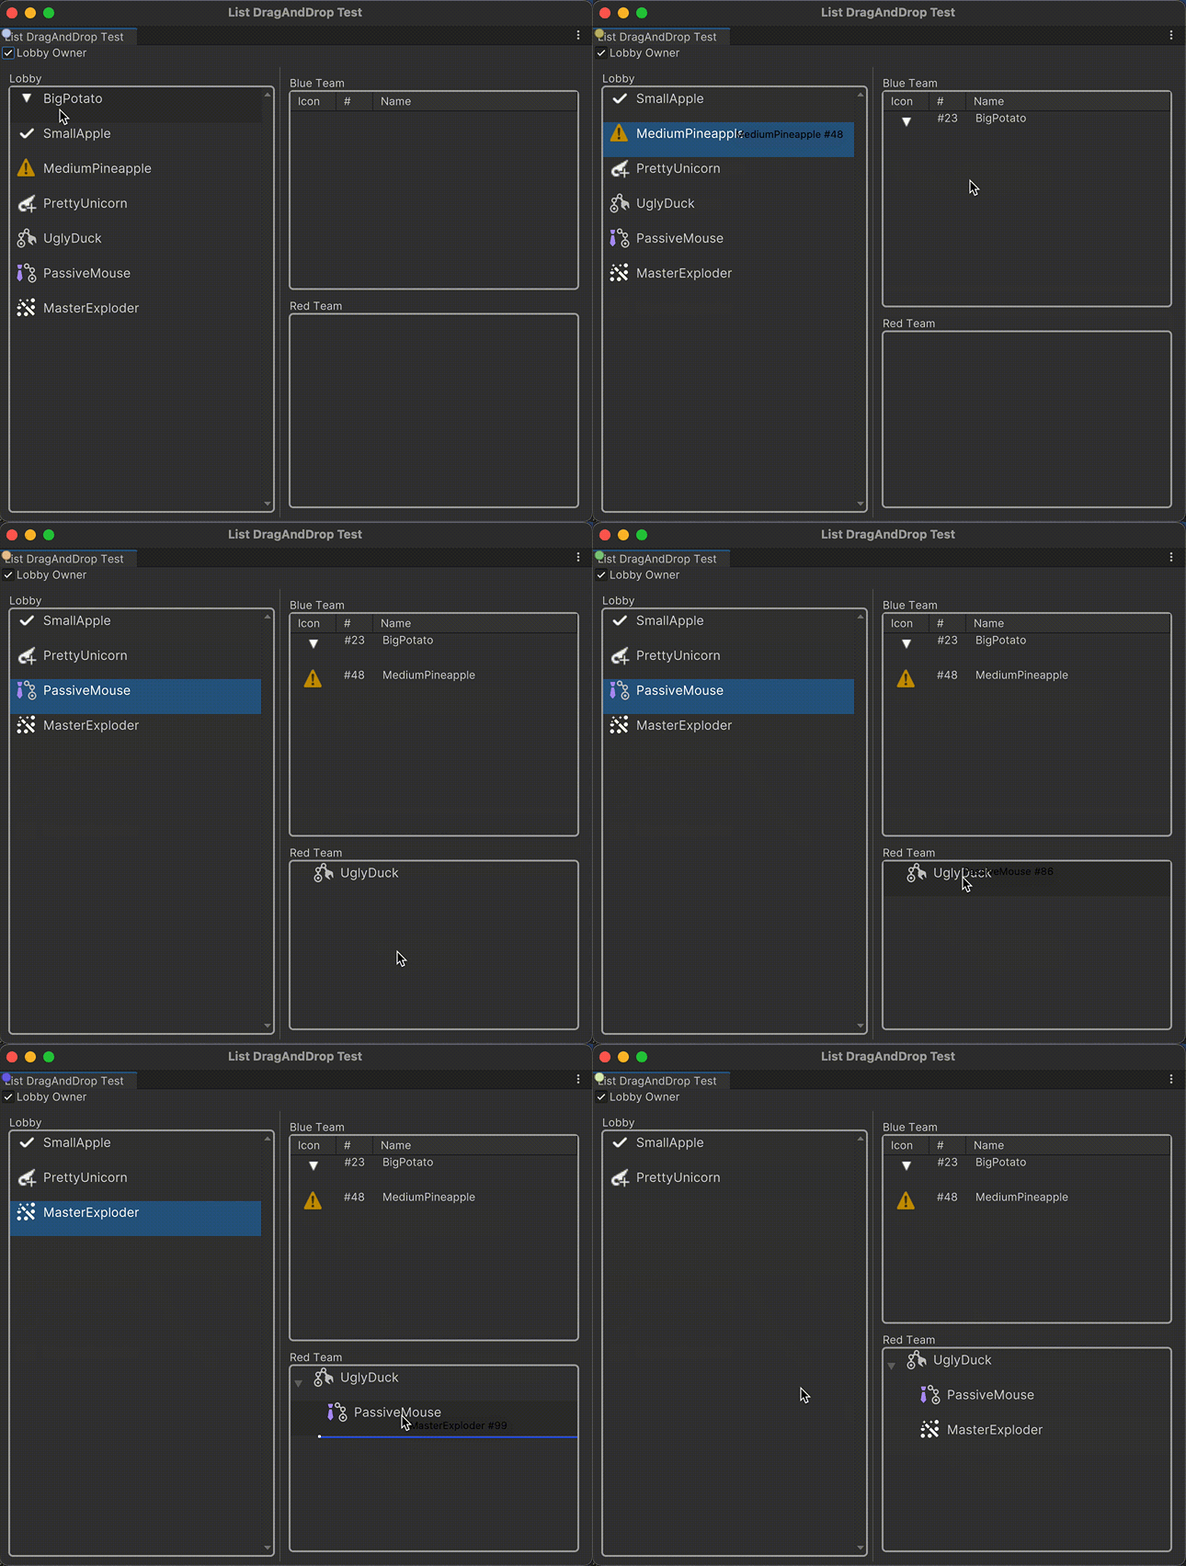
The example creates a split window that includes a lobby and two teams within a custom Editor window. The lobby is created with ListView. For demonstration purposes, one team is created with MultiColumnListView and another team is created with TreeView. The example uses a Toggle to enable and disable the drag-and-drop operation. Once enabled, you can drag the players to reorder them and drag them from the lobby list to the team lists, as shown below:

You can find the completed files that this example creates in this GitHub repository.
선행 조건
This guide is for developers familiar with the Unity Editor, UI Toolkit, and C# scripting. Before you start, get familiar with the following:
Create the player data
To begin, create an asset to manage a list of players in the lobby. Create a script to define the struct of PlayerData that represents data for a player. The struct has three fields: a string name, an integer number, and a Texture2D object icon. Mark the fields with the [SerializeField] attribute, so that their values can be serialized and stored in Unity’s data format. Create a Collection Database asset to manage the player data for the drag-and-drop UI. The Collection Database asset contains a serialized list of PlayerData objects that you can set in the Unity Editor.
Create a project in Unity with any template.
In the Assets folder of your Project window, create a folder named
Scriptsto store your script files.In the Scripts folder, create a folder named
Data.-
In the Data folder, create a C# script named
PlayerData.cswith the following content:[!code-cs[(Modules/UIElements/Tests/UIElementsExamples/Assets/ui-toolkit-manual-code-examples/create-drag-and-drop-list-treeview/Scripts/Data/PlayerData.cs)]
-
In the Data folder, create a C# script named
CollectionDatabase.cswith the following content:[!code-cs[(Modules/UIElements/Tests/UIElementsExamples/Assets/ui-toolkit-manual-code-examples/create-drag-and-drop-list-treeview/Scripts/Data/CollectionDatabase.cs)]
In the Assets folder, create a folder named
Resources.Right-click in the Resources folder, and select Create > Collection Database. This creates a new Collection Database asset.
In the Inspector window of the Collection Database asset, add a few players to the Lobby list. You can add as many players as you want.
Create custom controls to display the data
Create custom controls named PlayerDataElement and PlayerItemView to display the data of a player. The PlayerItemView control binds to a PlayerData object as its data context.
In the Scripts folder, create a folder named
UI.-
In the UI folder, create a C# script named
PlayerDataElement.cswith the following content:[!code-cs[(Modules/UIElements/Tests/UIElementsExamples/Assets/ui-toolkit-manual-code-examples/create-drag-and-drop-list-treeview/Scripts/UI/PlayerDataElement.cs)]
-
In the UI folder, create a C# script named
PlayerItemView.cswith the following content:[!code-cs[(Modules/UIElements/Tests/UIElementsExamples/Assets/ui-toolkit-manual-code-examples/create-drag-and-drop-list-treeview/Scripts/UI/PlayerItemView.cs)]
Define the layout and the style of the UI
Create a USS file to define the style for the UI. Create two UXML Documents to define the UI layout for the player item view and the main view. In the main view, to enable the reordering of list items by dragging, set the reorderable attribute to true for the ListView, MultiColumnListView, and TreeView.
In the Assets folder, create a folder named
UIto store your UXML and USS files.-
In the UI folder, create a USS file named
main.usswith the following content:[!code-css[(Modules/UIElements/Tests/UIElementsExamples/Assets/ui-toolkit-manual-code-examples/create-drag-and-drop-list-treeview/UI/main.uss)]
-
In the UI folder, create a UXML file named
PlayerItemView.uxmlwith the following content:[!code-css[(Modules/UIElements/Tests/UIElementsExamples/Assets/ui-toolkit-manual-code-examples/create-drag-and-drop-list-treeview/UI/PlayerItemView.uxml)]
-
In the UI folder, create a UXML file named
ListDragAndDropTestWindow.uxmlwith the following content:[!code-xml[(Modules/UIElements/Tests/UIElementsExamples/Assets/ui-toolkit-manual-code-examples/create-drag-and-drop-list-treeview/UI/ListDragAndDropTestWindow.uxml)]
Implement the drag-and-drop operations
Create a script to set up the lobby and the teams’ lists and bind them to the player data you created earlier. The script also implements drag-and-drop operations between the lobby and the teams’ lists.
In the Scripts folder, create a folder named
Controllers.-
In the Controllers folder, create a C# script named
LobbyController.cswith the following content:[!code-cs[(Modules/UIElements/Tests/UIElementsExamples/Assets/ui-toolkit-manual-code-examples/create-drag-and-drop-list-treeview/Scripts/Controller/LobbyController.cs)]
커스텀 에디터 창 생성
Create a custom Editor window to display the drag-and-drop UI.
In the Assets folder, create a folder named
Editor.-
In the Editor folder, create a C# script named
ListDragAndDropTestWindow.cswith the following content:[!code-cs[(Modules/UIElements/Tests/UIElementsExamples/Assets/ui-toolkit-manual-code-examples/create-drag-and-drop-list-treeview/Editor/ListDragAndDropTestWindow.cs)]
Test the UI
To test, change the order of the players in the Lobby list and move players from the Lobby list to the team lists when the Lobby Owner checkbox is selected. You can also change the hierarchy of players in the Red team list. Based on the conditions set in the LobbyController.cs script, you can add a maximum of three players to each team.
- From the main menu, select Collection Tests > List DragAndDrop Window.
- In the List DragAndDrop Test window, select the Lobby Owner checkbox.
- Drag the players in the Lobby list to change their orders.
- Drag the players from the Lobby list to the team lists.
- Drag the players in the Red team list to change their hierarchies.