Create a default Inspector
Default Inspector is a standard way to display serialized object properties without any custom modifications. When you use FillDefaultInspector method of the InspectorElement class, it automatically creates the default hierarchy with the default property fields.
Example overview
This example extend the CreateInspectorGUI() method in the Create a Custom Inspector example to create a default Inspector for the Car component. The example creates a Foldout control in the Car_Inspector_UXML.uxml file and attaches the default Inspector__ UI__(사용자 인터페이스) 사용자가 애플리케이션과 상호 작용하도록 해 줍니다. Unity는 현재 3개의 UI 시스템을 지원합니다. 자세한 정보
See in Glossary to it.
Prerequisites
이 가이드는 Unity 에디터, UI 툴킷, C# 스크립팅에 익숙한 개발자를 위한 가이드입니다. 시작하기 전에 먼저 다음을 숙지하십시오.
Create the default Inspector container
Create a Foldout control to display the default Inspector UI.
Double-click the
Car_Inspector_UXML.uxmlfile to open it in UI Builder.-
Add a Foldout control to your UI, name it
Default_Inspector, and set a label text:
Foldout for the default Inspector
Attach the default Inspector UI
To attach the default Inspector UI to the Foldout, you must obtain a reference to it. You can retrieve the visual element of the Foldout from the visual tree of your Inspector using UQuery, and use the FillDefaultInspector method of the InspectorElement class to attach the default Inspector UI to the Foldout control.
-
In the
Car_Inspector.csfile, update theCreateInspectorGUI()method to get a reference to theDefault_InspectorFoldout and attach the default Inspector UI to it:public override VisualElement CreateInspectorGUI() { ... // Get a reference to the default Inspector Foldout control. VisualElement InspectorFoldout = myInspector.Q("Default_Inspector"); // Attach a default Inspector to the Foldout. InspectorElement.FillDefaultInspector(InspectorFoldout, serializedObject, this); // Return the finished Inspector UI. return myInspector; } -
Select the GameObject that has the
Carcomponent to it. The Inspector for thecarcomponent now displays theDefault InspectorFoldout with the default Inspector UI inside.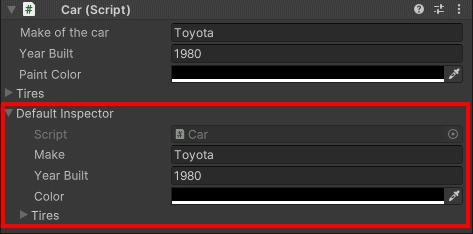
Inspector with a default Inspector
Additional resources
Copyright © 2023 Unity Technologies
优美缔软件(上海)有限公司 版权所有
"Unity"、Unity 徽标及其他 Unity 商标是 Unity Technologies 或其附属机构在美国及其他地区的商标或注册商标。其他名称或品牌是其各自所有者的商标。
公安部备案号:
31010902002961