Creating Screen Transitions
The need to transition between multiple UI screens is fairly common. In this page we will explore a simple way to create and manage those transitions using animation and State Machines to drive and control each screen.
Обзор
The high-level idea is that each of our screens will have an Animator Controller with two states (Open and Closed) and a boolean Parameter (Open). To transition between screens you will only need to close the currently open Screen and open the desired one. To make this process easier we will create a small Class ScreenManager that will keep track and take care of closing any already open Screen for us. The button that triggers the transition will only have to ask the ScreenManager to open the desired screen.
Размышляя о навигации
Если вы планируете ввести поддержку других контроллеров/клавиатуры для навигации по элементам интерфейса, нужно помнить о нескольких важных моментах. Важно не допустить наличия выделяемых (Selectable) элементов вне экрана, так как тогда у игрока(-ов) появится возможность выделять их. И подобную возможность можно отключить путём деактивации вне экранной (off-screen) иерархии. Мы также должны убедиться, что, когда отображается новый экран, нами уже заранее установлен элемент от него, который можно выбрать, в противном случае игрок не сможет перейти к новому экрану. Обо всём этом мы позаботимся в классе ScreenManager чуть ниже.
Настраивая контроллер анимации (Animatior Controller)
Давайте взглянем на наиболее распространённые и минимальные настройки для Animation Controller-а для создания перехода экрана (Screen). Контроллеру понадобиться boolean параметр (открытый) и два состояния (открытое и закрытое), каждое состояние должно иметь анимацию всего лишь с одним ключевым кадром, таким образом мы позволим State Machine осуществлять для нас плавный переход с одного экрана на другой.
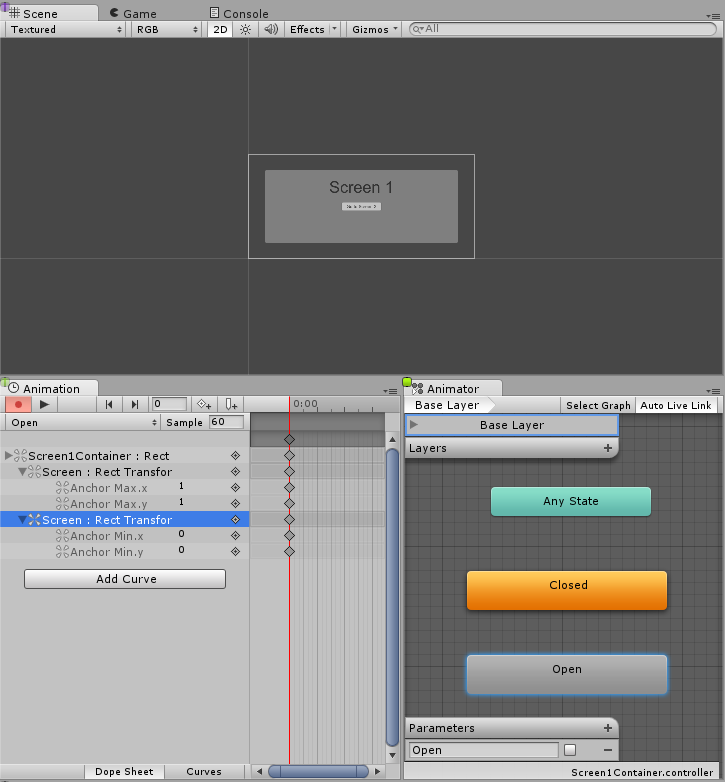
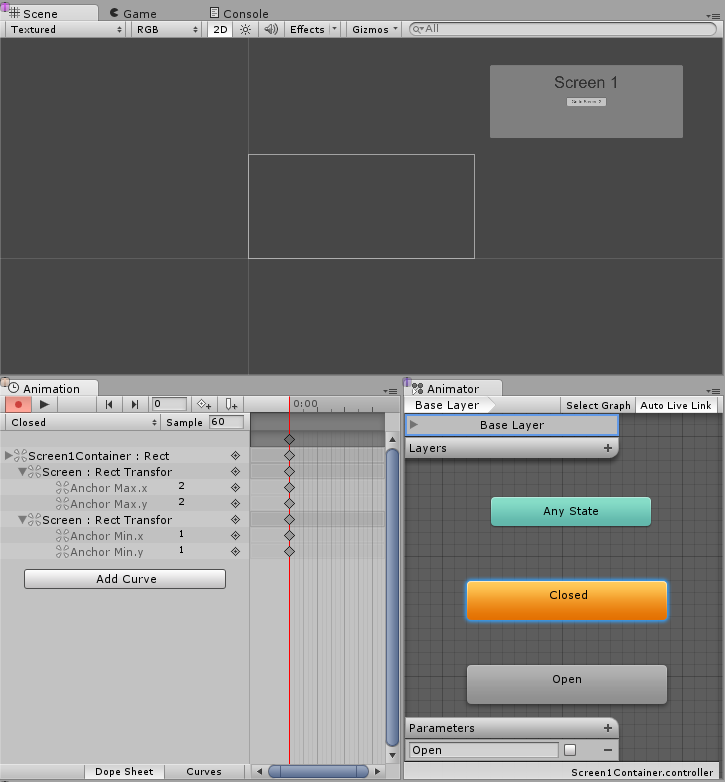
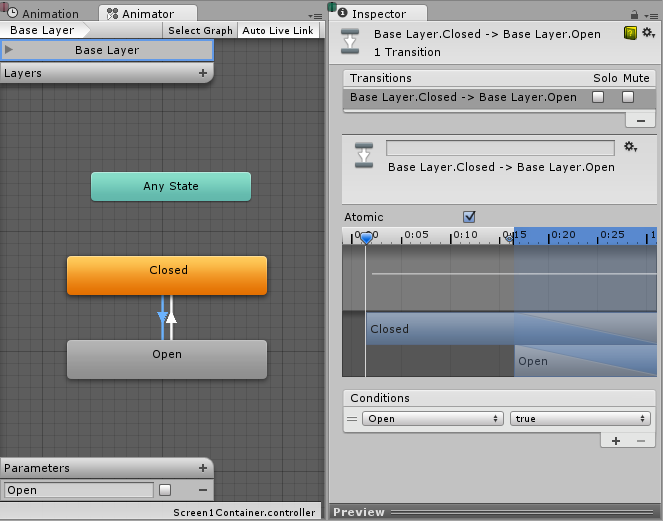
Теперь нам нужно создать transition между обоими состояниями, давайте начнём с перехода с открытого (Open) на закрытое (Closed) состояние и установим нужным образом наше состояние. Нам нужно перейти с открытого на закрытое и затем установить состояние с закрытого на открытое когда параметр (Open) примет значение равное true.
Managing the screens
With all the above set up, the only thing missing is for us to set the parameter Open to true on the screens Animator we want to transition to and Open to false on the currently open screens Animator. To do that, we will create a small script:
using UnityEngine;
using UnityEngine.UI;
using UnityEngine.EventSystems;
using System.Collections;
using System.Collections.Generic;

public class ScreenManager : MonoBehaviour {

    //Screen to open automatically at the start of the Scene
    public Animator initiallyOpen;

    //Currently Open Screen
    private Animator m_Open;

    //Hash of the parameter we use to control the transitions.
    private int m_OpenParameterId;

    //The GameObject Selected before we opened the current Screen.
    //Used when closing a Screen, so we can go back to the button that opened it.
    private GameObject m_PreviouslySelected;

    //Animator State and Transition names we need to check against.
    const string k_OpenTransitionName = "Open";
    const string k_ClosedStateName = "Closed";

    public void OnEnable()
    {
        //We cache the Hash to the "Open" Parameter, so we can feed to Animator.SetBool.
        m_OpenParameterId = Animator.StringToHash (k_OpenTransitionName);

        //If set, open the initial Screen now.
        if (initiallyOpen == null)
            return;
        OpenPanel(initiallyOpen);
    }

    //Closes the currently open panel and opens the provided one.
    //It also takes care of handling the navigation, setting the new Selected element.
    public void OpenPanel (Animator anim)
    {
        if (m_Open == anim)
            return;

        //Activate the new Screen hierarchy so we can animate it.
        anim.gameObject.SetActive(true);
        //Save the currently selected button that was used to open this Screen. (CloseCurrent will modify it)
        var newPreviouslySelected = EventSystem.current.currentSelectedGameObject;
        //Move the Screen to front.
        anim.transform.SetAsLastSibling();

        CloseCurrent();

        m_PreviouslySelected = newPreviouslySelected;

        //Set the new Screen as then open one.
        m_Open = anim;
        //Start the open animation
        m_Open.SetBool(m_OpenParameterId, true);

        //Set an element in the new screen as the new Selected one.
        GameObject go = FindFirstEnabledSelectable(anim.gameObject);
        SetSelected(go);
    }

    //Finds the first Selectable element in the providade hierarchy.
    static GameObject FindFirstEnabledSelectable (GameObject gameObject)
    {
        GameObject go = null;
        var selectables = gameObject.GetComponentsInChildren<Selectable> (true);
        foreach (var selectable in selectables) {
            if (selectable.IsActive () && selectable.IsInteractable ()) {
                go = selectable.gameObject;
                break;
            }
        }
        return go;
    }

    //Closes the currently open Screen
    //It also takes care of navigation.
    //Reverting selection to the Selectable used before opening the current screen.
    public void CloseCurrent()
    {
        if (m_Open == null)
            return;

        //Start the close animation.
        m_Open.SetBool(m_OpenParameterId, false);

        //Reverting selection to the Selectable used before opening the current screen.
        SetSelected(m_PreviouslySelected);
        //Start Coroutine to disable the hierarchy when closing animation finishes.
        StartCoroutine(DisablePanelDeleyed(m_Open));
        //No screen open.
        m_Open = null;
    }

    //Coroutine that will detect when the Closing animation is finished and it will deactivate the
    //hierarchy.
    IEnumerator DisablePanelDeleyed(Animator anim)
    {
        bool closedStateReached = false;
        bool wantToClose = true;
        while (!closedStateReached && wantToClose)
        {
            if (!anim.IsInTransition(0))
                closedStateReached = anim.GetCurrentAnimatorStateInfo(0).IsName(k_ClosedStateName);

            wantToClose = !anim.GetBool(m_OpenParameterId);

            yield return new WaitForEndOfFrame();
        }

        if (wantToClose)
            anim.gameObject.SetActive(false);
    }

    //Make the provided GameObject selected
    //When using the mouse/touch we actually want to set it as the previously selected and
    //set nothing as selected for now.
    private void SetSelected(GameObject go)
    {
        //Select the GameObject.
        EventSystem.current.SetSelectedGameObject(go);

        //If we are using the keyboard right now, that's all we need to do.
        var standaloneInputModule = EventSystem.current.currentInputModule as StandaloneInputModule;
        if (standaloneInputModule != null && standaloneInputModule.inputMode == StandaloneInputModule.InputMode.Buttons)
            return;

        //Since we are using a pointer device, we don't want anything selected.
        //But if the user switches to the keyboard, we want to start the navigation from the provided game object.
        //So here we set the current Selected to null, so the provided gameObject becomes the Last Selected in the EventSystem.
        EventSystem.current.SetSelectedGameObject(null);
    }
}
Давайте подключим этот скрипт. Мы сделаем это путём создания нового игрового объекта (GameObject), который мы можем переименовать например в “ScreenManager” и добавить к нему компонент. К нему можно привязать стартовый экран, который будет появляться когда будет запускаться ваша сцена.
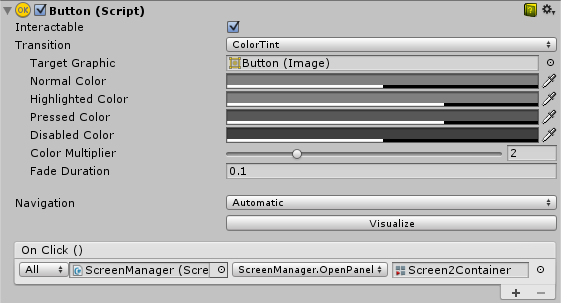
Наконец, в финале давайте сделаем так, чтобы UI buttons заработали. Выберите кнопку, которая должна реагировать на переход экрана и добавьте новое действие для события On Click () из выпадающего списка Inspector-а. Перетащите ScreenManager GameObject, который мы только что создали в ObjectField, в выпадающем списке выберите ScreenManager->OpenPanel (Animator) и перетащите ту панель, которую вы хотите чтобы открывалась при нажатии пользователя на эту кнопку в ObjectField.
Замечания
This technique only requires each screen to have an AnimatorController with an Open parameter and a Closed state to work - it doesn’t matter how your screen or State Machine are constructed. This technique also works well with nested screens, meaning you only need one ScreenManager for each nested level.
The State Machine we set up above has the default state of Closed, so all of the screens that use this controller start as closed. The ScreenManager provides an initiallyOpen property so you can specify which screen is shown first.
Copyright © 2023 Unity Technologies
优美缔软件(上海)有限公司 版权所有
"Unity"、Unity 徽标及其他 Unity 商标是 Unity Technologies 或其附属机构在美国及其他地区的商标或注册商标。其他名称或品牌是其各自所有者的商标。
公安部备案号:
31010902002961