Preset Manager
Use Presets to specify default properties for new components and Asset importers. You cannot set the default properties for Project settings, Preferences settings or native Assets such as Materials, Animations or SpriteSheets.
When you add a component to a GameObject or a new Asset to your Project, Unity uses a default Preset to set the properties of the new item. Default Presets override the Unity factory default settings.
Unity also uses default Presets when you use the Reset command in the Component Context Menu in the Inspector window.
For Transform components, Unity does not use the position in a default Preset when you add a new GameObject to a scene. In this case, the default position is the middle of the Scene view. Use the Reset command to apply the position, as well as the rotation and scale, of a default Preset for a Transform.
Specifying a Preset to use for default settings
You can specify a Preset to use for default settings with the Inspector window, the Preset Manager, or by dragging and dropping.
To specify default settings with the Inspector window:
Select a Preset in the Project window.
In the Inspector window, click Set as Default.

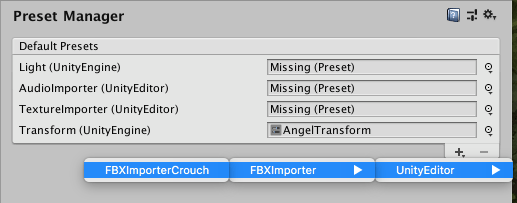
To specify default settings with the Preset Manager:
If you don’t already have a Preset in your project to use for default settings, create one.
Open the Preset Manager by choosing Edit > Project Settings, then selecting the Preset Manager category.
Click + and select the item that you want to use with a default Preset.
A default Preset for the selected item appears in the Preset Manager list.
Drag and drop a Preset from the Project window to the Preset Manager to add a new default Preset or change an existing default Preset.
Changing and removing default Presets
Use Preset Manager to change a default Preset. You can also drag and drop a Preset from the Project window to the Preset Manager to change an existing default Preset.
There are two ways to remove a default Preset: from Preset Manager or from the Inspector window.
To change a default Preset in Preset Manager:
- Open the Preset Manager by choosing Edit > Project Settings, then selecting the Preset Manager category.
- Click the drop-down menu next to the default Preset of an object type to select a Preset.
The selected Preset becomes the new default Preset.
To remove a default Preset in the Inspector:
- Select a Preset in the Project window.
- In the Inspector window, click Remove From.
To remove a default Preset in Preset Manager:
- Open the Preset Manager by choosing Edit > Project Settings, then select the Preset Manager category.
- Select the default Preset that you want to remove from the list of default Presets.
- Click - to remove the selected default Preset.
- 2017–03–27 Page published
- New feature in 2018.1 NewIn20181
Copyright © 2023 Unity Technologies
优美缔软件(上海)有限公司 版权所有
"Unity"、Unity 徽标及其他 Unity 商标是 Unity Technologies 或其附属机构在美国及其他地区的商标或注册商标。其他名称或品牌是其各自所有者的商标。
公安部备案号:
31010902002961