Preset Manager
The Preset Manager is a window in Project Settings (menu: Edit > Project Settings > Preset Manager) that allows you to manage custom Presets you create to specify default properties when you add a component to a GameObject or a new Asset to your project. The default Presets you define override Unity’s default settings.
Note: You cannot set the default properties for Project settings, Preferences settings, or native Assets such as Materials, Animations, or SpriteSheets.
In addition to using default Presets when creating new components and importing Assets, Unity applies default Presets when you use the Reset command in the Component Context Menu in the Inspector window.
Preset Manager reference
| Свойство: | Описание |
|---|---|
| Filter | Use the Filter field to define which components or importers the Preset is applied to. |
| Preset | Use the Preset field to set the Preset you want to use. By default, a Preset applies to all components or asset importers of that Preset type once you create it. If you want to only apply it to specific components or asset types, use the Filter field to define when to apply the Preset. |
| Add Default Preset | Select this button choose the Importer, Component, or ScriptableObject) to add a Preset to. If you choose Importer or Component, select the type of asset importer or component you want to create a Preset for. |
Assigning a Preset for default settings
To specify a Preset to use for default settings in the Preset Manager:
If you don’t already have a Preset in your project to use for default settings, create one.
Open the Preset Manager by choosing Edit > Project Settings, and selecting the Preset Manager.
Select Add Default Preset and select a default type.
The Preset type you choose appears in the Preset Manager list.

In the Preset field, click the Preset selector (circle icon).
From the Select Preset window, choose a Preset for this Preset type.
Alternatively, you can also drag and drop a Preset from the Project window into the Preset field.If you want to add another Preset field to the list, click the Add (+) tab.

Note: If you set a default Preset for Transform components, Unity does not use the Position values when you create a new GameObject. Instead, it sets the default Position values to the center of the Scene view. To set the Position values to those of the default Preset, select the Transform component’s More items button (⋮) and select Reset.
Assigning Presets via the Inspector window
You can also add and remove Presets to use for default settings via the Inspector window.
To add a default Preset:
Select a Preset in the Project window.
In the Inspector window, click Add to default.
Unity adds your default Preset to the Preset Manager.Open the Preset Manager to add filters to the Preset or reorder your Preset list.

To remove a default Preset:
- Select a Preset in the Project window.
- In the Inspector window, click Remove from.
Adding filters
By default, a Preset applies to all components or asset importers of that Preset type once it is created. If you want to only apply it to specific components or asset types, you can use the Filter field to define when to apply the Preset.
Filters allow you to create multiple Presets for a given type, and apply them to specific components or importers based on whether those components and importers meet the filter criteria. You can filter by file names, directories, and file extensions.
You can also apply partial Presets that affect only properties you specify in your components or assets.
Note: Default Presets in a Preset Type are applied in order from top to bottom. This means that filters at the bottom of the list can override previous filters if not logically ordered.
- Open the Preset Manager by choosing Edit > Project Settings, then selecting the Preset Manager category.
- Find the default Preset you want to filter, and enter the search string in the Filter field.
Advanced filter search
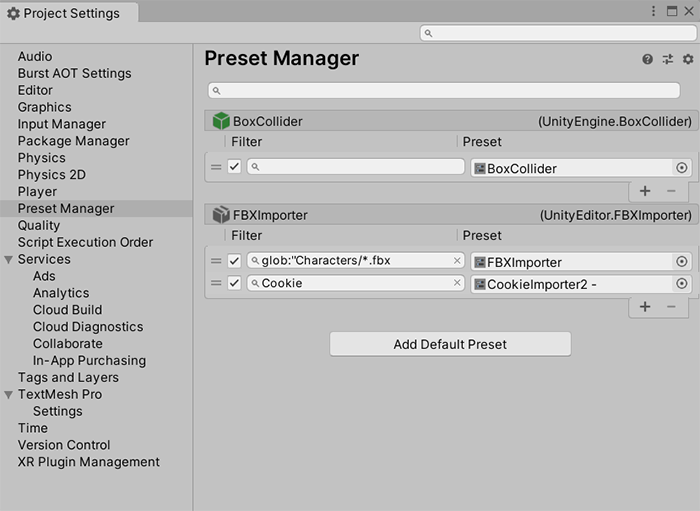
Presets can use glob search, which is a way to use symbols in your filters to allow for more inclusive import filters. See the table below for a list of symbols you can use. A glob search filter is case-sensitive.
To create a glob search filter, the syntax is glob:"yoursearchpatternhere".Your filter field must begin glob:, and the search term must be in quotation mark characters. For example, glob:"example-folder/*.fbx" filters for any .fbx file in a folder called example-folder.
Supported symbols:
| Symbol | Описание | Пример |
|---|---|---|
| * | Matches 0 or more characters in a single path portion (a single path portion is defined as any suite of characters excluding / ) |
glob:"foldername/*.fbx searches for any .fbx file located in a folder named foldername. |
| ? | Matches 1 character |
glob:"foldername/filename-?.fbx" searches for any .fbx file located in a folder named foldername that has the name filename- followed by one single character (for example, this would include filename–1.fbx, filename–2.fbx, but not filename–01.fbx). |
| […] | Matches a range of characters, similar to a RegExp range. If the first character of the range is ! or ^ then it matches any character not in the range. |
glob:"foldername/file[...]1.fbx" searches for any .fbx file located in a folder named foldername that has a name that begins file and ends with 1 (for example, this would include file–1.fbx, file–01.fbx, but not file–2.fbx). |
| (pattern|pat*|pat?erN) | Use searches inside parentheses, separated by a vertical pipe character (meaning “or”), to indicate that filter results can match one of the search patterns. |
glob:("foldername/*.fbx"\|"foldername/filename-?.fbx") searches for any .fbx file located in a folder named foldername, or any .fbx file located in a folder named foldername that has the name filename- followed by one single character. |
| ** | Matches zero or more directories and subdirectories searching for matches. |
glob:"foldername/**.fbx searches for any .fbx file located in a folder named foldername. or its subfolders. |
Editing the list of default Presets
This section describes how to toggle, move and remove Presets in the Preset Manager’s default Preset list for each Preset type.
- Reorder a Preset list: Select the handle (=) of the default Preset that you want to move, and drag it to the new position.
- Remove a Preset: Select the handle (=) of the default Preset that you want to remove, then click the Remove (-) button to remove the selected Preset.
- Remove a Preset type: Remove all Presets assigned to that default Preset type.
Disabling and enabling default Presets
You can temporarily disable/enable a default Preset without losing filter settings.
Open the Preset Manager by choosing Edit > Project Settings, and then selecting the Preset Manager category.
Clear the check box to the left of the default Preset to disable the Preset. Select the check box to enable.

- 2017–03–27 Page published
- New feature in 2018.1 NewIn20181
Copyright © 2023 Unity Technologies
优美缔软件(上海)有限公司 版权所有
"Unity"、Unity 徽标及其他 Unity 商标是 Unity Technologies 或其附属机构在美国及其他地区的商标或注册商标。其他名称或品牌是其各自所有者的商标。
公安部备案号:
31010902002961