Editing properties
Properties are settings and options for GameObject components and Assets. You edit properties in an Inspector window.
Properties fall into the following major categories:
- References: links to other GameObjects and Assets.
- Values: numbers, colors, on/off settings, text, and so on.
References
Reference properties take compatible Project Assets or GameObjects in the Scene as inputs. For example, the Mesh Filter component refers to a Mesh Asset somewhere in the Project.
When you create a component, its reference properties are unassigned.

You assign references to properties by dragging and dropping objects and Assets onto reference property fields, or using an Object Picker window.
Some reference properties accept specific types of components (for example, Transform). When you assign a GameObject to those properties, Unity locates the first component of the required type on the GameObject, and assigns it to the reference property. If the GameObject doesn’t have any components of the right type, you cannot assign the GameObject to the property.
Assigning references by dragging and dropping
To assign a reference to a property, drag and drop a compatible GameObject or Asset onto the property field in the Inspector.
Assigning references with the Object Picker window
Use the Object Picker window to find and select a reference object to assign.
- Click the small circle icon to the right of the property in the Inspector to open an Object Picker window.
- Find the object or Asset you want to reference, and double click it to assign it to the property.
Values
You edit most value properties using simple controls. For example:
Fields where you enter text and numeric values.

You can type numeric values directly in a property field, or click and drag the property label to increase and decrease the value.

Some properties also have sliders for adjusting numeric values.

Check boxes where you toggle properties on and off.

Drop-downs and pop-ups where you choose one of multiple possible values.

Some GameObjects and Assets have more complex properties that you edit with specialized controls or dedicated editors. The rest of this section describes how to set these complex properties.
Color values
The Inspector window displays color properties as swatches.

Click any swatch to open a color picker or an HDR color picker, depending on the context. For example, Unity displays the HDR Color Picker window when you edit the emission color property in the standard shader.
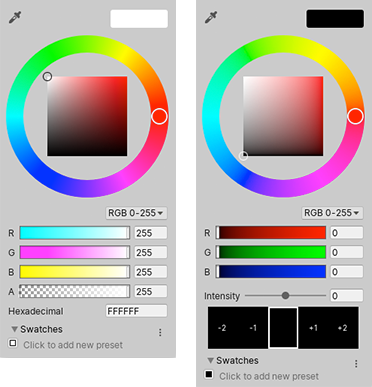
You can also use the eyedropper tool to pick color values from anywhere on the screen.

To pick a color, click the eyedropper button next to a color property, then click anywhere on the screen. Unity sets the color property to the color of the pixel you clicked.
You can save the colors you set in reusable swatch libraries that you can share between projects.
| Tip: |
|---|
| On macOS, you can choose to use the system color picker instead of Unity’s built-in color picker. From the Preferences (menu: Unity > Preferences) open the General panel and select macOS Color Picker. |
Gradient values
A gradient is a visual representation of a color progression. They are useful for blending one color gradually into another, over space or time.
In Unity, you set some gradients by setting two or more color properties.
Other gradients provide dedicated editors to control the relative amount of each color.
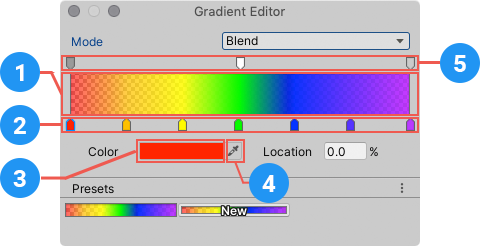
A dedicated gradient editor shows the main colors, called stops, and all the intermediate shades between them in the gradient bar (1).
Upward-pointing arrows along the bottom of the gradient bar represent color stops (2).
- Click a stop to select it. Unity displays its color value in the Color field.
- Click the color swatch (3) to edit the color using a standard color picker.
- You can also use the eyedropper tool (4) to pick color values from anywhere on the screen. Click the eyedropper button then click anywhere on the screen. Unity sets the color property to the color of the pixel you clicked.
- Click an empty area under the gradient bar to add a stop.
- Click and drag a stop to move it.
- To delete a stop, select it and use the Ctrl/Cmd + Delete shortcut.
Downward-pointing arrows above the gradient bar represent alpha stops (5) that control the gradient’s transparency at a given point. You add and edit alpha stops the same way you edit color stops. When you select an alpha stop, the gradient editor displays an Alpha slider instead of the Color field.
By default, a gradient has two stops set to 100% alpha, which makes the gradient fully opaque. You can edit a stop to adjust the transparency, and add additional stops as needed.
Curves
A Curve is a line graph that shows the response (on the y axis) to the varying value of an input (on the x axis).

Unity uses curves in a variety of different contexts, especially in animation. Curve editors have a number of different options and tools. For details, see Editing Curves.
Bar sliders
A bar slider is a specialized control that lets you allocate a particular resource visually. For example, the LOD Group component uses a bar slider to define transitions between GameObject LOD levels.
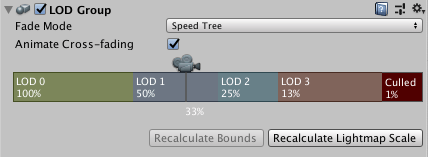
You adjust the relative values of each segment in the bar by dragging the segment edges. Some bar sliders also have draggable handles.
Arrays
When a script exposes an array as a public variable, the Inspector displays a control that lets you edit both the number of items in the array (Size) and the values or references within it.
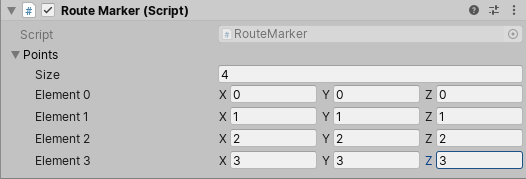
When you decrease the Size value, Unity removes values from the end of the array. When you increase the Size value, Unity copies the current last value into all the new elements it adds.
| Tip: |
|---|
| To set up an array whose values are mostly the same, add the first element and then change the size to copy its value to subsequent elements. |
Creating swatch libraries
Use swatch libraries to reuse, save, and share colors, gradients, and animation curves. You can save and choose swatches in the Color Picker, Gradient Editor, and Curve Editor.

A swatch library is a collection of swatches that you save in a file. The Swatches section displays a single library at a time.
To save a swatch:
- Open the Color Picker, Gradient Editor, or Curve Editor. For example, select Main Camera in the Hierarchy window.
- In the Inspector window, click Background Color.
- In the picker window, adjust the color, gradient, or curve to your liking.
- In Swatches, click the outlined box.
- If the view is in List mode, optionally type a name for the swatch.

Drag and drop swatches to change their order. Right-click a swatch to move it to the top, replace it, rename it, or delete it. You can also delete a swatch by Alt/Option-clicking it.
Use the drop-down menu in Swatches to:
- Choose List or Grid to change the view. The List view also displays the names of swatches.
- Choose a swatch library.
- Choose Create a Library to create a new swatch library and the location to save it in.
- Choose Reveal Current Library Location to view the current library in Windows Explorer/Mac OS Finder.
By default, Unity saves swatch libraries in your user preferences. You can also save a swatch library in your Project. Unity saves Project swatch libraries in the Editor folder of the Assets folder. To share Project swatch libraries between users, or to include them in a package, add them to a revision control repository.
To edit a Project swatch library:
- Reorganized Inspector section pages in Unity 2020.1
Copyright © 2023 Unity Technologies
优美缔软件(上海)有限公司 版权所有
"Unity"、Unity 徽标及其他 Unity 商标是 Unity Technologies 或其附属机构在美国及其他地区的商标或注册商标。其他名称或品牌是其各自所有者的商标。
公安部备案号:
31010902002961