Standalone Player Settings
This page details the Player Settings specific to standalone platforms (Mac OSX, Windows and Linux). A description of the general Player Settings can be found here.
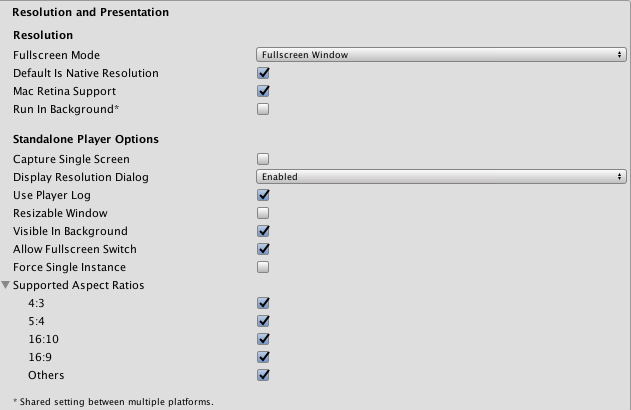
Resolution And Presentation
| Property: | Function: | |
|---|---|---|
| Resolution | ||
| Fullscreen Mode | Choose the full-screen mode. This defines the default window mode at startup. | |
| Fullscreen Window | The Fullscreen Window mode sets your app window to the full-screen native resolution of the display. Unity renders app content at the resolution set by script (or by user selection when the built application launches), but scales it to fill the window. When scaling, Unity adds black bars to the rendered output to match the aspect ratio chosen in the Player Settings, so that the content isn’t stretched. This process is called letterboxing. | |
| Exclusive Fullscreen | Exclusive Fullscreen mode sets your app to maintain sole full-screen use of a display. Unlike Fullscreen Window, this mode changes the OS resolution of the display to match the app’s chosen resolution. Exclusive Fullscreen is only supported on Windows; on other platforms, the setting falls back to Fullscreen Window. | |
| Maximized Window | Maximized Window mode sets the app window to the operating system’s definition of “maximized”. On macOS, this means a full-screen window with an auto-hidden menu bar and dock. Maximized Window is only supported on macOS; on other platforms, the setting falls back to Fullscreen Window. | |
| Windowed | Windowed mode sets your app to a standard, non-full-screen, movable window, the size of which is dependent on the app resolution. In Windowed mode, the window is resizable by default. To disable this, disable the Player Settings Resizable Window setting. | |
| Default Is Native Resolution | Check this box to make the game use the default resolution used on the target machine. | |
| Default Screen Width | Default width of the game screen in pixels. | |
| Default Screen Height | Default height of the game screen in pixels. | |
| Mac Retina Support | Check this box to enable support for high DPI (Retina) screens on a Mac. Unity enables this by default. This enhances Projects on a Retina display, but it is somewhat resource-intensive when active. | |
| Run in background | Check this box to make the game keep running (rather than pausing) if the app loses focus. | |
| Standalone Player Options | ||
| Capture Single Screen | Check this box to ensure standalone games in fullscreen mode do not darken the secondary monitor in multi-monitor setups. This is not supported on Mac OS X. | |
| Display Resolution Dialog | Choose whether the game should start with a dialog to let the user choose the screen resolution. The options are Disabled, Enabled and Hidden by Default (i.e. the option only appears if the alt key is held down at startup). | |
| Use Player Log | Check this box to write a log file with debugging information. If you plan to submit your application to the Mac App Store, leave this option un-ticked. Ticked is the default. | |
| Resizable Window | Check this box to allow the user to resize the standalone player window. | |
| Visible in Background | Check this box to show the application in the background if Fullscreen Windowed mode is used (in Windows). | |
| Allow Fullscreen Switch | Check this box to allow default OS full-screen key presses to toggle between full-screen and windowed modes. | |
| Force Single Instance | Check this box to restrict standalone players to a single concurrent running instance. | |
| Supported Aspect Ratios | Choose the aspect ratios that appear in the Resolution Dialog at startup (as long as they are supported by the user’s monitor). | |
Icon

| Property: | Function: |
|---|---|
| Override for Standalone | Check this box to assign a custom icon to be used for your standalone game. Upload different sizes of the icon to fit each of the squares below the checkbox. |
Splash Image

| Property: | Function: |
|---|---|
| Config Dialog Banner | Add a custom splash image to be displayed in the Display Resolution Dialog. |
| Show Unity Splash Screen | Shows the “Made with Unity” Splash Screen when the game is loading . |
Other Settings

| Property: | Function: |
|---|---|
| Rendering | |
| Color Space | Choose which color space should be used for rendering. The options are Gamma and Linear. See the Unity Manual page on Linear Rendering for a guide to the difference between the two. |
| Auto Graphics API for Windows | Check this box to use the best Graphics API on the Windows machine the game is running on. Uncheck it to add and remove supported Graphics APIs. |
| Auto Graphics API for Mac | Check this box to use the best Graphics API on the Mac the game is running on. Uncheck it to add and remove supported Graphics APIs. |
| Auto Graphics API for Linux | Check this box to use the best Graphics API on the Linux machine it runs on. Uncheck it to add and remove supported Graphics APIs. |
| Metal Editor Support (Experimental) | Makes the Unity Editor use the Metal API and unlocks faster shader iteration for targeting the Metal API. |
| Metal Restricted Backbuffer Use | Allow improved performance in non-default device orientation. This sets the frameBufferOnly flag on the back buffer, which prevents readback from the back buffer but enables some driver optimization. |
| Static Batching | Check this box to use Static batching. |
| Dynamic Batching | Check this box to use Dynamic Batching (activated by default). |
| GPU Skinning | Check this box to enable DX11/ES3 GPU skinning. |
| Graphics Jobs (Experimental) | Check this box to instruct Unity to offload graphics tasks (render loops) to worker threads running on other CPU cores. This is intended to reduce the time spent in Camera.Render on the main thread, which is often a bottleneck. Please note that this feature is experimental. it may not deliver a performance improvement for your project, and may introduce new crashes. |
| Lightmap Encoding | Affects the encoding scheme and compression format of the lightmaps. Choose from Normal Quality and High Quality. |
| Mac App Store Options | See Delivering your application to the Mac App Store. |
| Configuration | |
| Scripting Runtime Version | Choose which .NET runtime to use in your project. For more details, see Microsoft’s .NET documentation. |
| .NET 3.5 Equivalent | A .NET runtime which implements the .NET 3.5 API. This is the default scripting runtime. |
| .NET 4.x Equivalent | A .NET runtime which implements the .NET 4 API. This API is newer than .NET 3.5, and as such, it offers access to more APIs, is compatible with more external libraries, and supports C# 6. |
| Scripting Backend | Mono2x is the only scripting backend supported on Standalone platforms. |
| API Compatibility Level | There are two options for API compatibility level: .Net 2.0, or .Net 2.0 Subset. |
| Disable HW Statistics | Check this box to instruct the application not to send information about the hardware to Unity (See the Unity Hardware Statistics page for more details). |
| Scripting Define Symbols | use this to set custom compilation flags (see the platform dependent compilation page for more details). |
| Allow ‘unsafe’ Code | Enables support for compiling ‘unsafe’ C# code in a pre-defined assembly (for example, Assembly-CSharp.dll). For Assembly Definition Files (.asmdef), click on one of your .asmdef files and enable the option in the Inspector window that appears. |
| Optimization | |
| .Net 2.0 | .Net 2.0 libraries. Maximum .net compatibility, biggest file sizes. |
| .Net 2.0 Subset | Subset of full .net compatibility, smaller file sizes. |
| Prebake Collision Meshes | Check this box to add collision data to meshes at build time. |
| Preload Shaders | Check this box to load shaders when the player starts up. |
| Preloaded Assets | Set an array of assets to be loaded when the player starts up. |
| Vertex Compression | Vertex compression can be set per channel. You can, for instance, choose to have compression enabled for everything except positions and lightmap UVs. Whole mesh compression set per imported object will override the vertex compression on objects that have it set, while everything else will obey the vertex compression options/channels set here. |
| Optimize Mesh Data | Check this box to remove any data from meshes that is not required by the material applied to them (e.g. tangents, normals, colors, UV). |
API Compatibility Level
You can choose your mono API compatibility level for all targets. Sometimes a 3rd-party .net dll will use things that are outside of the .net compatibility level that you would like to use. In order to understand what is going on in such cases, and how to best fix it, install “Reflector” for Windows.
- Drag the .net assemblies for the API compatilibity level in question into Reflector. You can find these in Frameworks/Mono/lib/mono/YOURSUBSET/
- Drag in your 3rd-party assembly.
- Right-click your 3rd-party assembly and select “Analyze”.
- In the analysis report, inspect the “Depends on” section. Anything that the 3rd-party assembly depends on, but that is not available in the .net compatibility level of your choice, will be highlighted in red there.
XR Settings

| Property: | Function: |
|---|---|
| XR Settings | |
| Virtual Reality Supported | Enable native VR support for the Unity Editor and your game builds. |
| XR Support Installers | |
| Vuforia Augmented Reality | Enable use of the Vuforia Software Development Kit. You must have a Vuforia Software License and agree to the terms of that license before the property becomes enabled. |
Details
Customizing your Resolution Dialog
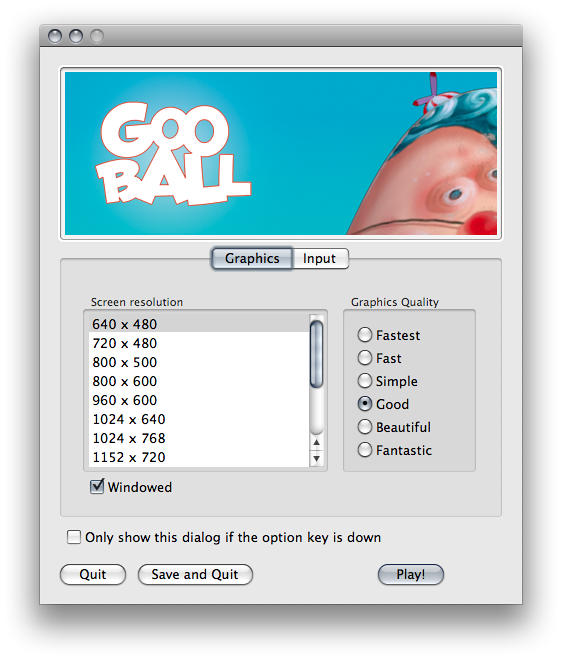
You have the option of adding a custom banner image to the Screen Resolution Dialog in the Standalone Player. The maximum image size is 432 x 163 pixels. The image does not scale up to fit the screen selector, it is automatically centered and cropped.
Publishing to the Mac App Store
The property Use Player Log enables writing a log file with debugging information. This is useful for investigating problems with your game. However you need to disable this when publishing games for Apple’s Mac App Store, as Apple may reject your submission if it is enabled. See the Unity Manual Log Files page for further information about log files.
The property Use Mac App Store Validation enables receipt validation for the Mac App Store. If this is enabled, your game will only run when it contains a valid receipt from the Mac App Store. Use this when submitting games to Apple for publishing on the App Store. This prevents people from running the game on a different computer to the one it was purchased on. Note that this feature does not implement any strong copy protection. In particular, any potential crack against one Unity game would work against any other Unity content. For this reason, it is recommended that you implement your own receipt validation code on top of this, using Unity’s plugin feature. However, since Apple requires plugin validation to initially happen before showing the screen setup dialog, you should still enable this check, or Apple might reject your submission.
-
2018–03–20 Page amended with limited editorial review
-
2017–09–04 > Added MacOS Retina Support checkbox Added in 2017.2 NewIn20171
- Allow ‘unsafe’ Code checkbox added in Unity 2018.1 NewIn20181
- .NET 4.x runtime added in 2018.1
对文档有任何疑问,请移步至开发者社区提问,我们将尽快为您解答