- Unity User Manual (2019.2)
- Timeline
- Timeline window
- Timeline Settings
Timeline Settings
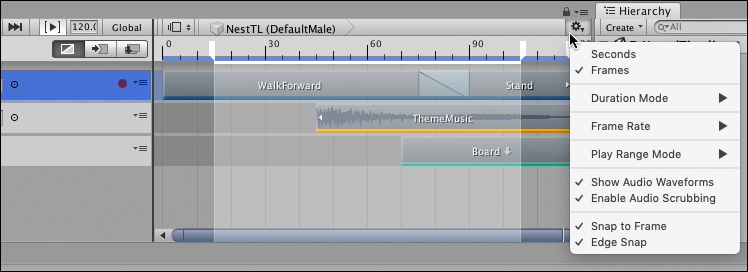
Use the Timeline Settings to choose the Timeline window and Timeline Asset settings such as the unit of measurement, the duration mode, audio waveform, and window snap settings.

Seconds or Frames
Select either Seconds or Frames to set the Timeline window to display time as either seconds or frames.
Duration Mode
Use the Duration Mode to set whether the duration of the Timeline Asset extends to the end of the last clip (Based On Clips), or ends at a specific time or frame (Fixed Length). When the Duration Mode is set to Fixed Length, use one of the following methods to change the length of the Timeline Asset:
Seleccione el Asset de Timeline en la ventana Proyecto y use la ventana del Inspector para establecer la Duración en segundos o frames.
In the Timeline window, drag the blue marker on the timeline. The blue marker indicates the end of the Timeline Asset. A blue line indicates the duration of the Timeline Asset.

Frame Rate
Select one of the options under Frame Rate to set the unit of measurement for the Timeline ruler. Change the Frame Rate to align clips at precise frames but changing the Frame Rate is only visual and has no effect on play speed, keys, tracks, or clips. The following standard frame rates are listed: Film (24 fps), PAL (25 fps), NTSC (29.97 fps), 30, 50, or 60.
Timeline supports custom frame rates from 1e–6 to 1000. To set a custom frame rate, you must use the Frame Rate property in the Timeline Asset settings. When the Timeline Asset is set to a custom frame rate, the Custom menu item is enabled and is automatically selected for the Timeline instance. The Custom menu item shows the custom frame rate in parentheses.
Play Range Mode
Select one of the options under Play Range Mode to set the behaviour of the Timeline window when the Play Range button is enabled.
When Play Range Mode is set to Loop, the Timeline instance plays the defined Play Range repeatedly, until playback is interrupted.
When Play Range Mode is set to Hold, the Timeline instance plays the defined Play Range once and stops at the end of the Play Range.
You can only set a play range when previewing a Timeline instance within the Timeline window. Unity ignores the play range in Play Mode.
Show Audio Waveforms
Enable Show Audio Waveforms to draw the waveforms for all audio clips on all audio tracks. For example, use an audio waveform as a guide when manually positioning an Audio clip of footsteps with the Animation clip of a humanoid walking. Disable Show Audio Waveform to hide audio waveforms. Show Audio Waveforms is enabled by default.
Enable Audio Scrubbing
Enable Audio Scrubbing to play audio while dragging the Timeline Playhead.
Disable Enable Audio Scrubbing to stop playing audio while dragging the Timeline Playhead. When disabled, Timeline only plays audio when in Timeline Playback mode.
Snap to Frame
Enable Snap to Frame to manipulate clips, preview Timeline instances, drag the Timeline Playhead, and position the Timeline Playhead using frames. Disable Snap to Frame to use subframes. Snap to Frame is enabled by default.

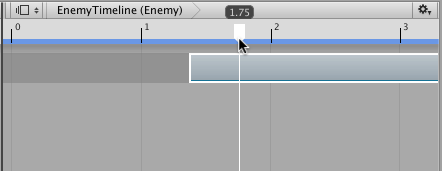
For example, when Snap to Frame is disabled and you drag the Timeline Playhead, it moves the playhead between frames. The format of Playhead Location displays differently depending on whether the Timeline window is set to Seconds or Frames:
When the Timeline window is set to Frames, the Playhead Location shows frames and subframes. For example, 8 frames and 34 subframes displays as 8.34.
When the Timeline window is set to Seconds, the Playhead Location shows seconds, frames, and subframes. For example, 6 seconds, 17 frames, and 59 subframes displays as 6:17 [.59].
La manipulación de clips, la vista previa de instancias de timeline y el posicionamiento de la cabeza lectora en el nivel de subtramas es útil cuando se intenta sincronizar animaciones y efectos con audio. Muchos productos de software de procesamiento de audio de alta gama crean formas de onda de audio con precisión de bastidor auxiliar.
Edge Snap
Enable the Edge Snap option to snap clips when you position, trim, and create blends.
When enabled, the Timeline window snaps the start or end of a clip when dragged within 10 pixels of the Timeline Playhead, the start or end of a clip on the same track, the start or end of a clip on another track, or the start or end of the entire Timeline instance. The start guide or end guide is redrawn in white to indicate that the clip has snapped to the edge of another clip or the Timeline Playhead.
Disable Edge Snap to create more accurate blends, ease-ins, or ease-outs. Edge Snap is enabled by default.
- 2019–08–20 Page published