Asset workflow
This area of the Unity User Manual provides a general overview of the principles of working with assets in Unity, including the following topics:
- Common types of assets
- Asset packages
- Using the Asset Store
- AssetBundles
- The Asset Database
- Scripting with assets
Also see the following related topics in other sections of the manual:
- Unity Accelerator under the Unity Services section
- Asset Server (Team License) under the Legacy section
- Asset Store Publishing
What assets represent
An asset is a representation of any item you can use in your project. An asset might come from a file created outside of Unity, such as a 3D Model, an audio file, or an image. You can create some asset types in Unity, such as a ProBuilder Mesh, an Animator Controller, an Audio Mixer, or a Render Texture.
How Unity imports assets
Unity automatically imports assets and manages additional data about them for you, such as what import settings should be used to import the asset, and where the asset is used throughout your project. Below is a description of how this process works:
- Unity assigns the asset a unique ID.
- Unity creates a .meta file.
- Unity processes the asset.
In some cases, Unity might create multiple assets while importing a single asset file. For more information, see Importing complex assets.
Import settings can affect how Unity processes assets. For more information, see Assets and their import settings.
Unique IDs
When you place an asset such as a Texture in the Assets folder, Unity detects that you have added a new file because the Editor frequently checks the contents of the Assets folder against the list of assets it already knows about.
When Unity finds the new file, it assigns a unique ID to the asset. This is an ID that Unity uses internally to reference the asset, so that Unity can move or rename the asset without breaking anything.
.meta files
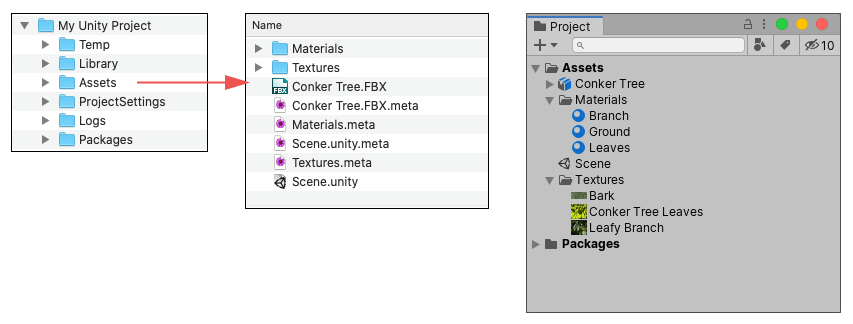
This example shows that Unity creates a .meta file for each asset or folder inside the project’s Assets folder, as they appear in a system file browser. However, these .meta files are not visible in the Project window because they are hidden by default. You can make them visible by selecting Visible Meta Files from the Mode project setting.
When Unity creates a .meta file for an asset, it writes the asset’s ID inside the .meta file and stores the .meta file in the same location as the asset file. The .meta file must stay in the same location as the asset file it relates to, because it contains the asset’s ID. If you move or rename an asset within the Project window, Unity automatically moves or renames the corresponding .meta file. However, if you move or rename an asset outside of Unity (for example, through your system’s file browser), make sure you move or rename the .meta file to match.
If an asset loses its .meta file (for example, if you moved or renamed the asset outside of Unity’s Project window, without updating its .meta file), any reference to that asset breaks, and Unity generates a new .meta file for the asset as if it were a different asset, deleting the old “orphaned” .meta file.
For example, in the case of a Texture asset losing its .meta file, any Materials that used that Texture no longer have a reference to the Texture. To fix this, you would have to manually re-assign that Texture to any Materials which required it.
Similarly, when a script asset attached to a GameObject (or Prefab) loses its .meta file, that GameObject loses the script’s functionality, and ends up with an “unassigned script” component. To fix this, you must manually re-assign the script to the GameObject.
Asset processing
Unity reads and processes any files that you add to the Assets folder, converting the contents of the file to internal game-ready data. The asset files themselves remain unchanged, and the internal data is stored in the project’s Library folder.
Using internal formats for assets allows Unity to have game-ready versions of your assets ready to use at runtime in the Editor, while keeping your unmodified source files in the Assets folder. Keeping the internal formats separate from the asset files means that you can quickly edit them and have the Editor pick up the changes automatically. For example, the Photoshop file format is convenient and you can save .psd files directly into your Assets folder, but hardware such as mobile devices and PC graphics cards can’t process that format directly in order to render them as Textures.
Unity stores the internal representation of your assets in the Library folder which is like a cache folder. As a user, you should never have to alter the Library folder manually, and attempting to do so may negatively affect your project in the Unity Editor. However, as long as the project is not open in Unity, you can safely delete the Library folder, because Unity can regenerate all of its data from the Assets and ProjectSettings folders. This also means that you should not include the Library folder under version control.
Importing complex assets
Sometimes Unity creates multiple assets when it imports a single asset file. For example, this can occur in the following situations:
| Import scenario: | How Unity handles the file: |
|---|---|
| When a 3D file (such as an FBX file) defines Materials or contains embedded Textures. | Unity extracts the Materials and embedded Textures as separate assets. |
| When you want to import an image file as multiple 2D sprites. | Use the 2D Sprite Editor to define multiple sprites from a single graphic image. In this case, each sprite defined in the Editor appears as a separate Sprite asset in the Project window. |
| When a 3D file contains multiple animation timelines or multiple clips. | Unity automatically defines separate animation timelines or clips based on its animation import settings. The resulting multiple animation clips appear as separate Animation Clip assets in the Project window. |
Assets and their import settings
As well as the unique ID assigned to the asset, the .meta files contain values for all the import settings you see in the Inspector window when you select an asset in your Project window. For a Texture, this includes the Texture Type, Wrap Mode, Filter Mode and Aniso Level import settings.
If you change the import settings for an asset, those new settings are saved to the .meta file accompanying the asset. Unity then re-imports the asset according to your updated settings, and then updates the corresponding imported “game-ready” data in the project’s Library folder.
When backing up a project, or adding a project to a version control repository, include the main Unity project folder, containing both the Assets and ProjectSettings folders. Unity relies on the information in these folders in order to reimport your assets and reconstruct your game or application. Don’t back up the Library and Temp folders or put them under version control.
Copyright © 2023 Unity Technologies
优美缔软件(上海)有限公司 版权所有
"Unity"、Unity 徽标及其他 Unity 商标是 Unity Technologies 或其附属机构在美国及其他地区的商标或注册商标。其他名称或品牌是其各自所有者的商标。
公安部备案号:
31010902002961