Sprites
Los Sprites son objetos gráficos 2D. Si usted está acostumbrado a trabajar en 3D, los Sprites son esencialmente texturas estándar pero hay técnicas especiales para combinar y manejar texturas sprites por eficiencia y conveniencia durante el desarrollo.
Unity provides a placeholder Sprite Creator, a built-in Sprite Editor, a Sprite Renderer and a Sprite Packer
See Importing and Setting up Sprites below for information on setting up assets as Sprites in your Unity project.
Sprite Tools
Sprite Creator
Utilice el Sprite Creator para crear un marcador de posiciones de sprites en su proyecto, para que usted pueda seguir con el desarrollo sin tener que tener una fuente o esperar por gráficos.
Sprite Editor
El Sprite Editor le permite a usted extraer gráficas sprite desde imágenes más grandes y editar un número de componentes de imagen dentro de una sola textura en su editor de imagen. Usted puede utilizar esto, por ejemplo, para mantener los brazos, piernas y cuerpos de un personaje como elementos separados dentro de una imagen.
Sprite Renderer
Los Sprites son renderizados con un componente Sprite Renderer en vez de un Mesh Renderer utilizado con objetos 3D. Utilice esto para mostrar imágenes como Sprites para su uso en ambas escenas 2D y 3D.
Sprite Packer
Use Sprite Packer to optimize the use and performance of video memory by your project.
Importing and Setting Up Sprites
Sprites are a type of Asset in Unity projects. You can see them, ready to use, via the Project view.
Hay dos maneras de traer Sprites a su proyecto:
-
In your computer’s Finder (Mac OS X) or File Explorer (Windows), place your image directly into your Unity Project’s Assets folder.
Unity detects this and displays it in your project’s Project view.
-
In Unity, go to Assets > Import New Asset to bring up your computer’s Finder (Mac OS X) or File Explorer (Windows).
From there, select the image you want, and Unity puts it in the Project view.
See Importing for more details on this and important information about organising your Assets folder.
Setting your Image as a Sprite
If your project mode is set to 2D, the image you import is automatically set as a Sprite. For details on setting your project mode to 2D, see 2D or 3D Projects.
Sin embargo, si el modo de su proyecto está configurado a 3D, su imagen es configurada como Texture, por lo que tiene que cambiar el Texture Type de su Asset:
- Haga clic en el asset para ver su Import Inspector.
- Set the Texture Type to Sprite (2D and UI):
For details on Sprite Texture Type settings, see Texture type: Sprite (2D and UI).
Sorting Sprites
Renderers in Unity are sorted by several criteria, such as their Layer order or their distance from the Camera. Unity’s GraphicsSettings (menu: Edit > Project Settings, then select the Graphics category) provide a setting called Transparency Sort Mode, which allows you to control how Sprites are sorted depending on where they are in relation to the Camera. More specifically, it uses the Sprite’s position on an axis to determine which ones are transparent against others, and which are not.
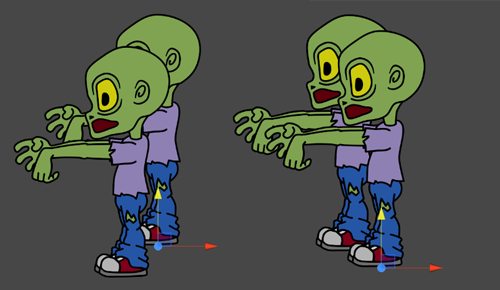
An example of when you might use this setting is to sort Sprites along the Y axis. This is quite common in 2D games, where Sprites that are higher up are sorted behind Sprites that are lower, to make them appear further away.
There are four Transparency Sort Mode options available:
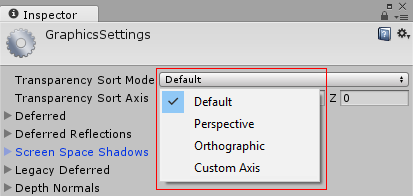
Default - Sorts based on whether the Camera’s Projection mode is set to Perspective or Orthographic
Perspective - Sorts based on perspective view. Perspective view sorts Sprites based on the distance from the Camera’s position to the Sprite’s center.
Orthographic - Sorts based on orthographic view. Orthographic view sorts Sprites based on the distance along the view direction.
Custom Axis - Sorts based on the given axis set in Transparency Sort Axis
If you have set the Transparency Sort Mode to Custom, you then need to set the Transparency Sort Axis:

If the Transparency Sort Mode is set to Custom Axis, renderers in the Scene view are sorted based on the distance of this axis from the camera. Use a value between –1 and 1 to define the axis. For example: X=0, Y=1, Z=0 sets the axis direction to up. X=1, Y=1, Z=0 sets the axis to a diagonal direction between X and Y.
For example, if you want Sprites to behave like the ones in the image above (those higher up the y axis standing behind the Sprites that are lower on the axis), set the Transparency Sort Mode to Custom Axis, and set the Y value for the Transparency Sort Axis to a value higher than 0.
Sorting Sprites using script
You can also sort Sprites per camera through scripts, by modifying the following properties in Camera:
TransparencySortMode (corresponds with Transparency Sort Mode)
TransparencySortAxis (corresponds with Transparency Sort Axis)
Por ejemplo:
var camera = GetComponent<Camera>();

camera.transparencySortMode = TransparencySortMode.CustomAxis;

camera.transparencySortAxis = new Vector3(0.0f, 1.0f, 0.0f);
2018–04–25 Page amended
2017–05–24 Page amended
Transparancy Sort Mode added in 5.6
Copyright © 2023 Unity Technologies
优美缔软件(上海)有限公司 版权所有
"Unity"、Unity 徽标及其他 Unity 商标是 Unity Technologies 或其附属机构在美国及其他地区的商标或注册商标。其他名称或品牌是其各自所有者的商标。
公安部备案号:
31010902002961