시각적 트리
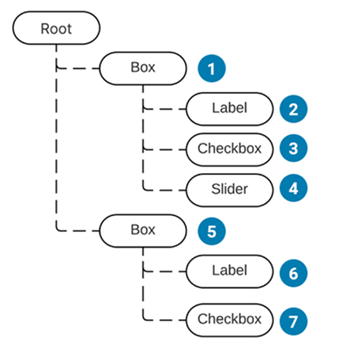
The most basic building block in UI Toolkit is a visual element. The visual elements are ordered into a hierarchy tree with parent-child relationships. The diagram below displays a simplified example of the hierarchy tree, and the rendered result in UI Toolkit.

Visual elements
The VisualElement class is the base for all nodes in the visual tree. The VisualElement base class contains common properties for all controls, such as styles, layout data, and event handlers. Visual elements can have children and descendant visual elements. For example, in the diagram above, the first Box visual element has three child visual elements: Label, Checkbox, and Slider.
You can customize the appearance of visual elements through stylesheets. You can also use event callbacks to modify the behavior of a visual element.
VisualElement derives into subclasses that define additional behavior and functionality, such as controls. UI Toolkit includes a variety of built-in controls with specialized behavior. For example, the following items are available as built-in controls:
- Buttons
- Toggles
- Text input fields
You can also combine visual elements together and modify their behavior to create custom controls. For a list of built-in controls, see the Control reference page.
Panels
The panel is the parent object of the visual tree. A visual tree must connect to a panel for the visual elements inside a tree to render. All panels belong to a window, such as an Editor Window. The panel also handles focus control and the event dispatching for the visual tree.
Every element in a visual tree holds a direct reference to the panel that holds the visual tree. To verify the connection of a VisualElement to a panel, you can test the panel property of this element. When the visual element isn’t connected, the test returns null.
Draw order
The draw order of elements in the visual tree follows a depth-first search. Child visual elements appear on top of parent elements. Child elements are also drawn in the order of the sibling list. The draw order is the following:
- The top visual element.
- The first child element of that visual element.
- The child elements of the descendant element.
The diagram below shows the draw order of the previous example:
To change the drawing order of visual elements, use the following functions:
For sibling visual elements, use the following:
Coordinate and position systems
UI Toolkit uses a powerful layout system that automatically calculates the position and size of individual elements based on the layout parameters in their style properties. For more information, see the Layout Engine page.
UI Toolkit has two types of coordinates:
- Relative: Coordinates relative to the element’s calculated position. The layout system calculates the position of the element, then adds the coordinates as an offset. Child elements can influence the position of the parent element, since the layout engine takes them into account when calculating element position.
- Absolute: Coordinates relative to the parent element. This circumvents the automatic layout calculation and directly sets the position of the element. Child elements under the same parent have no influence on the element’s position. Similarly, the element doesn’t influence the position and size of other siblings under the same parent.
Each visual element determines the coordinate system used to calculate its position. You can configure which coordinate system to use in the element style sheet.
The following code shows how to set the coordinate space and the position of a visual element through code:
    var newElement = new VisualElement();
    newElement.style.position = Position.Relative;
    newElement.style.left = 15;
    newElement.style.top = 35;
요소의 원점은 왼쪽 상단 코너입니다.
The layout system computes the VisualElement.layoutproperty (type Rect) for each element, which includes the final position of the element. This takes the relative or absolute position of the element into account.
The layout.position is expressed in points, relative to the coordinate space of its parent.
Each VisualElement has a transform property (ITransform) you can use to add an additional local offset to the position and rotation of an element. The offset isn’t represented in the calculated layout property. By default, the transform is the identity.
Use the worldBound property to retrieve the final window space coordinates of the VisualElement, taking into account both the layout position and the transform. This position includes the height of the header of the window.
예제
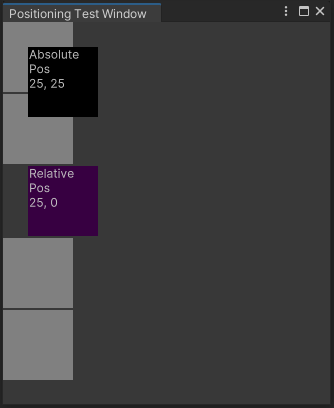
The following code sample demonstrates the difference between relative and absolute positioning. It uses the automatic layout system to add boxes to a window and calculate their positions. One box demonstrates a relative offset of 25 px, while another box demonstrates the absolute position of 25 px, 25 px.
To see this example in action, do the following:
- Under Assets > Scripts > Editor, create a C# script called PositioningTestWindow.
- Copy the code below into the C# script.
- From the Editor Toolbar, select Window > UI Toolkit > Positioning Test Window
using UnityEditor;
using UnityEngine;
using UnityEngine.UIElements;

public class PositioningTestWindow : EditorWindow
{
    [MenuItem("Window/UI Toolkit/Positioning Test Window")]
    public static void ShowExample()
    {
        var wnd = GetWindow<PositioningTestWindow>();
        wnd.titleContent = new GUIContent("Positioning Test Window");
    }

    public void CreateGUI()
    {
        for (int i = 0; i < 2; i++)
        {
            var temp = new VisualElement();
            temp.style.width = 70;
            temp.style.height = 70;
            temp.style.marginBottom = 2;
            temp.style.backgroundColor = Color.gray;
            rootVisualElement.Add(temp);
        }

        // Relative Positioning
        var relative = new Label("Relative\nPos\n25, 0");
        relative.style.width = 70;
        relative.style.height = 70;
        relative.style.left = 25;
        relative.style.marginBottom = 2;
        relative.style.backgroundColor = new Color(0.2165094f, 0, 0.254717f);
        rootVisualElement.Add(relative);

        for (int i = 0; i < 2; i++)
        {
            var temp = new VisualElement();
            temp.style.width = 70;
            temp.style.height = 70;
            temp.style.marginBottom = 2;
            temp.style.backgroundColor = Color.gray;
            rootVisualElement.Add(temp);
        }

        // Absolute Positioning
        var absolutePositionElement = new Label("Absolute\nPos\n25, 25");
        absolutePositionElement.style.position = Position.Absolute;
        absolutePositionElement.style.top = 25;
        absolutePositionElement.style.left = 25;
        absolutePositionElement.style.width = 70;
        absolutePositionElement.style.height = 70;
        absolutePositionElement.style.backgroundColor = Color.black;
        rootVisualElement.Add(absolutePositionElement);
    }
}
Transformation between coordinate systems
The VisualElement.layout.position and VisualElement.transform properties define how to transform between the local coordinate system and the parent coordinate system.
The VisualElementExtensions static class provides the following extension methods that transform points and rectangles between coordinate systems:
-
WorldToLocal은Vector2또는Rect를Panel공간에서 요소 내 레퍼렌셜로 변환합니다. -
LocalToWorldtransforms aVector2orRecttoPanelspace referential. -
ChangeCoordinatesTo는 한 요소의 로컬 공간에 있는Vector2또는Rect를 다른 로컬 공간으로 변환합니다.
Copyright © 2023 Unity Technologies
优美缔软件(上海)有限公司 版权所有
"Unity"、Unity 徽标及其他 Unity 商标是 Unity Technologies 或其附属机构在美国及其他地区的商标或注册商标。其他名称或品牌是其各自所有者的商标。
公安部备案号:
31010902002961