- Unity User Manual 2022.1
- 사용자 인터페이스(UI) 생성
- UI 툴킷
- Style UI
- USS properties
- USS common properties
USS common properties
이 페이지에서는 일반 USS 프로퍼티와 해당 구문, 승인된 값, 그리고 CSS와의 차이점을 소개합니다. 모든 USS 프로퍼티가 포함된 리스트는 USS 프로퍼티 레퍼런스를 참조하십시오.
박스 모델

크기
width: <length> | auto
height: <length> | auto
min-width: <length> | auto
min-height: <length> | auto
max-width: <length> | none
max-height: <length> | none
width와 height는 요소의 크기를 지정합니다. width가 지정되지 않으면 너비가 요소 콘텐츠의 너비를 따릅니다. height가 지정되지 않으면 높이는 요소 콘텐츠의 높이를 따릅니다.
마진
margin-left: <length> | auto;
margin-top: <length> | auto
margin-right: <length> | auto
margin-bottom: <length> | auto
/* Shorthand */
margin: [<length> | auto]{1,4}
테두리
border-left-width: <length>
border-top-width: <length>
border-right-width: <length>
border-bottom-width: <length>
/* Shorthand */
border-width: <length>{1,4}
패딩
padding-left: <length>
padding-top: <length>
padding-right: <length>
padding-bottom: <length>
/* Shorthand */
padding: <length>{1,4}
CSS와의 차이점
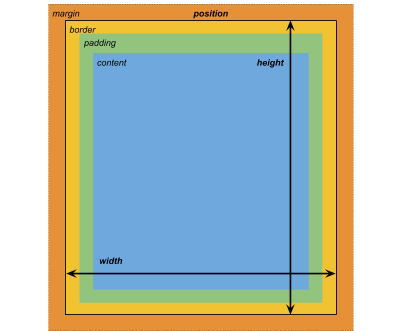
USS가 사용하는 대체 박스 모델은 표준 CSS 박스 모델과 다릅니다. 표준 CSS 박스 모델에서 width 및 height는 콘텐츠 상자의 크기를 정의합니다. 요소의 렌더링된 크기는 padding, border-width, width/height 값의 합입니다.
Unity의 모델은 CSS box-sizing 프로퍼티를 border-box로 설정하는 것과 같습니다. 자세한 내용은 MDN 문서를 참조하십시오.
플렉스 레이아웃
UI 툴킷에는 레이아웃 및 스타일링 프로퍼티에 따라 시각적 요소를 배치하는 레이아웃 엔진이 포함되어 있습니다. 레이아웃 엔진은 Flexbox의 하위 집합, 즉 HTML/CSS 레이아웃 시스템을 구현합니다.
기본적으로 모든 항목은 컨테이너에서 수직으로 배치됩니다.
/* Items */
flex-grow: <number>
flex-shrink: <number>
flex-basis: <length> | auto
flex: none | [ <'flex-grow'> <'flex-shrink'>? || <'flex-basis'> ]
align-self: auto | flex-start | flex-end | center | stretch

/* Containers */
flex-direction: row | row-reverse | column | column-reverse
flex-wrap: nowrap | wrap | wrap-reverse
align-content: flex-start | flex-end | center | stretch
align-items: flex-start | flex-end | center | stretch
justify-content: flex-start | flex-end | center | space-between | space-around
위치 지정
/* The default value is `relative` which positions the element based on its parent.
If sets to `absolute`, the element leaves its parent layout and values are specified based on the parent bounds.*/
position: absolute | relative

/* The distance from the parent edge or the original position of the element. */
left: <length> | auto
top: <length> | auto
right: <length> | auto
bottom: <length> | auto
배경
background-color: <color>
background-image: <resource> | <url> | none
-unity-background-scale-mode: stretch-to-fill | scale-and-crop | scale-to-fit
-unity-background-image-tint-color: <color>
슬라이싱
배경 이미지를 할당할 때 간소화된 9슬라이스 사양에 따라 그립니다.
-unity-slice-left: <integer>
-unity-slice-top: <integer>
-unity-slice-right: <integer>
-unity-slice-bottom: <integer>
-unity-slice-scale: <length>
테두리 컬러
border-color: <color>
테두리 반지름
border-top-left-radius: <length>
border-top-right-radius: <length>
border-bottom-left-radius: <length>
border-bottom-right-radius: <length>
/* Shorthand */
border-radius: <length>{1,4}
CSS와의 차이점
테두리 반지름 프로퍼티는 USS와 CSS에서 거의 동일하게 작동합니다. border-radius에 대한 자세한 내용은 MDN 문서를 참조하십시오.
하지만 두 가지 큰 차이점이 있습니다.
- Unity는 타원형 모서리를 만드는 데 사용되는 second-radius 짧은 표기(
border-radius: (첫 번째 반지름 값)/(두 번째 반지름 값);)를 지원하지 않습니다. - Unity는 테두리 반지름을 요소 크기(픽셀 단위)의 절반으로 줄입니다. 예를 들어 100px x 100px 요소의 경우 50px보다 큰
border-radius값은 50px로 줄어듭니다. 테두리 반지름 프로퍼티에 백분율(%) 값을 사용하면 Unity는 먼저 백분율을 픽셀로 환원한 다음border-radius값을 환원한 픽셀 값의 절반으로 줄입니다. 두 개 이상의 모서리가 반지름 값이 다르면 Unity는 요소 크기의 절반보다 큰 모든 값을 요소 크기의 절반으로 줄입니다.
형상
overflow: hidden | visible
-unity-overflow-clip-box: padding-box | content-box
-unity-paragraph-spacing: <length>
opacity: <number>
visibility: visible | hidden
display: flex | none
-unity-overflow-clip-box는 요소 콘텐츠의 클리핑 사각형을 정의합니다. 기본값은 padding-box, 즉 패딩 영역 바깥쪽 사각형(위 상자 모델 이미지의 녹색 사각형)입니다. content-box는 패딩 영역(위 상자 모델 이미지의 파란색 사각형) 내 값을 나타냅니다.
The display default value is flex. Setting display to none removes the element. Setting the visibility to hidden hides the element, but the element still occupies space in the layout.
CSS와의 차이점
USS display 프로퍼티는 CSS display 프로퍼티의 사용 가능한 키워드 값 중 일부만 지원합니다. USS 버전은 Yoga 레이아웃 엔진에서 작동하는 키워드를 지원합니다.
- For more information about Yoga, see Flexible Layouts with Yoga.
CSS
display프로퍼티에 대한 자세한 내용은 MDN 문서를 참조하십시오.
텍스트 프로퍼티
텍스트 프로퍼티는 컬러, 폰트, 폰트 크기, 그리고 폰트 리소스, 폰트 스타일, 단어 줄바꿈, 잘라내기에 대한 Unity 고유 프로퍼티를 설정합니다.
color: <color>
-unity-font: <resource> | <url>
-unity-font-definition: <resource> | <url>
font-size: <number>
-unity-font-style: normal | italic | bold | bold-and-italic
-unity-text-align: upper-left | middle-left | lower-left | upper-center | middle-center | lower-center | upper-right | middle-right | lower-right
-unity-text-overflow-position: start | middle | end
white-space: normal | nowrap

-unity-text-outline-width: <length>
-unity-text-outline-color: <color>
/* Shorthand */
-unity-text-outline: <length> | <color>
참고: UI 빌더에서 폰트를 설정할 때 인스펙터의 Font 컨트롤은 -unity-font를 설정하고 Font Asset은 -unity-font-definition을 설정합니다. -Unity-font-definition이 -unity-font에 대해 우선권을 가지므로 Font 리스트에서 폰트를 사용하는 경우 반드시 Font Asset에서 None을 선택해야 합니다. 이렇게 하지 않으면 선택한 폰트 효과가 적용되지 않습니다.
커서
The cursor property specifies the mouse cursor to be displayed when the mouse pointer is over an element.
cursor: [ [ <resource> | <url> ] [ <integer> <integer>]? , ] [ arrow | text | resize-vertical | resize-horizontal | link | slide-arrow | resize-up-right | resize-up-left | move-arrow | rotate-arrow | scale-arrow | arrow-plus | arrow-minus | pan | orbit | zoom | fps | split-resize-up-down | split-resize-left-right ]
Note: Cursor keywords are only available in the Editor UI. Cursor keywords do not work in runtime UI. In runtime UI, you must use a texture for custom cursors.
CSS와의 차이점
CSS에서는 단일 cursor 스타일 선언에서 여러 선택적 커스텀 커서와 필수 키워드를 지정할 수 있습니다. 여러 커서를 지정하면 커서가 폴백 체인을 형성합니다. 브라우저가 첫 번째 커스텀 커서를 로드할 수 없으면, 다른 커서 중 하나가 로드되거나 로드를 시도할 커스텀 커서가 더 이상 없을 때까지 다른 커서를 차례대로 로드하려고 시도합니다. 브라우저가 커스텀 커서를 로드할 수 없으면 키워드를 사용합니다.
USS에서 커스텀 커서와 키워드는 상호 배타적입니다. cursor 스타일 선언은 하나의 커스텀 커서 또는 하나의 키워드만 포함할 수 있습니다.
CSS cursor 프로퍼티에 대한 자세한 내용은 MDN 문서를 참조하십시오.
불투명도
opacity: <number>
CSS와의 차이점
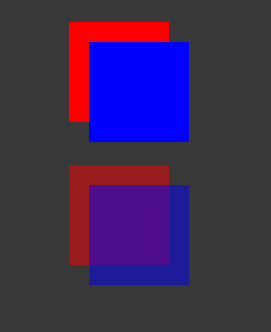
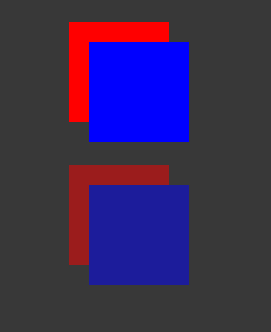
USS 불투명도는 CSS 불투명도와 유사합니다. 부모 요소의 불투명도는 자식 요소의 인식된 불투명도에 영향을 줍니다. USS 불투명도와 CSS 불투명도 사이에 인지 가능도의 차이는 있습니다.
다음의 USS 예시에서 파란 사각형은 빨간 사각형의 자식입니다. 빨간 사각형의 opacity는 0.5입니다.
.red {
    background-color: red;
    opacity: 0.5;
}

.blue {
    background-color: blue;
    left: 20px;
    top: 20px;
}
파란 사각형은 불투명도 값이 없지만 빨간 사각형에서 불투명도 0.5를 인식합니다. 파란 사각형을 통해 빨간 사각형을 볼 수 있습니다.

CSS에서 동일한 스타일을 적용하면 빨간 사각형과 파란 사각형은 투명도가 50%입니다. 하지만 파란 사각형의 opacity를 1보다 낮게 설정하지 않으면 파란 사각형을 통해 빨간 사각형을 볼 수 없습니다.
