문제 해결
이 섹션은 다음 문제에 관한 정보를 제공합니다.
| 오류 타입 | 오류 메시지 |
|---|---|
| 일반적인 시작 문제 | - Package Manager 창의 오류 메시지 - 패키지 관리자 누락 또는 창이 열리지 않음 - Unity 버전 업그레이드 이후 발생하는 문제 - 프로젝트의 패키지 설정 초기화 |
| 패키지 설치 문제 | - Package installation fails - Packages not recognized - Unable to add package from Git URL - Insufficient drive space |
| Package signature issues | - Package version has no signature - Package version doesn’t have a valid signature |
| Git 종속성 설치 중에 발생하는 문제 | - ‘git’ 실행 파일을 찾을 수 없음 - git-lfs: 커맨드를 찾을 수 없음 - 저장소를 찾을 수 없음 - 사용자 이름을 읽을 수 없음: 터미널 프롬프트가 비활성화됨 - Git 버전을 업데이트할 수 없음 |
| 에셋 스토어 패키지(My Assets) | - My Assets 컨텍스트에서 ‘Http 리스폰스를 파싱하지 못함’ |
| 범위 지정 레지스트리 | - Package Manager 창에 ’My Registries’가 없음 |
| 패키지 빌드 중에 발생하는 문제 | - Missing MonoBehaviour 오류 - Windows에서 hostfxr.dll에 대한 로딩 오류 |
You can also run the Unity Package Manager Diagnostics tool if you are experiencing problems that might be network-related. For more information, see Diagnose network issues.
Package Manager 창의 오류 메시지
The Package Manager displays error indicators in the Package Manager window when it encounters problems.
System-wide issues
-
Network connection issues
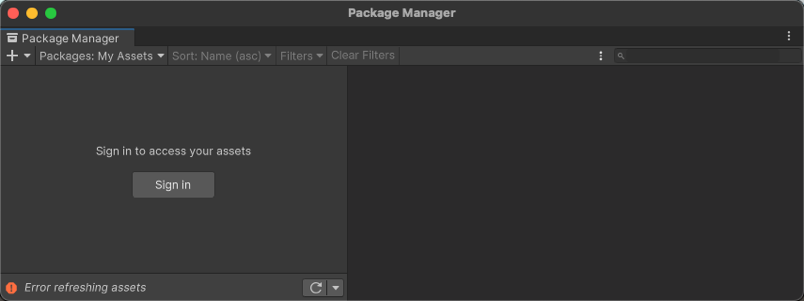
Error messages appear in the status bar when the Package Manager has detected an issue that isn’t related to a specific package. For example, if the Package Manager can’t access the package registry server, it displays this message in the status bar:

네트워크 오류 메시지 -
Error refreshing assets (or Error refreshing packages)
If your network can’t reach the package registry server, it’s probably because there is a connection problem with the network. When you or your system administrator diagnose and fix the network error, the status bar clears.
If your network connection is working, but you aren’t signed into your Unity account, the Package Manager doesn’t display any Asset Store packages. When you try to use the My Assets context, the Package Manager displays an error in the status bar:

Unity 계정에서 로그아웃됨 리스트 뷰 안에 있는 Sign in 버튼을 클릭하여 Unity Hub를 통해 Unity 계정에 로그인합니다.
Package-specific issues
-
If a specific package has a problem when loading or installing (for example, when determining which package versions to load), the error icon (
 ) appears in the package list next to the compromised package (A). To find out what the problem is, open the compromised package’s details view to see the detailed error message (B):
종속성 오류 메시지
패키지 관리자 누락 또는 창이 열리지 않음
Package Manager 창이 화면 밖으로 이동되거나 다른 창에 가려질 수 있습니다. 따라서 Package Manager 창이 열리지 않은 것처럼 보입니다. 이 경우 창 레이아웃을 초기화(Window > Layouts > Default)하여 Package Manager 창을 다시 열 수 있습니다.
Package Manager 창이 여전히 나타나지 않으면 Unity 콘솔 창을 확인하십시오.
패키지를 확인하지 못함: [<project-path>/Packages/manifest.json] 파일이 유효한 JSON이 아님:
  44:1에서 예기치 못한 토큰 '}'
  }
이 오류 메시지는 manifest.json 파일이 손상되었음을 나타냅니다. 또한 패키지 관리자가 파일을 구문 분석하지 못한 줄 번호도 알려주므로, JSON을 수정할 수 있습니다. 문제를 수정하는 데 사용할 수 있는 다양한 온라인 검증기가 있습니다. 수정된 파일을 저장하면 Unity가 Package Manager 창을 다시 로드합니다.
Unity 에디터의 초기 버전에서 업그레이드한 경우 패키지 매니페스트 파일에 다른 문제가 있을 수 있습니다.
-
2019.3부터
manifest.json파일에 com.unity.package-manager-ui 패키지에 대한 레퍼런스를 포함할 수 없습니다. 프로젝트의 패키지 설정을 초기화하거나 매니페스트의 종속성 리스트에서 다음 줄을 제거할 수 있습니다."com.unity.package-manager-ui": "2.1.1", 프로젝트 매니페스트가 “exclude”를 패키지 버전으로 사용하는지 확인하십시오. 이 값은 dependencies 프로퍼티에 더 이상 사용되지 않습니다. 이러한 줄이 보이면 전체 줄을 제거하십시오. 패키지 관리자는 프로젝트에 종속성으로 명시적으로 포함된 패키지만 설치합니다. 따라서 해당 항목을 제거하면 패키지 관리자가 해당 패키지를 무시하고 설치하지 않습니다.
패키지 관리자가 여전히 로드되지 않으면 패키지가 인식되지 않음 및 프로젝트의 패키지 설정 초기화에 나온 절차를 따르십시오.
Unity 버전 업그레이드 이후 발생하는 문제
프로젝트를 새로운 Unity 버전으로 업그레이드하는 경우 패키지 관리자는 호환이 불가능한 패키지를 호환이 가능한 버전으로 자동으로 업데이트합니다. 하지만 패키지가 컴파일되지 않으면 패키지 관리자가 콘솔에 오류 메시지를 표시합니다.
이러한 메시지를 해결하려면 오류 메시지를 읽은 후 해결할 수 있는 문제를 수정해야 합니다. 예를 들어 패키지에 다른 패키지나 버전에 대한 종속성이 없는 경우 패키지를 직접 설치할 수 있습니다.
또한 제대로 동작할 때까지 다음과 같은 해결책을 순서대로 시도해 볼 수 있습니다.
- 프로젝트 아래에 있는
Packages폴더를 백업한 후 삭제합니다. - 프로젝트의
Packages폴더에 있는 패키지 소스를 백업한 후 삭제하여manifest.json파일만 남겨둡니다. 그런 다음 프로젝트를 다시 로드하십시오. - 빈 프로젝트를 새로 생성합니다. Package Manager 창이 성공적으로 로드되면 문제가 있는 프로젝트의
Library/PackageCache/com.unity.package-manager-ui@<version>폴더를 새로 생성한 프로젝트에 있는 동일한 폴더로 교체합니다. - 최후의 수단으로 프로젝트를 재설정하여 기본 패키지 설정으로 돌아간 후 동작할 때까지 패키지를 한 번에 하나씩 추가할 수 있습니다.
프로젝트의 패키지 설정 초기화
프로젝트에 패키지 문제가 너무 많은 경우에는 프로젝트를 해당 Unity 에디터 버전의 기본 패키지 설정으로 초기화할 수 있습니다. 이 작업을 수행하면 프로젝트의 모든 패키지가 초기화됩니다. 이렇게 하면 문제의 원인을 해결하지는 못하더라도 최소한 어떤 문제인지는 파악할 수 있습니다.
참고: 패키지 설정 초기화는 되돌릴 수 없으므로, manifest.json 파일을 미리 백업해두거나 프로젝트에 소스 컨트롤이 적용되는지 확인하십시오. 또한 프로젝트를 클로닝한 후 해당 클로닝에 대한 작업을 테스트함으로써 추가적인 조치를 취할 수도 있습니다.
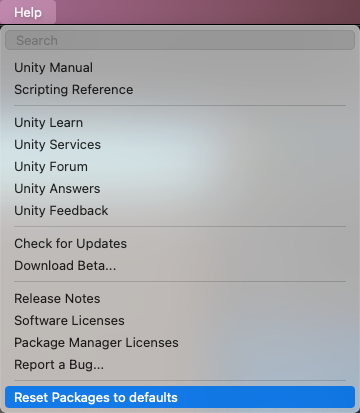
기본 패키지 설정으로 되돌아가려면 Help 메뉴에서 Reset Packages to defaults를 선택하십시오.

프로젝트 클로닝 재설정
최종 변경 사항을 적용하기 전에 다음 단계에 따라 패기지 초기화를 테스트해볼 수도 있습니다.
프로젝트 폴더를 복사하여 붙여넣은 후 쉽게 찾을 수 있는 이름을 지정하여 프로젝트 클로닝을 생성합니다. 예를 들어 프로젝트 이름이
MyProject인 경우clone_MyProject라는 이름을 지정할 수 있습니다.새로 생성한 프로젝트 클로닝을 로드합니다.
-
도움말 메뉴에서 Reset Packages to defaults를 선택합니다.
프로젝트 크기에 따라 이 작업에 몇 분 정도가 소요될 수 있습니다.
패키지가 성공적으로 재설정되었는지 확인합니다. 성공했다면 원본 프로젝트에 대해 안심하고 작업을 수행할 수 있습니다.
패키지 설치 실패
레지스트리에서 새 패키지를 설치할 수 없는 경우에는 권한 관련 문제일 수 있습니다.
You must have full permissions on the cache folder:
- Windows:
C:\Users\yourname\AppData\Local\Unity\cache - macOS:
~/Library/Unity/cache - Linux:
~/.config/unity3d/cache
네트워크 문제라고 생각되면 방화벽 및 프록시 설정을 확인하십시오.
때때로 학교, 관공서 같은 기관이나 네트워크 보호 작업 공간에서는 프록시 서버를 설치하여 네트워크와 인터넷 간 트래픽을 제어하고, Unity 또는 패키지 관리자에서 인식되지 않는 고유한 서버 인증서를 사용하십시오. 자세한 내용은 네트워크 관리자에 문의하시기 바랍니다.
패키지가 인식되지 않음
컴파일 오류가 많이 표시된다면 Unity가 기존 프로젝트의 패키지를 인식하지 못하기 때문일 수 있습니다. 이 경우 .NET 컴포넌트가 누락되었을 가능성이 있습니다.
Windows:
- Other Toolsets에서 .NET Core cross-platform development workload가 선택된 상태로 Visual Studio 2017 버전 15.9.0 이상을 다운로드하여 설치합니다.
- .NET SDK v2.2.101 컴포넌트를 다운로드하여 설치합니다.
MacOS:
.NET SDK v2.2.101 컴포넌트를 다운로드하여 설치합니다.
Visual Studio의 권장 업데이트를 설치합니다.
-
Homebrew를 사용하여 mono를 브루잉(brew)하고 설치합니다.
brew update
brew install mono # optional
brew upgrade mono
필요한 경우 프로젝트의
Library/obj/temp폴더를 삭제하고 Unity를 재시작합니다.여전히 문제가 발생하면 컴퓨터를 재부팅합니다.
Unable to add package from Git URL
See Repository not found.
Insufficient drive space
If your installation drive is out of space or low on space, consider changing the location of the package caches:
- To change the global cache, see Customize the global cache location.
- To change the Asset Store cache, see Customize the Asset Store cache location.
Package version has no signature
This message can appear when you fetch a Unity package from a scoped registry. Unity signs packages that it creates, except for older packages, which aren’t necessarily re-signed in later releases. If you copy an unsigned Unity package from a scoped registry to another registry, Package Manager can’t determine if the package content is safe and identical to the original package.
If you encounter this message, try these solutions:
- Use another version of the package.
- Fetch the Unity package from the Unity Registry.
- If you own the scoped registry, make sure you copy the newest version of the package from the Unity Registry.
Package version doesn’t have a valid signature
Packages have a signature to ensure that the content wasn’t changed before or during transit. An invalid signature typically occurs in the following situations:
- Someone published the package with modifications on their own registry.
- An error occurred while transferring the file to the end user.
In both cases, Package Manager considers the package to be potentially malicious.
When you encounter an invalid signature, you can try to install a different version of the package. You should also avoid using Unity packages from a registry other than the Unity Registry.
If you are sharing a Unity package that contains a fix, consider using a Git URL or embedding the package in your project.
‘git’ 실행 파일을 찾을 수 없음
Git URL에서 패키지를 설치하려고 시도하면 다음과 유사한 메시지가 나타납니다.
Cannot perform upm operation: Unable to add package
[https://github.example.com/myuser/myrepository.git]:
No 'git' executable was found. Please install Git on your system and restart Unity [NotFound]
UnityEditor.EditorApplication:Internal_CallUpdateFunctions()
git-lfs: 커맨드를 찾을 수 없음
Git LFS(Large File Storage)를 사용하는 패키지를 다운로드하려고 시도하면 다음 오류 메시지가 표시될 수 있습니다.
Error when executing git command. git-lfs filter-process: command not found.
Git LFS가 컴퓨터에 설치되지 않았음을 나타냅니다. 다음 커맨드 라인에서 테스트하여 확인할 수 있습니다.
git lfs --version
다음과 같은 메시지가 표시되면 Git LFS가 설치된 것입니다.
git-lfs/2.8.0 (GitHub; darwin amd64; go 1.12.7)
그렇지 않으면 Bitbucket 및 GitHub 지침에 따라 설치할 수 있습니다.
저장소를 찾을 수 없음
존재하지 않는 위치를 지정하면 다음과 유사한 메시지가 Unity 콘솔에 나타납니다.
Cannot perform upm operation: Unable to add package [https://mycompany.github.com/gitproject/com.mycompany.mypackage.git]:
  Error when executing git command. fatal: repository 'https://mycompany.github.com/gitproject/com.mycompany.mypackage.git/' not found
 [NotFound]
UnityEditor.EditorApplication:Internal_CallUpdateFunctions() (at /Users/builduser/buildslave/unity/build/Editor/Mono/EditorApplication.cs:310)
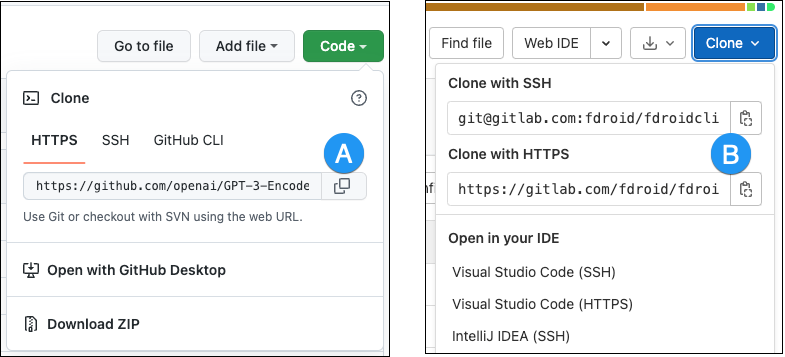
철자를 확인하십시오. 정확한 URL을 사용하려면 저장소의 페이지로 이동한 후 Clone 버튼으로 URL을 복사하십시오.

GitHub (A) 또는 GitLab (B)에서 URL 오른쪽에 있는 버튼을 클릭하면 URL을 클립보드에 복사합니다.
저장소의 위치가 정확하다면 URL에 다른 문제가 있을 수 있습니다.
- 특정 리비전을 타게팅하는 경우 리비전이 마지막에 오는지 확인하십시오. 예를 들면 다음과 같습니다.
https://github.example.com/myuser/myrepository1.git#revision - 리비전을 타게팅하고 있고 패키지가 루트에 없는 경우
path쿼리 파라미터가 리비전 앵커 앞에 오는지 확인하십시오. 예를 들면 다음과 같습니다.https://github.example.com/myuser/myrepository.git?path=/example/folder#v1.2.3
사용자 이름을 읽을 수 없음: 터미널 프롬프트가 비활성화됨
인증이 필요한 프라이빗 저장소에서 패키지를 설치하려고 하면 다음과 유사한 메시지가 Unity 콘솔에 나타납니다.
Cannot perform upm operation: Unable to add package [https://mycompany.github.com/gitproject/com.mycompany.mypackage.git]:
  Error when executing git command. fatal: could not read Username for 'https://mycompany.github.com': terminal prompts disabled
 [NotFound]
UnityEditor.EditorApplication:Internal_CallUpdateFunctions() (at /Users/builduser/buildslave/unity/build/Editor/Mono/EditorApplication.cs:310)
이 메시지는 HTTP에 대한 사용자 이름과 비밀번호를 입력하거나 SSH 키를 잠금 해제하기 위한 패스프레이즈를 입력할 수 있는 대화형 터미널 또는 다이얼로그를 패키지 관리자가 제공하지 않기 때문에 표시될 수 있습니다.
-
HTTP(S)를 사용하면 BitBucket, GitHub 또는 GitLab에 로그인할 때마다 터미널이나 다이얼로그에 사용자 이름과 비밀번호를 입력해야 합니다. 하지만 패키지 관리자는 HTTP(S)에 대한 사용자 이름과 비밀번호를 입력할 수 있는 대화형 터미널이나 다이얼로그를 제공하지 않습니다.
이 문제를 우회하려면 HTTPS에 대한 해결책에서 제안한 해결 방법 중 하나를 사용하십시오.
-
SSH는 한 쌍의 공개 및 비공개 SSH 키를 사용합니다. Bitbucket, GitHub 또는 GitLab에 공개 SSH 키를 추가하면 사용자 이름과 비밀번호를 입력하지 않고도 저장소에 액세스할 수 있습니다.
하지만 SSH 키를 안전하게 유지하기 위해 패스프레이즈를 설정한 경우에는 터미널이나 다이얼로그에 패스프레이즈를 입력하여 키를 인증해야 합니다. 이러한 경우 SSH 키를 잠금 해제할 수 있는 SSH 에이전트를 사용하여 패키지 관리자가 사용자를 대신하여 인증하도록 만들 수 있습니다.
HTTPS에 대한 해결책
패키지 관리자는 HTTP(S) 사용자 이름과 비밀번호를 입력할 수 있는 대화형 터미널이나 다이얼로그를 제공하지 않습니다. 이 문제를 우회하려면 다음 해결 방법 중 한 가지를 사용하십시오.
- 자격 증명 관리자(Git Credential Manager for Windows 또는 OSXKeyChain)를 사용합니다. 자격 증명 관리자는 터미널이나 커맨드 프롬프트를 사용하지 않고도 비밀번호 전송을 처리합니다.
- Use git-credentials from a terminal or command prompt, then launch the Hub from the same terminal so that Unity has access to the cached or stored credentials.
- Use SSH to authenticate instead. If you set up your SSH key without a passphrase, the Package Manager doesn’t have to decrypt it to authenticate with the Git server. If you decide to use a passphrase for added security, you can use the ssh-agent on either macOS or Windows to get around the authentication problem.
SSH에 대한 해결책
If you use the SSH protocol to install a package by Git URL, you might get an authentication error from Git. This typically happens when you set up a private SSH key on your local machine that is protected by a passphrase.
이 문제에 대한 해결책은 SSH 키를 잠금 해제할 수 있는 SSH 에이전트를 설정하여 패키지 관리자가 사용자를 대신하여 인증하도록 만드는 것입니다. 사용 중인 운영체제에 해당하는 섹션의 지침을 따르십시오.
Windows용 OpenSSH 설정
ssh-agent의 기본 Windows OpenSSH 버전은 Git for Windows에서 기본적으로 사용 가능한 버전보다 더욱 잘 작동합니다. 다음 절차는 OpenSSH 클라이언트를 설정하고 해당 ssh-agent에 키를 추가하는 방법을 설명합니다. Git for Windows를 사용하는 경우 Git for Windows SSH 에이전트보다 기본 Windows OpenSSH를 더 우선시할 수도 있습니다.
Make sure the OpenSSH Client is installed. To do this, search for it in the Windows Settings Optional features window (Start > Settings, then search for “Optional features”). This applies to Windows 10+.
-
%PATH%환경 변수를 확인하여 기본 Windows OpenSSH 위치가 나타나는지 확인합니다(예:C:\WINDOWS\System32\OpenSSH\).참고: 이미 Git for Windows를 사용하고 있다면
%PATH%변수에서 기본 Windows OpenSSH 위치가 Windows용 Git SSH 위치보다 먼저 나타나는지 확인하십시오. 이렇게 하면 Windows는 Git for Windows SSH 에이전트보다 기본 Windows OpenSSH 에이전트를 우선적으로 사용합니다. -
PowerShell 터미널에서
ssh-agent프로세스를 시작하여 다음과 같이 자동으로 시작되는지 확인합니다.# Set the ssh-agent service to start automatically and manually start it now Get-Service ssh-agent | Set-Service -StartupType Automatic # Run the ssh-agent process to start the ssh-agent service ssh-agent -
Import your key into the ssh-agent. To do this, run
ssh-addon the command line and then follow the instructions. By default, the agent adds the%USERPROFILE%\.ssh\id_rsakey and prompts you for the password.# Import the key ssh-add다른 키를 사용하려면 다음을 인수로 지정할 수 있습니다.
# Set the ssh-agent service to start automatically and manually start it now
ssh-add <your-secure-ssh-key-name>
키 이름이 기억나지 않으면 에이전트에 나열하도록 요청할 수 있습니다.
ssh-add -l -
Git for Windows를 설치한 경우
%GIT-SSH%환경 변수를 초기화하여 Git이 항상 기본 Windows OpenSSH 버전의 ssh-agent를 사용하도록 합니다.[Environment]::SetEnvironmentVariable("GIT_SSH", "$((Get-Command ssh).Source)", [System.EnvironmentVariableTarget]::User)
macOS용 SSH 에이전트에 SSH 키 추가
Use the ssh-add command to add your SSH keys to the ssh-agent running on your macOS system. The command parameter you use depends on your version of macOS:
-
Prior to macOS 12, use:
ssh-add -K ~/.ssh/<your-secure-ssh-key-name> -
Starting with macOS 12, use:
ssh-add --apple-use-keychain ~/.ssh/<your-secure-ssh-key-name>
이 커맨드를 실행하면 터미널은 SSH 키를 잠금 해제하기 위한 비밀번호를 요청한 후 이를 macOS 키체인에 추가합니다. 하지만 시스템을 다시 시작하면 ssh-agent에 저장된 모든 키가 초기화됩니다.
To make sure you don’t need to re-enter your password after you restart your system, open the ~/.ssh/config file (or create one if you don’t find it), and add the following:
Host *
    UseKeychain yes
    AddKeysToAgent yes
    IdentityFile ~/.ssh/<your-secure-ssh-key-name>
컴퓨터를 다시 시작하여 이러한 변경 사항을 적용하십시오.
Git 버전을 업데이트할 수 없음
Git 종속성을 저장소에서 최신 버전으로 업데이트하려고 시도하지만 그럴 수 없는 경우 Git 종속성이 잠금 상태이기 때문일 수 있습니다. Git 종속성을 저장소에서 최신 버전으로 업데이트하려면 Git URL에서 패키지 추가 버튼을 사용하여 Git URL을 입력하십시오. 자세한 내용은 잠긴 Git 종속성을 참조하십시오.
My Assets 컨텍스트에서 ‘Http 리스폰스를 파싱하지 못함’
If you see the following message in the Console window when you try to download an Asset Store package, there might be a problem with your Asset Store cache:
[PackageManager] Error Failed to parse response. UnityEditor.AsyncHTTPClientone(State, Int32)
To solve this problem, delete all downloaded assets from the Asset Store package directory and then try to download the assets again.
Warning: If your project contains a lot of asset data, it might take a lot of time and bandwidth to re-download everything.
Package Manager 창에 ’My Registries’가 없음
모든 레지스트리 공급자가 Unity의 패키지 관리자와 호환되는 것은 아닙니다. 추가한 패키지 레지스트리 서버가 /-/v1/search 또는 /-/all 엔드포인트를 구현하지 않는 경우 범위 지정 레지스트리는 Unity의 패키지 관리자와 호환되지 않으며, Package Manager 창의 My Registries 컨텍스트에 나타나지 않습니다.
Missing MonoBehaviour 오류
빌드하는 동안 Missing Behavior에 대한 오류가 많은 경우 UnityLinker가 참조되지 않은 것으로 생각되는 컴포넌트를 실수로 제거할 수 있습니다. 스트리핑 레벨이 너무 적극적이기 때문에 이러한 상황이 종종 발생합니다. 예를 들어 2D SpriteShape 패키지의 SpriteShape 컴포넌트를 참조하는 에셋 번들에 프리팹이 있는 경우 오브젝트가 누락되어 컴파일러 경고를 생성할 수 있습니다.
이를 수정하기 위해 UnityLinker에 대한 스트리핑 레벨을 낮추거나 link.xml 파일 내에서 패키지의 어셈블리를 선언하여 스트리핑되지 않도록 만들 수 있습니다.
<linker>
    <assembly fullname="Unity.2D.SpriteShape.Runtime" preserve="all"/>
    <assembly fullname="Unity.2D.Common.Runtime" preserve="all"/>
 </linker>
스트리핑 레벨과 UnityLinker에 대한 자세한 내용은 관리되는 코드 스트리핑을 참조하십시오.
Windows에서 hostfxr.dll에 대한 로딩 오류
콘솔이 hostfxr.dll 라이브러리를 찾았지만 Unity가 C:\<path_to_app>\hostfxr.dll에서 로드하지 못했다고 보고하는 경우 KB2999226 및 KB2533623 패치를 모두 설치한 후 Windows 7 또는 Windows Server 2008 R2에서 이 오류를 수정할 수 있습니다.