문제 해결
이 섹션은 다음 문제에 관한 정보를 제공합니다.
| Type of error: | Error message: |
|---|---|
| General startup issues | - Error messages in the Package Manager window - Package Manager missing or window doesn’t open - Problems after upgrading Unity to new version - Resetting your project’s package configuration |
| Package installation issues | - Package installation fails - Packages not recognized |
| Problems installing git dependencies | - No ‘git’ executable was found - git-lfs: command not found - Repository not found - Could not read Username: terminal prompts disabled - Can’t update Git version |
| Asset Store packages (My Assets) | - ‘Failed to parse Http response’ in My Assets context |
| Scoped registries | - Missing ‘My Registries’ in the Package Manager window |
| Issues when building packages | - Missing MonoBehaviour errors - Loading error for hostfxr.dll on Windows |
네트워크 관련 문제가 발생한 경우 Unity 패키지 관리자 진단 툴을 실행할 수도 있습니다. 자세한 내용은 네트워크 문제를 참조하십시오.
Package Manager 창의 오류 메시지
패키지 관리자는 문제가 발생하면 Package Manager 창에 오류 표시기를 표시합니다.
-
시스템 관련 문제
상태 표시줄에 나타나는 오류 메시지는 패키지 관리자가 특정 패키지와 관련되지 않은 문제를 감지했다는 의미입니다. 예를 들어 패키지 관리자가 패키지 레지스트리 서버를 찾지 못하면 상태 표시줄에 다음의 메시지를 표시합니다.

네트워크 오류 메시지 네트워크가 패키지 레지스트리 서버에 도달하지 못하는 경우 네트워크에 연결 문제가 발생했기 때문일 수 있습니다. 여러분 또는 시스템 관리자가 네트워크 오류를 수정하면 상태 표시줄의 내용이 지워집니다.
If your network connection is working, but you are not signed into your Unity account, the Package Manager doesn’t display any Asset Store packages. When you try to use the My Assets context, the Package Manager displays an error in the status bar:
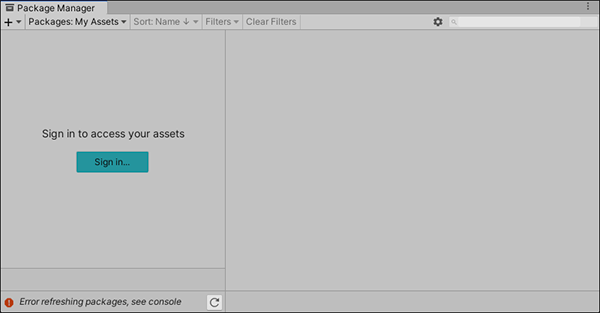
Unity 계정에서 로그아웃됨 -
패키지별 문제
로드 또는 설치 시(예: 로드할 패키지 버전을 결정하는 경우) 특정 패키지에 문제가 발생하면 오류 아이콘(
 )이 영향을 받은 패키지 (A) 옆에 있는 패키지 리스트에 나타납니다. 어떤 문제인지 확인하려면 영향을 받은 패키지의 세부 정보 뷰를 열어 상세한 오류 메시지 (B)를 확인하십시오.
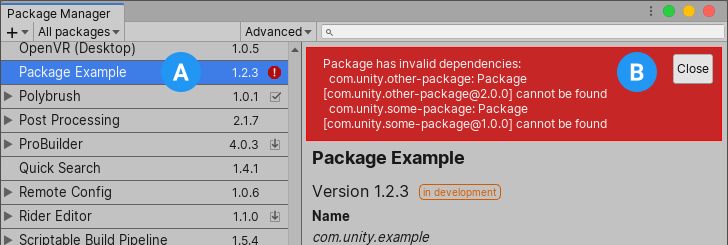
종속성 오류 메시지
Missing MonoBehaviour 오류
빌드하는 동안 Missing Behavior에 대한 오류가 많은 경우 UnityLinker가 참조되지 않은 것으로 생각되는 컴포넌트를 실수로 제거할 수 있습니다. 스트리핑 레벨이 너무 적극적이기 때문에 이러한 상황이 종종 발생합니다. 예를 들어 2D SpriteShape 패키지의 SpriteShape 컴포넌트를 참조하는 에셋 번들에 프리팹이 있는 경우 오브젝트가 누락되어 컴파일러 경고를 생성할 수 있습니다.
이를 수정하기 위해 UnityLinker에 대한 스트리핑 레벨을 낮추거나 link.xml 파일 내에서 패키지의 어셈블리를 선언하여 스트리핑되지 않도록 만들 수 있습니다.
<linker>
    <assembly fullname="Unity.2D.SpriteShape.Runtime" preserve="all"/>
    <assembly fullname="Unity.2D.Common.Runtime" preserve="all"/>
 </linker>
스트리핑 레벨과 UnityLinker에 대한 자세한 내용은 관리되는 코드 스트리핑을 참조하십시오.
패키지 관리자 누락 또는 창이 열리지 않음
The Package Manager window might get moved offscreen or hidden by another window. When this happens, it looks like the Package Manager window failed to open. In this case, you can try to reset the window layout (Window > Layouts > Default) and reopen the Package Manager window again.
If the Package Manager window still doesn’t appear, check your Unity Console window:
패키지를 확인하지 못함: [<project-path>/Packages/manifest.json] 파일이 유효한 JSON이 아님:
  44:1에서 예기치 못한 토큰 '}'
  }
This error message indicates that your manifest.json file is malformed. It also tells you the line number where the Package Manager failed to parse the file, so you can fix the JSON. There are a number of online validators that you can use to try to correct the problem. Once you save the corrected file, Unity reloads the Package Manager window.
If you upgraded from an early version of the Unity Editor, there may be other problems with your package manifest file:
-
As of 2019.3, your
manifest.jsonfile should not contain any references to the com.unity.package-manager-ui package. You can either reset your project’s package configuration or remove the following line from the manifest’s dependencies list:"com.unity.package-manager-ui": "2.1.1", Check to see if your project manifest uses “exclude” as a package version. This is an obsolete value for the dependencies property. If you find any lines like these, remove the entire line. Package Manager only installs packages that are explicitly included as a dependency in your project, so once you remove that entry, Package Manager ignores the package and doesn’t install it.
패키지 관리자가 여전히 로드되지 않으면 패키지가 인식되지 않음 및 프로젝트의 패키지 설정 초기화에 나온 절차를 따르십시오.
Unity 버전 업그레이드 이후 발생하는 문제
프로젝트를 새로운 Unity 버전으로 업그레이드하는 경우 패키지 관리자는 호환이 불가능한 패키지를 호환이 가능한 버전으로 자동으로 업데이트합니다. 하지만 패키지가 컴파일되지 않으면 패키지 관리자가 콘솔에 오류 메시지를 표시합니다.
이러한 메시지를 해결하려면 오류 메시지를 읽은 후 해결할 수 있는 문제를 수정해야 합니다. 예를 들어 패키지에 다른 패키지나 버전에 대한 종속성이 없는 경우 패키지를 직접 설치할 수 있습니다.
또한 제대로 동작할 때까지 다음과 같은 해결책을 순서대로 시도해 볼 수 있습니다.
- 프로젝트 아래에 있는
Packages폴더를 백업한 후 삭제합니다. - 프로젝트의
Packages폴더에 있는 패키지 소스를 백업한 후 삭제하여manifest.json파일만 남겨둡니다. 그런 다음 프로젝트를 다시 로드하십시오. - 빈 프로젝트를 새로 생성합니다. Package Manager 창이 성공적으로 로드되면 문제가 있는 프로젝트의
Library/PackageCache/com.unity.package-manager-ui@<version>폴더를 새로 생성한 프로젝트에 있는 동일한 폴더로 교체합니다. - 최후의 수단으로 프로젝트를 재설정하여 기본 패키지 설정으로 돌아간 후 동작할 때까지 패키지를 한 번에 하나씩 추가할 수 있습니다.
패키지 설치 실패
레지스트리에서 새 패키지를 설치할 수 없는 경우에는 권한 관련 문제일 수 있습니다.
다음의 캐시 폴더에 대한 전체 권한이 있어야 합니다.
- Windows:
C:\Users\yourname\AppData\Local\Unity\cache - MacOS:
~/Users/Library/Unity/cache
네트워크 문제라고 생각되면 방화벽 및 프록시 설정을 확인하십시오.
때때로 학교, 관공서 같은 기관이나 네트워크 보호 작업 공간에서는 프록시 서버를 설치하여 네트워크와 인터넷 간 트래픽을 제어하고, Unity 또는 패키지 관리자에서 인식되지 않는 고유한 서버 인증서를 사용하십시오. 자세한 내용은 네트워크 관리자에 문의하시기 바랍니다.
패키지가 인식되지 않음
컴파일 오류가 많이 표시된다면 Unity가 기존 프로젝트의 패키지를 인식하지 못하기 때문일 수 있습니다. 이 경우 .NET 컴포넌트가 누락되었을 가능성이 있습니다.
Windows:
- Other Toolsets에서 .NET Core cross-platform development workload가 선택된 상태로 Visual Studio 2017 버전 15.9.0 이상을 다운로드하여 설치합니다.
- .NET SDK v2.2.101 컴포넌트를 다운로드하여 설치합니다.
MacOS:
.NET SDK v2.2.101 컴포넌트를 다운로드하여 설치합니다.
Visual Studio의 권장 업데이트를 설치합니다.
-
Homebrew를 사용하여 mono를 브루잉(brew)하고 설치합니다.
brew update
brew install mono # optional
brew upgrade mono
필요한 경우 프로젝트의
Library/obj/temp폴더를 삭제하고 Unity를 재시작합니다.여전히 문제가 발생하면 컴퓨터를 재부팅합니다.
Windows에서 hostfxr.dll에 대한 로딩 오류
콘솔이 hostfxr.dll 라이브러리를 찾았지만 Unity가 C:\<path_to_app>\hostfxr.dll에서 로드하지 못했다고 보고하는 경우 KB2999226 및 KB2533623 패치를 모두 설치한 후 Windows 7 또는 Windows Server 2008 R2에서 이 오류를 수정할 수 있습니다.
프로젝트의 패키지 설정 초기화
프로젝트에 패키지 문제가 너무 많은 경우에는 프로젝트를 해당 Unity 에디터 버전의 기본 패키지 설정으로 초기화할 수 있습니다. 이 작업을 수행하면 프로젝트의 모든 패키지가 초기화됩니다. 이렇게 하면 문제의 원인을 해결하지는 못하더라도 최소한 어떤 문제인지는 파악할 수 있습니다.
참고: 패키지 설정 초기화는 되돌릴 수 없으므로, manifest.json 파일을 미리 백업해두거나 프로젝트에 소스 컨트롤이 적용되는지 확인하십시오. 또한 프로젝트를 클로닝한 후 해당 클로닝에 대한 작업을 테스트함으로써 추가적인 조치를 취할 수도 있습니다.
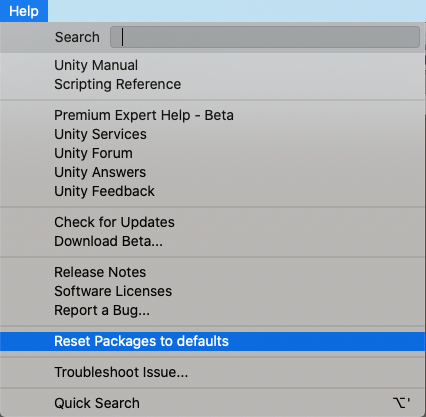
기본 패키지 설정으로 되돌아가려면 Help 메뉴에서 Reset Packages to defaults를 선택하십시오.
프로젝트 클로닝 재설정
최종 변경 사항을 적용하기 전에 다음 단계에 따라 패기지 초기화를 테스트해볼 수도 있습니다.
프로젝트 폴더를 복사하여 붙여넣은 후 쉽게 찾을 수 있는 이름을 지정하여 프로젝트 클로닝을 생성합니다. 예를 들어 프로젝트 이름이
MyProject인 경우clone_MyProject라는 이름을 지정할 수 있습니다.새로 생성한 프로젝트 클로닝을 로드합니다.
-
도움말 메뉴에서 Reset Packages to defaults를 선택합니다.
프로젝트 크기에 따라 이 작업에 몇 분 정도가 소요될 수 있습니다.
패키지가 성공적으로 재설정되었는지 확인합니다. 성공했다면 원본 프로젝트에 대해 안심하고 작업을 수행할 수 있습니다.
No ‘git’ executable was found
If you try to install a package from a git URL, a message similar to this appears:
Cannot perform upm operation: Unable to add package
[https://github.example.com/myuser/myrepository.git]:
No 'git' executable was found. Please install Git on your system and restart Unity [NotFound]
UnityEditor.EditorApplication:Internal_CallUpdateFunctions()
git-lfs: command not found
If you are trying to download a package that uses Git LFS (Large File Storage), you might see this error message:
Error when executing git command. git-lfs filter-process: command not found.
This indicates that Git LFS is probably not installed on your machine. To make sure, you could test it on the command line:
git lfs --version
If you see something like this, Git LFS is installed:
git-lfs/2.8.0 (GitHub; darwin amd64; go 1.12.7)
Otherwise, you can install it by following the Bitbucket GitHub instructions.
Repository not found
존재하지 않는 위치를 지정하면 다음과 유사한 메시지가 Unity 콘솔에 나타납니다.
Cannot perform upm operation: Unable to add package [https://mycompany.github.com/gitproject/com.mycompany.mypackage.git]:
  Error when executing git command. fatal: repository 'https://mycompany.github.com/gitproject/com.mycompany.mypackage.git/' not found
 [NotFound]
UnityEditor.EditorApplication:Internal_CallUpdateFunctions() (at /Users/builduser/buildslave/unity/build/Editor/Mono/EditorApplication.cs:310)
철자를 확인하십시오. 정확한 URL을 사용하려면 저장소의 페이지로 이동한 후 Clone 버튼으로 URL을 복사하십시오.
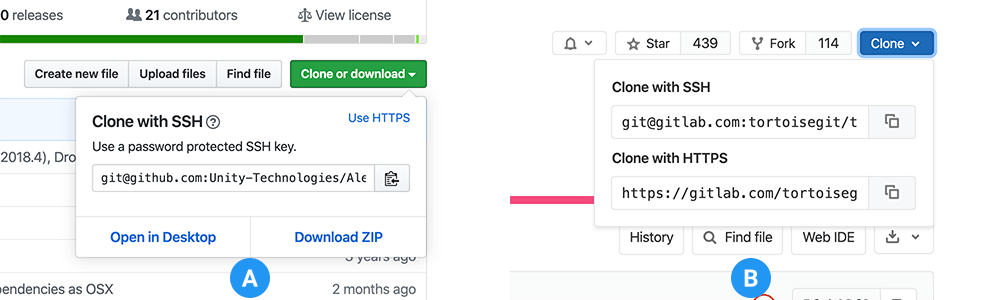
GitHub (A) 또는 GitLab (B)에서 URL 오른쪽에 있는 버튼을 클릭하면 URL을 클립보드에 복사합니다.
If the location of the repository is correct, there may be another problem with the URL:
- If you are targeting a specific revision, make sure your revision comes last. For example:
https://github.example.com/myuser/myrepository1.git#revision - If you are targeting a revision and the package is not at the root, make sure the
pathquery parameter precedes the revision anchor. For example:https://github.example.com/myuser/myrepository.git?path=/example/folder#v1.2.3
Could not read Username: terminal prompts disabled
인증이 필요한 프라이빗 저장소에서 패키지를 설치하려고 하면 다음과 유사한 메시지가 Unity 콘솔에 나타납니다.
Cannot perform upm operation: Unable to add package [https://mycompany.github.com/gitproject/com.mycompany.mypackage.git]:
  Error when executing git command. fatal: could not read Username for 'https://mycompany.github.com': terminal prompts disabled
 [NotFound]
UnityEditor.EditorApplication:Internal_CallUpdateFunctions() (at /Users/builduser/buildslave/unity/build/Editor/Mono/EditorApplication.cs:310)
This message is likely due to the fact that Package Manager does not provide an interactive terminal or dialog where you can enter your username and password for HTTP, or your passphrase to unlock your SSH key:
-
With HTTP(S), every time you log onto BitBucket, GitHub or GitLab you need to enter your username and password in a terminal or a dialog box. However, the Package Manager does not provide an interactive terminal or dialog where you can enter your username and password for HTTP(S).
To bypass this, use one of the workarounds suggested in Solutions for HTTPS.
-
SSH uses a pair of public and private SSH keys. You can add your public SSH key to Bitbucket, GitHub or GitLab and then access repositories without having to enter a username and password.
However, if you have set up a passphrase to keep your SSH key safe, you still have to enter that passphrase in a terminal or a dialog box in order to authorize your key. In that case, you can use an SSH agent that can unlock your SSH key to authenticate with the Package Manager on your behalf.
Solutions for HTTPS
The Package Manager does not provide an interactive terminal or dialog where you can enter your HTTP(S) username and password. To bypass this, use one of these workarounds:
- Use a credential manager (Git Credential Manager for Windows or OSXKeyChain). Credential managers handle sending the password without having to use a terminal or a command prompt.
- 터미널 또는 커맨드 프롬프트에서 Git 자격 증명을 사용합니다. 그런 다음 Unity가 캐싱되거나 저장된 자격 증명에 액세스할 수 있도록 동일한 터미널에서 Hub를 실행합니다.
- Use SSH to authenticate instead. If you set up your SSH key without a passphrase, the Package Manager doesn’t have to decrypt it in order to authenticate with the Git server. If you decide to use a passphrase for added security, you can still get around the authentication problem by using the ssh-agent on either macOS or Windows.
Solutions for SSH
If you are using the SSH protocol to install a package by Git URL, you might get an authentication error from Git. This typically happens when you set up a private SSH key on your local machine that is protected by a passphrase.
The solution to this problem is to set up an SSH agent that can unlock your SSH key to authenticate with the Package Manager on your behalf. Follow the instructions in the section that corresponds to your operating system:
Setting up OpenSSH for Windows
The native Windows OpenSSH version of the ssh-agent works better than the version available by default with Git for Windows. This procedure explains how to set up the OpenSSH client and add your key to its ssh-agent. If you are using Git for Windows, you can also prioritize the native Windows OpenSSH over the Git for Windows SSH agent:
Make sure the OpenSSH Client is installed by searching for it in the Windows Settings Optional features window (Start > Settings, then search for “Optional features”). This applies to Windows 10+.
-
Check your
%PATH%environment variable to make sure the native Windows OpenSSH location appears (for example,C:\WINDOWS\System32\OpenSSH\).Note: If you are already using Git for Windows, make sure the native Windows OpenSSH location appears before the Git for Windows SSH location in your
%PATH%variable. This ensures that Windows uses the native Windows OpenSSH agent over the Git for Windows SSH agent. -
In a PowerShell terminal, start the
ssh-agentprocess and make sure it starts automatically:# Set the ssh-agent service to start automatically and manually start it now Get-Service ssh-agent | Set-Service -StartupType Automatic # Run the ssh-agent process to start the ssh-agent service ssh-agent -
Import your key into the ssh-agent by running
ssh-addon the command line and then following the instructions. By default, the agent adds the%USERPROFILE%\.ssh\id_rsakey and prompts you for the password.# Import the key ssh-addTo use a different key, you can specify it as an argument:
# Set the ssh-agent service to start automatically and manually start it now
ssh-add <your-secure-ssh-key-name>
If you can’t remember the name of your key, you can ask the agent to list them:
ssh-add -l -
If you installed Git for Windows, reset the
%GIT-SSH%environment variable to make sure that Git always uses the native Windows OpenSSH version of the ssh-agent:[Environment]::SetEnvironmentVariable("GIT_SSH", "$((Get-Command ssh).Source)", [System.EnvironmentVariableTarget]::User)
Adding SSH keys to your SSH Agent for macOS
Use the following command to add your SSH keys to the ssh-agent running on your macOS system:
ssh-add -K ~/.ssh/<your-secure-ssh-key-name>
After you run this command, the terminal asks for the password to unlock your SSH key and then adds it to the macOS keychain. However, once you restart your system, every key stored in the ssh-agent is reset.
To prevent re-entering your password after restarting your system, open the ~/.ssh/config file (or create one if you don’t find it), and add the following:
Host *
    UseKeychain yes
    AddKeysToAgent yes
    IdentityFile ~/.ssh/<your-secure-ssh-key-name>
Restart your machine to apply these changes.
Can’t update Git version
If you are trying to update your Git dependency to a newer version from the repository, but it’s not working, it’s probably because your Git dependency is locked. If you want to update your Git dependency to a newer version from the repository, use the Add package from git URL button and enter a Git URL. For more information, see Locked Git dependencies.
Missing ‘My Registries’ in the Package Manager window
Not all registry providers are compatible with Unity’s Package Manager. If the package registry server you added does not implement the /-/v1/search or /-/all endpoints, your scoped registry is not compatible with Unity’s Package Manager, and doesn’t appear in the My Registries context in the Package Manager window.
‘Failed to parse Http response’ in My Assets context
If you see the following message in the Console window when trying to download an Asset Store package, there might be a problem with your Asset Store cache:
[PackageManager] Error Failed to parse response. UnityEditor.AsyncHTTPClientone(State, Int32)
To solve this problem, delete all downloaded assets from the Asset Store package directory and then try downloading the assets again.
Warning: If your project contains a lot of asset data, this might take a lot of time and bandwidth to re-download everything.
Copyright © 2023 Unity Technologies
优美缔软件(上海)有限公司 版权所有
"Unity"、Unity 徽标及其他 Unity 商标是 Unity Technologies 或其附属机构在美国及其他地区的商标或注册商标。其他名称或品牌是其各自所有者的商标。
公安部备案号:
31010902002961