Uploading assets to your package
After you create a package draft, you can add your assets and upload them to this package draft. There are two ways to do this:
- Open the Project containing the assets you want to upload inside the Unity Editor.
- Create new package 페이지로 이동한 후 Package upload 섹션으로 이동하고 Launch Unity 버튼을 클릭하여 Unity를 실행하고 프로젝트를 엽니다.
To prevent confusion during upload and import for your users, make sure that the assets you want to upload are inside a top-level folder with the same title as your submission. This folder contains all of the components for your Project:
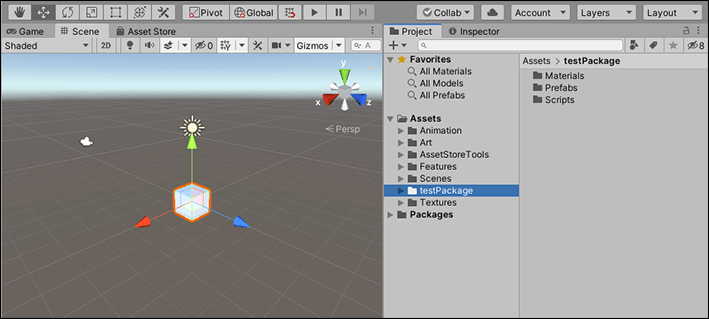
Note: If your package contains audio or video files, you must upload samples of your media assets in the Audio/Video section of your package draft’s Package Detail section.
To upload assets to your package:
에셋 스토어에서 에셋 스토어 툴 패키지를 다운로드합니다.
에셋 스토어에 제출할 콘텐츠가 들어 있는 Unity 프로젝트를 열고 에셋 스토어 툴을 임포트합니다.
-
Unity 에디터의 메인 메뉴에서 Asset Store Tools > Package Upload를 선택합니다.
Publisher Login 다이얼로그가 나타나 퍼블리셔 자격 증명을 입력하라는 메시지를 표시합니다.
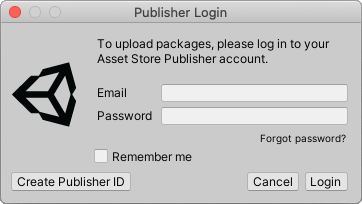
퍼블리셔 계정을 만드는 데 사용한 이메일과 비밀번호를 입력하십시오. 퍼블리셔 계정이 없는 경우 Create Publisher ID 버튼을 클릭하여 만들 수 있습니다. 패키지 업로드 툴이 Package Upload 창에 드래프트와 패키지를 표시합니다.
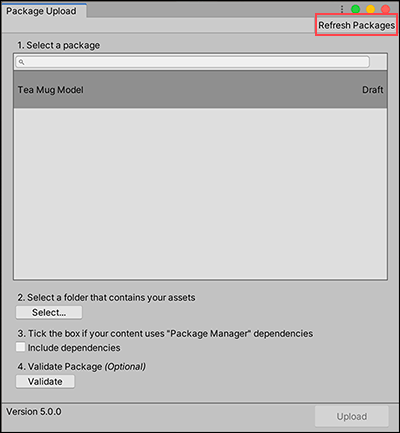
패키지 드래프트와 패키지 드래프트에 업로드할 에셋 폴더를 선택합니다 리스트에 패키지 드래프트가 보이지 않으면 오른쪽 상단의 Refresh Packages 버튼을 클릭합니다.
리스트에서 사용할 패키지 드래프트를 선택합니다.
Click the Select button to choose the folder that contains the assets you want to upload from the file browser. You can only select one folder, and if the selected folder is empty, an error message appears when you click the Validate or Upload button.
-
Validate 버튼을 클릭하여 Validator 창을 표시합니다.
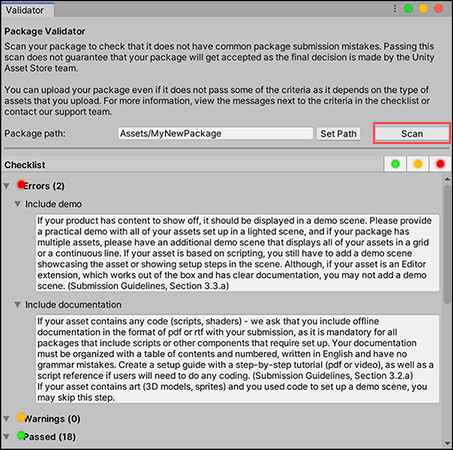
Scan 버튼을 클릭하면 Validation 결과가 표시됩니다 Scan 버튼을 클릭하여 패키지에 문제가 있는지 검사합니다. 패키지를 제출해서 승인을 받으려면 먼저 이러한 문제를 해결해야 합니다. 작업을 마치면 이 창을 닫고 Package Upload 창으로 되돌아갑니다.
Click Upload to connect your assets to your package. The status bar next to the title of your selected folder shows the progress of the upload. When the upload is finished, a dialog box appears letting you know whether or not the upload was successful.
새로 생성된
.unitypackage파일을 테스트하려면 새 Unity 프로젝트를 생성하고 패키지를 임포트합니다.
이 창을 닫고 Publisher Account 페이지로 돌아와 패키지 드래프트에 최종 변경 사항을 적용하고 최종 승인을 위해 패키지를 제출할 수 있습니다.
Copyright © 2023 Unity Technologies
优美缔软件(上海)有限公司 版权所有
"Unity"、Unity 徽标及其他 Unity 商标是 Unity Technologies 或其附属机构在美国及其他地区的商标或注册商标。其他名称或品牌是其各自所有者的商标。
公安部备案号:
31010902002961