Custom shader fundamentals
These example shaders for the Built-in Render Pipeline demonstrate the basics of writing custom shaders, and cover common use cases.
For information on writing shaders, see Writing shaders.
씬 설정
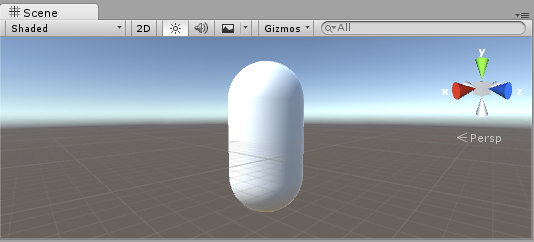
가장 먼저 할 일은 셰이더를 테스트하는 데에 사용할 오브젝트를 몇 개 만드는 일입니다. 메인 메뉴에서 Game Object > 3D Object > Capsule__을 선택해야 합니다. 다음으로 카메라가 캡슐을 바라보도록 위치시켜야 합니다. 계층 구조에서 캡슐을 더블 클릭하여 씬 뷰의 포커스를 맞춘 후 메인 카메라 오브젝트를 선택하고 메인 메뉴에서 Game object__ > __Align with View__를 클릭해야 합니다.
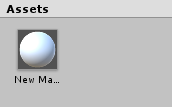
프로젝트 뷰의 메뉴에서 Create > Material 을 선택하여 새 머티리얼을 생성합니다. New Material 이라는 이름의 새 머티리얼이 프로젝트 뷰에 나타납니다.
셰이더 생성
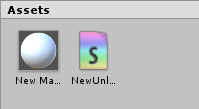
이제 비슷한 방식으로 새 셰이더 에셋을 생성합니다. 프로젝트 뷰의 메뉴에서 Create > Shader > __Unlit Shader__를 선택합니다. 이렇게 하면 아무 조명 없이 텍스처만을 표시하는 기본 셰이더가 생성됩니다.
Create > Shader 메뉴의 다른 항목을 선택하면 기본만 있는(barebone) 셰이더 또는 다른 타입의 셰이더, 예를 들어 기본 표면 셰이더가 생성됩니다.
메시, 머티리얼, 셰이더 연결
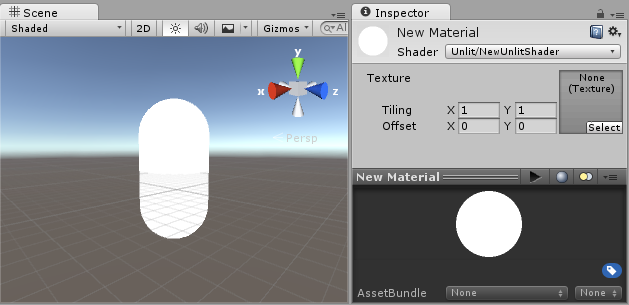
머티리얼의 인스펙터를 통해 머티리얼이 셰이더를 사용하도록 하거나, 셰이더 에셋을 프로젝트 뷰의 머티리얼 에셋 위로 드래그해야 합니다. 머티리얼 인스펙터는 이 셰이더를 사용할 때 흰 구체를 표시합니다.

이제 머티리얼을 씬 또는 계층 뷰의 메시 오브젝트 위로 드래그해야 합니다. 또는 오브젝트를 선택하고, 인스펙터에서 이 오브젝트가 메시 렌더러 컴포넌트의 머티리얼 슬롯에 있는 머티리얼을 사용하게 만듭니다.
이렇게 설정하고 나면, 이제 셰이더 코드를 살펴볼 수 있습니다. 그리고 셰이더에 가한 변경 결과가 씬 뷰의 캡슐에 나타납니다.
셰이더 주요 파트
셰이더 코드를 살펴보려면 프로젝트 뷰의 셰이더 에셋을 더블 클릭해야 합니다. 그러면 셰이더 코드가 스크립트 에디터(MonoDevelop 또는 Visual Studio)에 열립니다.
셰이더는 다음 코드로 시작합니다.
Shader "Unlit/NewUnlitShader"
{
    Properties
    {
        _MainTex ("Texture", 2D) = "white" {}
    }
    SubShader
    {
        Tags { "RenderType"="Opaque" }
        LOD 100

        Pass
        {
            CGPROGRAM
            #pragma vertex vert
            #pragma fragment frag
            // make fog work
            #pragma multi_compile_fog

            #include "UnityCG.cginc"

            struct appdata
            {
                float4 vertex : POSITION;
                float2 uv : TEXCOORD0;
            };

            struct v2f
            {
                float2 uv : TEXCOORD0;
                UNITY_FOG_COORDS(1)
                float4 vertex : SV_POSITION;
            };

            sampler2D _MainTex;
            float4 _MainTex_ST;

            v2f vert (appdata v)
            {
                v2f o;
                o.vertex = UnityObjectToClipPos(v.vertex);
                o.uv = TRANSFORM_TEX(v.uv, _MainTex);
                UNITY_TRANSFER_FOG(o,o.vertex);
                return o;
            }

            fixed4 frag (v2f i) : SV_Target
            {
                // sample the texture
                fixed4 col = tex2D(_MainTex, i.uv);
                // apply fog
                UNITY_APPLY_FOG(i.fogCoord, col);
                return col;
            }
            ENDCG
        }
    }
}
이 초기 셰이더는 별로 간단해 보이지 않습니다! 그러나 걱정하지 말아야 합니다. 각 파트를 단계별로 짚어 봅니다.
이 단순한 셰이더의 주요 파트를 살펴 봅시다.
Shader
셰이더 명령은 셰이더의 이름을 가지는 문자열을 포함합니다. 머티리얼 인스펙터에서 해당 셰이더를 선택할 때 포워드슬래시 문자 “/”를 사용하여 셰이더를 서브 메뉴에 위치시킬 수 있습니다.
프로퍼티
프로퍼티 블록은 머티리얼의 일부로 저장되고 머티리얼 인스펙터에 나타나게 될 셰이더 변수(텍스처, 컬러 등)를 포함하고 있습니다. 이 언릿 셰이더 템플릿에서는 하나의 텍스처 프로퍼티가 선언되었습니다.
SubShader
하나의 셰이더는 하나 이상의 서브셰이더를 포함할 수 있으며 서브셰이더는 일차적으로 다른 GPU 성능에 맞는 셰이더를 구현하기 위해 사용됩니다. 이 튜토리얼에서는 서브셰이더에 대해서는 크게 고려하지 않습니다. 따라서 여기서 모든 셰이더는 단지 하나의 서브셰이더만 포함합니다.
Pass
각 서브셰이더는 여러 개의 패스로 구성되며 각 패스는 해당 셰이더의 머티리얼과 함께 렌더링될 동일 오브젝트용 버텍스 및 프래그먼트 코드의 실행을 나타냅니다. 단순 셰이더 중에는 단지 하나의 패스만을 사용하는 경우가 많지만 조명과 상호작용하는 셰이더의 경우 더 많은 패스를 필요로 할 수도 있습니다(구체적인 설명은 조명 파이프라인을 참조하십시오. 패스 내의 명령은 보통 고정 함수 상태(예: 블렌딩 모드)를 설정합니다.
CGPROGRAM .. ENDCG
이러한 키워드는 버텍스 및 프래그먼트 셰이더 내의 HLSL 코드 부분을 둘러쌉니다. 보통 여기가 바로 가장 흥미로운 코드가 있는 곳입니다. 자세한 내용은 버텍스 및 프래그먼트 셰이더를 참조하십시오.
단순 언릿 셰이더
언릿(unlit) 셰이더 템플릿은 텍스처가 있는 오브젝트를 표시하기 위해 꼭 필요한 몇 가지 작업을 더 합니다. 예를 들어 안개를 지원하며 머티리얼의 텍스처 타일링/오프셋 필드를 지원합니다. 우선 셰이더를 최소한의 수준으로 단순화시킨 다음 코멘트를 더 추가해 봅시다.
Shader "Unlit/SimpleUnlitTexturedShader"
{
    Properties
    {
        // we have removed support for texture tiling/offset,
        // so make them not be displayed in material inspector
        [NoScaleOffset] _MainTex ("Texture", 2D) = "white" {}
    }
    SubShader
    {
        Pass
        {
            CGPROGRAM
            // use "vert" function as the vertex shader
            #pragma vertex vert
            // use "frag" function as the pixel (fragment) shader
            #pragma fragment frag

            // vertex shader inputs
            struct appdata
            {
                float4 vertex : POSITION; // vertex position
                float2 uv : TEXCOORD0; // texture coordinate
            };

            // vertex shader outputs ("vertex to fragment")
            struct v2f
            {
                float2 uv : TEXCOORD0; // texture coordinate
                float4 vertex : SV_POSITION; // clip space position
            };

            // vertex shader
            v2f vert (appdata v)
            {
                v2f o;
                // transform position to clip space
                // (multiply with model*view*projection matrix)
                o.vertex = mul(UNITY_MATRIX_MVP, v.vertex);
                // just pass the texture coordinate
                o.uv = v.uv;
                return o;
            }

            // texture we will sample
            sampler2D _MainTex;

            // pixel shader; returns low precision ("fixed4" type)
            // color ("SV_Target" semantic)
            fixed4 frag (v2f i) : SV_Target
            {
                // sample texture and return it
                fixed4 col = tex2D(_MainTex, i.uv);
                return col;
            }
            ENDCG
        }
    }
}
버텍스 셰이더(Vertex Shader) 는 3D 모델의 각 버텍스에서 실행되는 프로그램입니다. 많은 경우 버텍스 셰이더는 특별히 흥미로운 동작을 하지는 않습니다. 여기서는 버텍스 위치를 오브젝트 공간에서 이른바 “클립 공간”으로 변환하기만 합니다. GPU가 오브젝트를 화면에 래스터화하기 위해 클립 공간을 사용합니다. 프래그먼트 셰이더에서 텍스처를 샘플링하기 위해 필요로 합니다.
프래그먼트 셰이더(Fragment Shader)는 오브젝트가 화면에서 차지하고 있는 모든 픽셀마다 실행되는 프로그램이며 보통 각 픽셀의 컬러를 계산하고 출력하기 위해 사용됩니다. 화면에는 보통 수백만 개의 픽셀이 있으며 프래그먼트 셰이더는 이 모든 픽셀에 대해 실행됩니다! 프래그먼트 셰이더를 최적화하는 것은 전반적인 게임 성능에 있어 매우 중요한 부분입니다.
일부 변수 또는 함수 정의 뒤에는 시맨틱 표시자가 붙습니다(예: : POSITION 또는 : SV_Target). 이 시맨틱은 이 변수의 “의미”를 GPU에 알려줍니다. 자세한 내용은 셰이더 시맨틱 페이지를 참조하십시오.
위 셰이더는 좋은 텍스처 및 모델과 함께 사용할 경우 상당히 좋은 결과를 냅니다!
더 간단한 단순 컬러 셰이더
이 셰이더를 지금보다도 더 단순화시켜 보겠습니다. 전체 오브젝트를 한 가지 컬러로 그리는 셰이더를 만듭니다. 별로 유용한 셰이더가 되지는 않겠지만 학습용으로는 충분합니다.
Shader "Unlit/SingleColor"
{
    Properties
    {
        // Color property for material inspector, default to white
        _Color ("Main Color", Color) = (1,1,1,1)
    }
    SubShader
    {
        Pass
        {
            CGPROGRAM
            #pragma vertex vert
            #pragma fragment frag

            // vertex shader
            // this time instead of using "appdata" struct, just spell inputs manually,
            // and instead of returning v2f struct, also just return a single output
            // float4 clip position
            float4 vert (float4 vertex : POSITION) : SV_POSITION
            {
                return mul(UNITY_MATRIX_MVP, vertex);
            }

            // color from the material
            fixed4 _Color;

            // pixel shader, no inputs needed
            fixed4 frag () : SV_Target
            {
                return _Color; // just return it
            }
            ENDCG
        }
    }
}
이번에는 입력(appdata) 및 출력(v2f) 용으로 구조체를 사용하는 대신, 셰이더 함수는 입력을 수동으로 판독합니다. 두 가지 방법 다 사용할 수 있으며 어느 방법을 사용할지는 코딩 스타일 및 선호도에 따라 달라집니다.
메시 노멀로 재미있는 이펙트 만들기
우선 월드 공간에 메시 노멀을 표시하는 셰이더에서 시작해 보겠습니다. 당장 시작해 봅시다.
Shader "Unlit/WorldSpaceNormals"
{
    // no Properties block this time!
    SubShader
    {
        Pass
        {
            CGPROGRAM
            #pragma vertex vert
            #pragma fragment frag
            // include file that contains UnityObjectToWorldNormal helper function
            #include "UnityCG.cginc"

            struct v2f {
                // we'll output world space normal as one of regular ("texcoord") interpolators
                half3 worldNormal : TEXCOORD0;
                float4 pos : SV_POSITION;
            };

            // vertex shader: takes object space normal as input too
            v2f vert (float4 vertex : POSITION, float3 normal : NORMAL)
            {
                v2f o;
                o.pos = UnityObjectToClipPos(vertex);
                // UnityCG.cginc file contains function to transform
                // normal from object to world space, use that
                o.worldNormal = UnityObjectToWorldNormal(normal);
                return o;
            }

            fixed4 frag (v2f i) : SV_Target
            {
                fixed4 c = 0;
                // normal is a 3D vector with xyz components; in -1..1
                // range. To display it as color, bring the range into 0..1
                // and put into red, green, blue components
                c.rgb = i.worldNormal*0.5+0.5;
                return c;
            }
            ENDCG
        }
    }
}
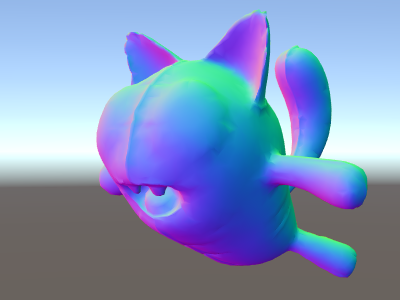
노멀은 알록달록한 컬러를 만들어내는 것 외에도 모든 종류의 그래픽스 이펙트(조명, 반사, 실루엣 등등)에 사용됩니다.
위 셰이더에서는 Unity의 내장 셰이더 첨부 파일 중 하나를 사용하였습니다. 여기서 편리한 함수 UnityObjectToWorldNormal__이 포함된 UnityCG.cginc__가 사용되었습니다. 또한 오브젝트 공간의 버텍스를 화면으로 변환하는 유틸리티 함수 __UnityObjectToClipPos__를 사용했습니다. 따라서 코드를 더 쉽게 읽을 수 있고 특정 상황에서 더 효율적입니다.
소위 “인터폴레이터”(때로는 “varying”이라 부름)에서 데이터가 버텍스에서 프래그먼트 셰이더로 전달될 수 있다는 점을 앞서 확인하였습니다. HLSL 셰이딩 언어에서는 인터폴레이터에 보통 TEXCOORDn 시맨틱으로 레이블을 붙이며 각 인터폴레이터는 최대 4성분 벡터가 될 수 있습니다. 자세한 내용은 시맨틱 페이지를 참조하십시오.
Also we’ve learned a simple technique in how to visualize normalized vectors (in –1.0 to +1.0 range) as colors: just multiply them by half and add half. For more vertex data visualization examples, see Visualizaing vertex data.
월드-공간 노멀을 사용한 환경 반사
씬에서 반사 소스로 스카이박스가 사용될 때(라이팅 창 참조) 이 스카이박스 데이터를 담고 있는 “기본” 반사 프로브가 반드시 생성됩니다. 반사 프로브는 내부적으로는 큐브맵 텍스처입니다. 이를 살펴보기 위해 위의 월드-공간 노멀 셰이더를 확장해 보겠습니다.
이제는 코드가 좀 더 복잡해지기 시작했습니다. 물론 광원, 섀도우, 반사, 그리고 조명 시스템의 나머지 요소와 함께 자동으로 동작하는 셰이더를 원한다면 표면 셰이더를 사용하는 편이 훨씬 쉽습니다. 이 예는 조명 시스템의 일부를 “수동” 방식으로 사용하는 방법을 보여주려는 의도로 만들어졌습니다.
Shader "Unlit/SkyReflection"
{
    SubShader
    {
        Pass
        {
            CGPROGRAM
            #pragma vertex vert
            #pragma fragment frag
            #include "UnityCG.cginc"

            struct v2f {
                half3 worldRefl : TEXCOORD0;
                float4 pos : SV_POSITION;
            };

            v2f vert (float4 vertex : POSITION, float3 normal : NORMAL)
            {
                v2f o;
                o.pos = UnityObjectToClipPos(vertex);
                // compute world space position of the vertex
                float3 worldPos = mul(_Object2World, vertex).xyz;
                // compute world space view direction
                float3 worldViewDir = normalize(UnityWorldSpaceViewDir(worldPos));
                // world space normal
                float3 worldNormal = UnityObjectToWorldNormal(normal);
                // world space reflection vector
                o.worldRefl = reflect(-worldViewDir, worldNormal);
                return o;
            }

            fixed4 frag (v2f i) : SV_Target
            {
                // sample the default reflection cubemap, using the reflection vector
                half4 skyData = UNITY_SAMPLE_TEXCUBE(unity_SpecCube0, i.worldRefl);
                // decode cubemap data into actual color
                half3 skyColor = DecodeHDR (skyData, unity_SpecCube0_HDR);
                // output it!
                fixed4 c = 0;
                c.rgb = skyColor;
                return c;
            }
            ENDCG
        }
    }
}
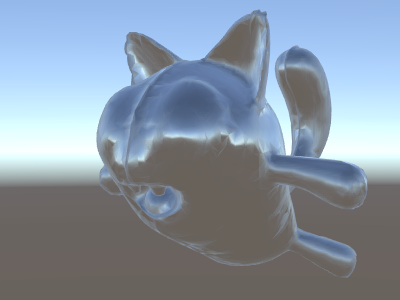
위 예제는 내장 셰이더 첨부 파일로부터 여러 가지를 사용합니다:
- 빌트인 셰이더 변수 중 unity_SpecCube0, unity_SpecCube0_HDR, Object2World, UNITY_MATRIX_MVP. __unity_SpecCube0__은 사용 중인 반사 프로브의 데이터를 포함하고 있습니다.
- 큐브맵을 샘플링하기 위한 UNITY_SAMPLE_TEXCUBE 빌트인 매크로. 대부분의 일반 큐브맵은 표준 HLSL 구문(samplerCUBE 및 texCUBE)을 사용하여 선언되고 사용됩니다. 그러나 Unity의 반사 프로브 큐브맵은 샘플러 슬롯을 절약하기 위해 특별한 방식으로 선언됩니다. 만약 이에 대해 잘 모른다 해도 걱정하지 말아야 합니다. unity_SpecCube0 큐브맵을 사용하기 위해서는 UNITY_SAMPLE_TEXCUBE 매크로를 사용해야 한다는 점만 알면 됩니다.
- UnityCG.cginc 의 UnityWorldSpaceViewDir 함수 및 DecodeHDR 함수. 후자는 반사 프로브 데이터에서 실제 컬러를 얻기 위해 사용됩니다. Unity는 반사 프로브 큐브맵을 특별하게 인코딩된 방식으로 저장하기 때문입니다.
- reflect 는 주어진 노멀 주변의 벡터 반사 계산하기 위한 빌트인 HLSL 함수입니다.
노멀 맵이 있는 환경 반사
노멀 맵(Normal Maps) 은 오브젝트에 추가 지오메트리 생성 없이 추가 디테일을 생성하기 위해 종종 사용됩니다. 노멀 맵 텍스처를 가지고 환경을 반사하는 셰이더를 만드는 방법을 살펴 봅시다.
이제 수학이 정말 복잡해지기 시작하므로, 몇 단계로 나누어 진행합니다. 위 셰이더에서 반사 방향은 각 버텍스당 계산되었으며(버텍스 셰이더에서) 프래그먼트 셰이더는 단지 반사 프로브 큐브맵 검색만을 했습니다. 그러나 일단 노멀 맵을 사용하기 시작하면 표면 노멀 자체가 픽셀당 기준으로 계산되어야 합니다. 즉 환경이 각 픽셀마다 어떻게 반사되는지도 계산해야 한다는 의미입니다!
그러므로 우선 위의 셰이더가 같은 동작을 하도록 재작성하되 일부 계산을 프래그먼트 셰이더로 옮겨서 픽셀당으로 계산되도록 합니다:
Shader "Unlit/SkyReflection Per Pixel"
{
    SubShader
    {
        Pass
        {
            CGPROGRAM
            #pragma vertex vert
            #pragma fragment frag
            #include "UnityCG.cginc"

            struct v2f {
                float3 worldPos : TEXCOORD0;
                half3 worldNormal : TEXCOORD1;
                float4 pos : SV_POSITION;
            };

            v2f vert (float4 vertex : POSITION, float3 normal : NORMAL)
            {
                v2f o;
                o.pos = UnityObjectToClipPos(vertex);
                o.worldPos = mul(_Object2World, vertex).xyz;
                o.worldNormal = UnityObjectToWorldNormal(normal);
                return o;
            }

            fixed4 frag (v2f i) : SV_Target
            {
                // compute view direction and reflection vector
                // per-pixel here
                half3 worldViewDir = normalize(UnityWorldSpaceViewDir(i.worldPos));
                half3 worldRefl = reflect(-worldViewDir, i.worldNormal);

                // same as in previous shader
                half4 skyData = UNITY_SAMPLE_TEXCUBE(unity_SpecCube0, worldRefl);
                half3 skyColor = DecodeHDR (skyData, unity_SpecCube0_HDR);
                fixed4 c = 0;
                c.rgb = skyColor;
                return c;
            }
            ENDCG
        }
    }
}
이것만으로는 크게 변한 것이 없습니다. 이 셰이더는 완전히 그대로인 것처럼 보입니다. 이제 셰이더가 모델의 각 버텍스에 대해서가 아니라 화면의 모든 픽셀 각각에 대해 계산을 더 많이 하게 되면서 더 느려졌다는 것을 제외하면 말입니다. 그러나 이 계산은 빨리 이루어져야 합니다. 그래픽스 정확도를 높이려면 더 복잡한 셰이더가 필요할 경우가 많습니다.
또한 이제 새로운 것도 하나 배워야 합니다. 바로 “탄젠트 공간”입니다. 노멀 맵 텍스처는 대부분의 경우 좌표 공간에서 표현되는데 이는 모델의 “표면을 따르는” 것으로 생각할 수 있습니다. 지금 만들려는 셰이더에서는 탄젠트 공간 기반 벡터를 알아야 하고 텍스처로부터 노멀 벡터를 읽어야 하고 이 벡터를 월드 공간으로 변환하고 그 후 위 셰이더에서 모든 수학적 계산을 해야 합니다. 그럼 시작해 봅시다!
Shader "Unlit/SkyReflection Per Pixel"
{
    Properties {
        // normal map texture on the material,
        // default to dummy "flat surface" normalmap
        _BumpMap("Normal Map", 2D) = "bump" {}
    }
    SubShader
    {
        Pass
        {
            CGPROGRAM
            #pragma vertex vert
            #pragma fragment frag
            #include "UnityCG.cginc"

            struct v2f {
                float3 worldPos : TEXCOORD0;
                // these three vectors will hold a 3x3 rotation matrix
                // that transforms from tangent to world space
                half3 tspace0 : TEXCOORD1; // tangent.x, bitangent.x, normal.x
                half3 tspace1 : TEXCOORD2; // tangent.y, bitangent.y, normal.y
                half3 tspace2 : TEXCOORD3; // tangent.z, bitangent.z, normal.z
                // texture coordinate for the normal map
                float2 uv : TEXCOORD4;
                float4 pos : SV_POSITION;
            };

            // vertex shader now also needs a per-vertex tangent vector.
            // in Unity tangents are 4D vectors, with the .w component used to
            // indicate direction of the bitangent vector.
            // we also need the texture coordinate.
            v2f vert (float4 vertex : POSITION, float3 normal : NORMAL, float4 tangent : TANGENT, float2 uv : TEXCOORD0)
            {
                v2f o;
                o.pos = UnityObjectToClipPos(vertex);
                o.worldPos = mul(_Object2World, vertex).xyz;
                half3 wNormal = UnityObjectToWorldNormal(normal);
                half3 wTangent = UnityObjectToWorldDir(tangent.xyz);
                // compute bitangent from cross product of normal and tangent
                half tangentSign = tangent.w * unity_WorldTransformParams.w;
                half3 wBitangent = cross(wNormal, wTangent) * tangentSign;
                // output the tangent space matrix
                o.tspace0 = half3(wTangent.x, wBitangent.x, wNormal.x);
                o.tspace1 = half3(wTangent.y, wBitangent.y, wNormal.y);
                o.tspace2 = half3(wTangent.z, wBitangent.z, wNormal.z);
                o.uv = uv;
                return o;
            }

            // normal map texture from shader properties
            sampler2D _BumpMap;

            fixed4 frag (v2f i) : SV_Target
            {
                // sample the normal map, and decode from the Unity encoding
                half3 tnormal = UnpackNormal(tex2D(_BumpMap, i.uv));
                // transform normal from tangent to world space
                half3 worldNormal;
                worldNormal.x = dot(i.tspace0, tnormal);
                worldNormal.y = dot(i.tspace1, tnormal);
                worldNormal.z = dot(i.tspace2, tnormal);

                // rest the same as in previous shader
                half3 worldViewDir = normalize(UnityWorldSpaceViewDir(i.worldPos));
                half3 worldRefl = reflect(-worldViewDir, worldNormal);
                half4 skyData = UNITY_SAMPLE_TEXCUBE(unity_SpecCube0, worldRefl);
                half3 skyColor = DecodeHDR (skyData, unity_SpecCube0_HDR);
                fixed4 c = 0;
                c.rgb = skyColor;
                return c;
            }
            ENDCG
        }
    }
}
휴, 굉장히 복잡한 과정이었습니다. 하지만 보세요, 노멀 맵을 사용한 반사입니다!
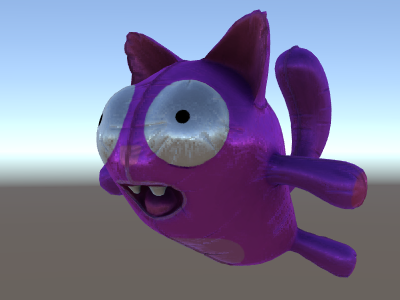
더 많은 텍스처 추가
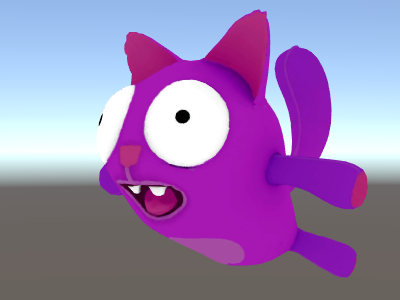
노멀 매핑된 하늘을 반사하는 위 셰이더에 더 많은 텍스처를 추가해 봅시다. 맨 처음의 언릿 예제에서 보았던 베이스 컬러 텍스처를 추가하고 움푹한 곳을 더 어둡게 표현하도록 오클루전 맵을 추가합니다.
Shader "Unlit/More Textures"
{
    Properties {
        // three textures we'll use in the material
        _MainTex("Base texture", 2D) = "white" {}
        _OcclusionMap("Occlusion", 2D) = "white" {}
        _BumpMap("Normal Map", 2D) = "bump" {}
    }
    SubShader
    {
        Pass
        {
            CGPROGRAM
            #pragma vertex vert
            #pragma fragment frag
            #include "UnityCG.cginc"

            // exactly the same as in previous shader
            struct v2f {
                float3 worldPos : TEXCOORD0;
                half3 tspace0 : TEXCOORD1;
                half3 tspace1 : TEXCOORD2;
                half3 tspace2 : TEXCOORD3;
                float2 uv : TEXCOORD4;
                float4 pos : SV_POSITION;
            };
            v2f vert (float4 vertex : POSITION, float3 normal : NORMAL, float4 tangent : TANGENT, float2 uv : TEXCOORD0)
            {
                v2f o;
                o.pos = UnityObjectToClipPos(vertex);
                o.worldPos = mul(_Object2World, vertex).xyz;
                half3 wNormal = UnityObjectToWorldNormal(normal);
                half3 wTangent = UnityObjectToWorldDir(tangent.xyz);
                half tangentSign = tangent.w * unity_WorldTransformParams.w;
                half3 wBitangent = cross(wNormal, wTangent) * tangentSign;
                o.tspace0 = half3(wTangent.x, wBitangent.x, wNormal.x);
                o.tspace1 = half3(wTangent.y, wBitangent.y, wNormal.y);
                o.tspace2 = half3(wTangent.z, wBitangent.z, wNormal.z);
                o.uv = uv;
                return o;
            }

            // textures from shader properties
            sampler2D _MainTex;
            sampler2D _OcclusionMap;
            sampler2D _BumpMap;

            fixed4 frag (v2f i) : SV_Target
            {
                // same as from previous shader...
                half3 tnormal = UnpackNormal(tex2D(_BumpMap, i.uv));
                half3 worldNormal;
                worldNormal.x = dot(i.tspace0, tnormal);
                worldNormal.y = dot(i.tspace1, tnormal);
                worldNormal.z = dot(i.tspace2, tnormal);
                half3 worldViewDir = normalize(UnityWorldSpaceViewDir(i.worldPos));
                half3 worldRefl = reflect(-worldViewDir, worldNormal);
                half4 skyData = UNITY_SAMPLE_TEXCUBE(unity_SpecCube0, worldRefl);
                half3 skyColor = DecodeHDR (skyData, unity_SpecCube0_HDR);
                fixed4 c = 0;
                c.rgb = skyColor;

                // modulate sky color with the base texture, and the occlusion map
                fixed3 baseColor = tex2D(_MainTex, i.uv).rgb;
                fixed occlusion = tex2D(_OcclusionMap, i.uv).r;
                c.rgb *= baseColor;
                c.rgb *= occlusion;

                return c;
            }
            ENDCG
        }
    }
}
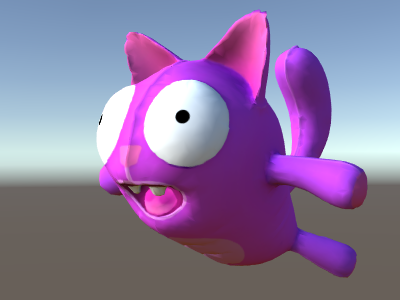
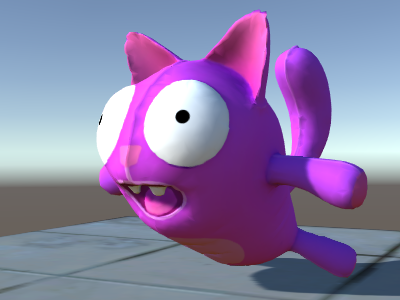
고양이 풍선이 보기 좋아졌습니다!
텍스처링 셰이더 예제
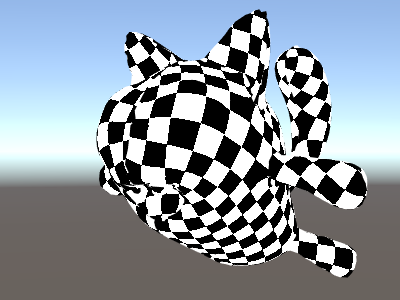
순차적 체커보드 패턴
다음은 메시의 텍스처 좌표에 기반한 체커보드 패턴을 출력하는 셰이더입니다.
Shader "Unlit/Checkerboard"
{
    Properties
    {
        _Density ("Density", Range(2,50)) = 30
    }
    SubShader
    {
        Pass
        {
            CGPROGRAM
            #pragma vertex vert
            #pragma fragment frag
            #include "UnityCG.cginc"

            struct v2f
            {
                float2 uv : TEXCOORD0;
                float4 vertex : SV_POSITION;
            };

            float _Density;

            v2f vert (float4 pos : POSITION, float2 uv : TEXCOORD0)
            {
                v2f o;
                o.vertex = UnityObjectToClipPos(pos);
                o.uv = uv * _Density;
                return o;
            }

            fixed4 frag (v2f i) : SV_Target
            {
                float2 c = i.uv;
                c = floor(c) / 2;
                float checker = frac(c.x + c.y) * 2;
                return checker;
            }
            ENDCG
        }
    }
}
프로퍼티 블록의 밀도 슬라이더는 체커보드가 얼마나 조밀하게 나타날지를 조절합니다. 버텍스 셰이더에서 메시 UV에 밀도 값이 곱해져서 UV가 01 범위에서 0밀도 범위로 변환됩니다. 밀도를 30으로 설정했다고 해 봅시다. 이렇게 하면 프래그먼트 셰이더로 입력되는 i.uv 입력은 030 사이의 부동소수점 값이 되어 메시가 렌더링되는 여러 지점에 적용됩니다.
그러면 프래그먼트 셰이더 코드는 HLSL의 빌트인 floor 함수를 사용하여 입력 좌표의 정수 부분만을 취하고 이를 2로 나눕니다. 입력 좌표는 030 사이의 수라는 점을 기억해야 합니다. 즉 위 과정을 통해 좌표가 모두 0, 0.5, 1, 1.5, 2, 2.5, …와 같은 값으로 “양자화”됩니다. 이는 입력 좌표의 x 및 y 성분 모두에 적용됩니다.
다음으로 이 x와 y 좌표를 더하고(각 좌표는 0, 0.5, 1, 1.5, …와 같은 값만 가질 수 있습니다), 또 다른 빌트인 HLSL 함수인 frac 을 사용하여 소수 부분만 취합니다. 이 결과는 오직 0.0 또는 0.5 중 하나가 됩니다. 그러면 여기에 2를 곱해서 0.0 또는 1.0으로 만들고 컬러로 출력합니다(이 결과는 각각 검정 또는 흰색이 됩니다).
삼평면 텍스처링
복잡한 메시 또는 절차적 메시의 경우에는 일반 UV 좌표를 사용하여 텍스처링하는 것보다는 때로는 세 주방향으로부터 오브젝트 위에 텍스처를 “투사”하는 것이 유용합니다. 즉 표면 노멀을 사용하여 세 텍스처 방향에 가중치를 줍니다. 다음이 바로 그 셰이더입니다.
Shader "Unlit/Triplanar"
{
    Properties
    {
        _MainTex ("Texture", 2D) = "white" {}
        _Tiling ("Tiling", Float) = 1.0
        _OcclusionMap("Occlusion", 2D) = "white" {}
    }
    SubShader
    {
        Pass
        {
            CGPROGRAM
            #pragma vertex vert
            #pragma fragment frag
            #include "UnityCG.cginc"

            struct v2f
            {
                half3 objNormal : TEXCOORD0;
                float3 coords : TEXCOORD1;
                float2 uv : TEXCOORD2;
                float4 pos : SV_POSITION;
            };

            float _Tiling;

            v2f vert (float4 pos : POSITION, float3 normal : NORMAL, float2 uv : TEXCOORD0)
            {
                v2f o;
                o.pos = UnityObjectToClipPos(pos);
                o.coords = pos.xyz * _Tiling;
                o.objNormal = normal;
                o.uv = uv;
                return o;
            }

            sampler2D _MainTex;
            sampler2D _OcclusionMap;

            fixed4 frag (v2f i) : SV_Target
            {
                // use absolute value of normal as texture weights
                half3 blend = abs(i.objNormal);
                // make sure the weights sum up to 1 (divide by sum of x+y+z)
                blend /= dot(blend,1.0);
                // read the three texture projections, for x,y,z axes
                fixed4 cx = tex2D(_MainTex, i.coords.yz);
                fixed4 cy = tex2D(_MainTex, i.coords.xz);
                fixed4 cz = tex2D(_MainTex, i.coords.xy);
                // blend the textures based on weights
                fixed4 c = cx * blend.x + cy * blend.y + cz * blend.z;
                // modulate by regular occlusion map
                c *= tex2D(_OcclusionMap, i.uv);
                return c;
            }
            ENDCG
        }
    }
}
조명 계산
일반적으로 Unity의 조명 파이프라인에서 동작하는 셰이더를 원한다면 표면 셰이더를 작성하게 됩니다. 표면 셰이더는 대부분의 “힘든 일”을 처리해 주며 셰이더 코드에는 단지 표면 프로퍼티만 정의해 주면 됩니다.
그러나 표준 표면 셰이더 경로를 우회하고 싶을 경우도 있습니다. 단지 성능을 위해 전체 조명 파이프라인의 일부 제한된 서브셋을 지원하고자 하는 이유일 수도 있고 또는 “표준 조명”에 별로 가깝지 않은 자신만의 무엇인가를 만들고 싶을 수도 있습니다. 다음 예는 수동으로 작성한 버텍스 및 프래그먼트 셰이더에서 조명 데이터를 얻는 방법을 보여줍니다. 표면 셰이더가 생성한 코드를 살펴보는 것(셰이더 인스펙터를 통해) 역시 좋은 학습 방법입니다.
단순 산란광
가장 먼저 할 일은 실제로 셰이더가 조명 정보를 전달받아야 한다는 점을 명시합니다. Unity의 렌더링 파이프라인은 여러 가지 렌더링 방식을 지원합니다. 여기서는 디폴트 포워드 렌더링을 사용합니다.
우선 하나의 방향 광원만을 지원하는 것으로 시작하겠습니다. Unity의 포워드 렌더링에서는 ForwardBase 라는 이름의 단일 패스로 메인 방향 광원, 앰비언트, 라이트맵, 반사를 렌더링합니다. 셰이더에서는 패스 태그(Tags {“LightMode”=“ForwardBase”})를 추가하여 이를 명시합니다. 이렇게 하면 방향 광원 데이터가 몇 가지 내장 변수를 통해 셰이더로 전달됩니다.
다음은 버텍스마다 단순 산란광을 계산하고 하나의 메인 텍스처를 사용하는 셰이더입니다:
Shader "Lit/Simple Diffuse"
{
    Properties
    {
        [NoScaleOffset] _MainTex ("Texture", 2D) = "white" {}
    }
    SubShader
    {
        Pass
        {
            // indicate that our pass is the "base" pass in forward
            // rendering pipeline. It gets ambient and main directional
            // light data set up; light direction in _WorldSpaceLightPos0
            // and color in _LightColor0
            Tags {"LightMode"="ForwardBase"}

            CGPROGRAM
            #pragma vertex vert
            #pragma fragment frag
            #include "UnityCG.cginc" // for UnityObjectToWorldNormal
            #include "UnityLightingCommon.cginc" // for _LightColor0

            struct v2f
            {
                float2 uv : TEXCOORD0;
                fixed4 diff : COLOR0; // diffuse lighting color
                float4 vertex : SV_POSITION;
            };

            v2f vert (appdata_base v)
            {
                v2f o;
                o.vertex = UnityObjectToClipPos(v.vertex);
                o.uv = v.texcoord;
                // get vertex normal in world space
                half3 worldNormal = UnityObjectToWorldNormal(v.normal);
                // dot product between normal and light direction for
                // standard diffuse (Lambert) lighting
                half nl = max(0, dot(worldNormal, _WorldSpaceLightPos0.xyz));
                // factor in the light color
                o.diff = nl * _LightColor0;
                return o;
            }

            sampler2D _MainTex;

            fixed4 frag (v2f i) : SV_Target
            {
                // sample texture
                fixed4 col = tex2D(_MainTex, i.uv);
                // multiply by lighting
                col *= i.diff;
                return col;
            }
            ENDCG
        }
    }
}
이렇게 하면 오브젝트가 광원 방향에 대해 반응합니다. 광원을 향하는 부분은 빛나게 되고 반대 방향을 향하는 부분은 전혀 빛나지 않게 됩니다.

앰비언트가 있는 산란광
위 예제에서는 주변광 또는 라이트 프로브를 전혀 고려하지 않습니다. 이 점을 수정해 봅시다! 단지 코드 한 줄만 추가하면 수정할 수 있습니다. 앰비언트 및 라이트 프로브 데이터 모두 스피리컬 하모닉스 형태로 셰이더에 전달되며 월드 공간 노멀을 고려하여 UnityCG.cginc 첨부 파일의 ShadeSH9 함수가 모든 계산을 수행합니다.
Shader "Lit/Diffuse With Ambient"
{
    Properties
    {
        [NoScaleOffset] _MainTex ("Texture", 2D) = "white" {}
    }
    SubShader
    {
        Pass
        {
            Tags {"LightMode"="ForwardBase"}

            CGPROGRAM
            #pragma vertex vert
            #pragma fragment frag
            #include "UnityCG.cginc"
            #include "UnityLightingCommon.cginc"

            struct v2f
            {
                float2 uv : TEXCOORD0;
                fixed4 diff : COLOR0;
                float4 vertex : SV_POSITION;
            };

            v2f vert (appdata_base v)
            {
                v2f o;
                o.vertex = UnityObjectToClipPos(v.vertex);
                o.uv = v.texcoord;
                half3 worldNormal = UnityObjectToWorldNormal(v.normal);
                half nl = max(0, dot(worldNormal, _WorldSpaceLightPos0.xyz));
                o.diff = nl * _LightColor0;

                // the only difference from previous shader:
                // in addition to the diffuse lighting from the main light,
                // add illumination from ambient or light probes
                // ShadeSH9 function from UnityCG.cginc evaluates it,
                // using world space normal
                o.diff.rgb += ShadeSH9(half4(worldNormal,1));
                return o;
            }

            sampler2D _MainTex;

            fixed4 frag (v2f i) : SV_Target
            {
                fixed4 col = tex2D(_MainTex, i.uv);
                col *= i.diff;
                return col;
            }
            ENDCG
        }
    }
}
셰이더는 사실 빌트인 레거시 디퓨즈 셰이더와 매우 유사한 결과를 내기 시작했습니다!
섀도우 캐스팅 구현
셰이더는 현재 섀도우를 투영할 수도 없고 섀도우가 투영될 수도 없습니다. 섀도우 캐스팅을 먼저 구현해 봅시다.
섀도우를 투영하기 위해서는 셰이더의 서브셰이더 또는 폴백(fallback) 중 하나에 ShadowCaster패스 타입이 있어야 합니다. ShadowCaster 패스는 섀도우맵에 오브젝트를 렌더링하기 위해 사용되며 보통 아주 단순합니다. 버텍스 셰이더는 버텍스 포지션을 계산하기만 하면 되고 프래그먼트 셰이더는 거의 아무 것도 하지 않습니다. 섀도우맵은 뎁스 버퍼일 뿐이므로 프래그먼트 셰이더에 의한 컬러 출력조차도 크게 의미가 없습니다.
즉 대부분의 셰이더에 있어 섀도우 캐스터 패스는 거의 똑같을 것이라는 의미입니다(단 오브젝트에 커스텀 버텍스 셰이더 기반 변형이 있거나 알파 컷아웃/반투명 부분이 있을 경우 제외). 섀도우 캐스터 패스를 가져오는 가장 쉬운 방법은 UsePass 셰이더 명령을 사용합니다:
Pass
{
    // regular lighting pass
}
// pull in shadow caster from VertexLit built-in shader
UsePass "Legacy Shaders/VertexLit/SHADOWCASTER"
그러나 셰이더는 학습을 위한 것이므로 말하자면 “손으로” 동일한 작업을 해 봅시다. 코드 길이를 줄이기 위해 조명 패스(“ForwardBase”)를 텍스처화되지 않은(untextured) 앰비언트만 적용하는 코드로 대체하였습니다. 그 아래에는 오브젝트가 섀도우 캐스팅을 지원하도록 만드는 “ShadowCaster” 패스가 있습니다.
Shader "Lit/Shadow Casting"
{
    SubShader
    {
        // very simple lighting pass, that only does non-textured ambient
        Pass
        {
            Tags {"LightMode"="ForwardBase"}
            CGPROGRAM
            #pragma vertex vert
            #pragma fragment frag
            #include "UnityCG.cginc"
            struct v2f
            {
                fixed4 diff : COLOR0;
                float4 vertex : SV_POSITION;
            };
            v2f vert (appdata_base v)
            {
                v2f o;
                o.vertex = UnityObjectToClipPos(v.vertex);
                half3 worldNormal = UnityObjectToWorldNormal(v.normal);
                // only evaluate ambient
                o.diff.rgb = ShadeSH9(half4(worldNormal,1));
                o.diff.a = 1;
                return o;
            }
            fixed4 frag (v2f i) : SV_Target
            {
                return i.diff;
            }
            ENDCG
        }

        // shadow caster rendering pass, implemented manually
        // using macros from UnityCG.cginc
        Pass
        {
            Tags {"LightMode"="ShadowCaster"}

            CGPROGRAM
            #pragma vertex vert
            #pragma fragment frag
            #pragma multi_compile_shadowcaster
            #include "UnityCG.cginc"

            struct v2f {
                V2F_SHADOW_CASTER;
            };

            v2f vert(appdata_base v)
            {
                v2f o;
                TRANSFER_SHADOW_CASTER_NORMALOFFSET(o)
                return o;
            }

            float4 frag(v2f i) : SV_Target
            {
                SHADOW_CASTER_FRAGMENT(i)
            }
            ENDCG
        }
    }
}
이제 아래쪽에는 일반 빌트인 디퓨즈 셰이더를 사용한 평면이 있어서 섀도우가 동작하는 모습을 볼 수 있습니다(기억하세요. 현재 셰이더는 섀도우를 받는 것은 아직 지원하지 않습니다!).
위에서 #pragma multi_compile_shadowcaster 지시자를 사용하였습니다. 이로 인해 이 셰이더는 여러 배리언트로 컴파일되며 이 때 각 전처리기 매크로가 각 배리언트에 대해 정의됩니다. 자세한 내용은 멀티플 셰이더 배리언트 페이지를 참조하십시오. 섀도우맵에 렌더링할 때 점 광원 대 기타 광원 타입의 경우는 조금 다른 셰이더 코드를 필요로 합니다. 그렇기 때문에 이 지시자가 필요합니다.
섀도우 리시브
섀도우 리시브 지원을 구현하려면 베이스 조명 패스를 여러 배리언트로 컴파일하여 “섀도우 없는 방향 광원” 및 “섀도우가 있는 방향 광원”의 경우를 제대로 처리할 수 있어야 합니다. #pragma multi_compile_fwdbase 지시자가 이 역할을 합니다(구체적인 내용은 멀티플 셰이더 배리언트 페이지를 참조하십시오). 사실 그 외에도 많은 일을 합니다: 이 지시자는 다른 라이트맵 타입용의 배리언트를 컴파일하고 실시간 GI를 켜거나 끄는 등의 동작을 합니다. 현재는 이러한 것이 필요가 없으므로 이 배리언트는 명시적으로 건너뜁니다.
다음으로 실제 섀도우 계산 결과를 얻기 위해 #include “AutoLight.cginc” 셰이더 포함 파일을 포함하고 이로부터 SHADOW_COORDS, TRANSFER_SHADOW, SHADOW_ATTENUATION 매크로를 사용합니다.
다음은 셰이더입니다.
Shader "Lit/Diffuse With Shadows"
{
    Properties
    {
        [NoScaleOffset] _MainTex ("Texture", 2D) = "white" {}
    }
    SubShader
    {
        Pass
        {
            Tags {"LightMode"="ForwardBase"}
            CGPROGRAM
            #pragma vertex vert
            #pragma fragment frag
            #include "UnityCG.cginc"
            #include "Lighting.cginc"

            // compile shader into multiple variants, with and without shadows
            // (we don't care about any lightmaps yet, so skip these variants)
            #pragma multi_compile_fwdbase nolightmap nodirlightmap nodynlightmap novertexlight
            // shadow helper functions and macros
            #include "AutoLight.cginc"

            struct v2f
            {
                float2 uv : TEXCOORD0;
                SHADOW_COORDS(1) // put shadows data into TEXCOORD1
                fixed3 diff : COLOR0;
                fixed3 ambient : COLOR1;
                float4 pos : SV_POSITION;
            };
            v2f vert (appdata_base v)
            {
                v2f o;
                o.pos = UnityObjectToClipPos(v.vertex);
                o.uv = v.texcoord;
                half3 worldNormal = UnityObjectToWorldNormal(v.normal);
                half nl = max(0, dot(worldNormal, _WorldSpaceLightPos0.xyz));
                o.diff = nl * _LightColor0.rgb;
                o.ambient = ShadeSH9(half4(worldNormal,1));
                // compute shadows data
                TRANSFER_SHADOW(o)
                return o;
            }

            sampler2D _MainTex;

            fixed4 frag (v2f i) : SV_Target
            {
                fixed4 col = tex2D(_MainTex, i.uv);
                // compute shadow attenuation (1.0 = fully lit, 0.0 = fully shadowed)
                fixed shadow = SHADOW_ATTENUATION(i);
                // darken light's illumination with shadow, keep ambient intact
                fixed3 lighting = i.diff * shadow + i.ambient;
                col.rgb *= lighting;
                return col;
            }
            ENDCG
        }

        // shadow casting support
        UsePass "Legacy Shaders/VertexLit/SHADOWCASTER"
    }
}
보세요, 이제 섀도우가 생겼습니다!
기타 셰이더 예제
안개(Fog)
Shader "Custom/TextureCoordinates/Fog" {
    SubShader {
        Pass {
            CGPROGRAM
            #pragma vertex vert
            #pragma fragment frag

            //Needed for fog variation to be compiled.
            #pragma multi_compile_fog

            #include "UnityCG.cginc"

            struct vertexInput {
                float4 vertex : POSITION;
                float4 texcoord0 : TEXCOORD0;
            };

            struct fragmentInput{
                float4 position : SV_POSITION;
                float4 texcoord0 : TEXCOORD0;

                //Used to pass fog amount around number should be a free texcoord.
                UNITY_FOG_COORDS(1)
            };

            fragmentInput vert(vertexInput i){
                fragmentInput o;
                o.position = UnityObjectToClipPos(i.vertex);
                o.texcoord0 = i.texcoord0;

                //Compute fog amount from clip space position.
                UNITY_TRANSFER_FOG(o,o.position);
                return o;
            }

            fixed4 frag(fragmentInput i) : SV_Target {
                fixed4 color = fixed4(i.texcoord0.xy,0,0);

                //Apply fog (additive pass are automatically handled)
                UNITY_APPLY_FOG(i.fogCoord, color);

                //to handle custom fog color another option would have been
                //#ifdef UNITY_PASS_FORWARDADD
                //  UNITY_APPLY_FOG_COLOR(i.fogCoord, color, float4(0,0,0,0));
                //#else
                //  fixed4 myCustomColor = fixed4(0,0,1,0);
                //  UNITY_APPLY_FOG_COLOR(i.fogCoord, color, myCustomColor);
                //#endif

                return color;
            }
            ENDCG
        }
    }
}
Copyright © 2023 Unity Technologies
优美缔软件(上海)有限公司 版权所有
"Unity"、Unity 徽标及其他 Unity 商标是 Unity Technologies 或其附属机构在美国及其他地区的商标或注册商标。其他名称或品牌是其各自所有者的商标。
公安部备案号:
31010902002961